At WhichVoIP we tend to highlight the advantages of hosted PBX phone systems for small and medium sized businesses. After all, it is probably the easiest way to reduce your business phone bills and there is no hardware or software to maintain.
Having said that, with some basic computer skills, it really isn't that difficult to setup an on-premise IP-PBX phone system in your office to handle all of your business phone calls. It doesn't matter if you are a small business or a large business, the steps are relatively straightforward.
Why Bother with an On-premise PBX Solution?
Well, for starters all extension-to-extension calls are completely free and they do not use any external bandwidth, unless an extension is in a remote office. Also, depending on how many minutes you require each month you may be much cheaper with this option than using a hosted PBX, where you are typically charged per user extension. As an example, let's assume a 5 extension hosted phone system with 2000 total long distance minutes per month from all extensions. For a hosted PBX this is likely to cost at least $150 per month, which admittedly is significantly cheaper than traditional landlines. For an on-premise PBX, running Asterisk, and using a SIP provider to route your calls, this would likely costs around $30 per month in total, including the cost of the phone numbers.
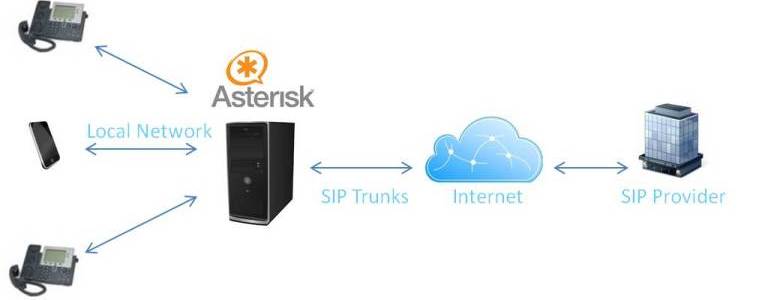
Intrigued? If so read on and see if you are up for the challenge. I will show you how to set up an Asterisk SIP based IP-PBX phone system, similar to the diagram above, and show you how to configure it to make and receive phone calls using a SIP trunking provider.
What Equipment is Required?
Very little is actually required to get an Asterisk PBX up and running. An older PC running Linux, even if it is a few years old, will usually suffice as Linux can typically be run on lower performance CPUs, unlike Windows. In fact for the purpose of this Asterisk SIP project I used a Network Attached Storage (NAS) device from Synology, the DS-213J. I decided on this since I already use this for backing up computers, it runs Linux, it is always powered on and is pre-configured with the Digium Asterisk server (v1.8 LTS - Long Term Support).
The goal of this article is not to show you how to install Linux and the Digium Asterisk PBX server, there are plenty of articles on the Internet already for this including the following useful guides and videos for installing Asterisk on CentOS and Asterisk on Ubuntu. Likewise, it you would prefer an ISO package that has Linux and Asterisk on it, check out the Digium AsteriskNOW PBX which comes with the FreePBX user interface.
The only other hardware required is IP phones. These digital phones typically start at around $50. For this project I used a 3 line Cisco SPA-303 which retails for around $60 at Amazon.
The Asterisk GUI
When you have the Digium Asterisk PBX installed, you can bring up the Asterisk GUI using a web browser, by pointing to the URL for the Asterisk admin control panel (in my case this is a private IP address inside my network). In Figure 1 below you will see a screenshot of my Asterisk GUI (v1.8) status after being configured and registered with a SIP provider (note the green registrations). It also shows some registered IP phones and softphones (running on an Apple iPhone5S). Note the private IP address in the browser address window - this is my private network. We will work our way through the steps to get to this point but it is good to show what we are striving for here.
NOTE: After each change in Asterisk make sure you click on the button at the top right of the GUI that says "Apply Changes". It is easy to miss and can lead to frustration.
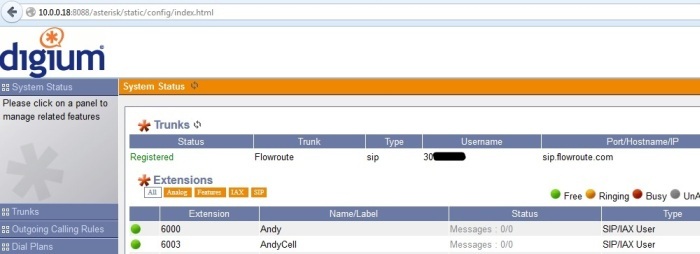
Figure 1: Digium Asterisk GUI
Configure the Asterisk SIP Trunks
The following steps are necessary in order to connect Asterisk to the outside world, using SIP trunks.
- Select a SIP Trunking Provider
- Find the SIP Credentials
- Direct Inward Dial (DID) Management
- Configure SIP Trunk in the Asterisk PBX
The first step to configure the Asterisk SIP trunks is to find a SIP trunking provider and configure the trunks in the Asterisk PBX. For this project I chose Flowroute simply because of the simplicity of its service and also it is pay as you go, so it is easy to load up a few dollars and start making and receiving calls. For a good list of options for trunking, visit our SIP providers section.


The next step is to find out the specific credentials for your account so you can register this in Asterisk. In Figure 2 below you can see the credentials I gathered from Flowroute, with the actual authentication details blackened out.
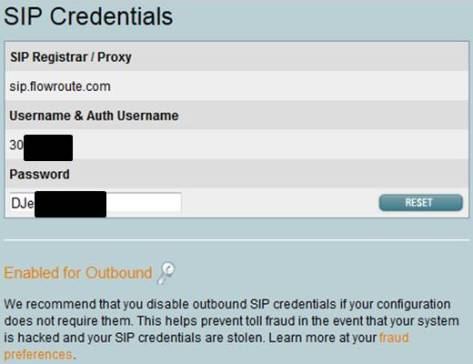
Figure 2: Flowroute SIP Credentials
Normally a business requires local DID phone numbers for its business. SIP providers usually offer this as a service where you can order a DID from any area code in the country. Figure 3 highlights the DID number management section in Flowroute. Notice that each of my DID numbers, including the 855 toll free number is configured for SIP registration. This is required so it can be registered by the Asterisk PBX.
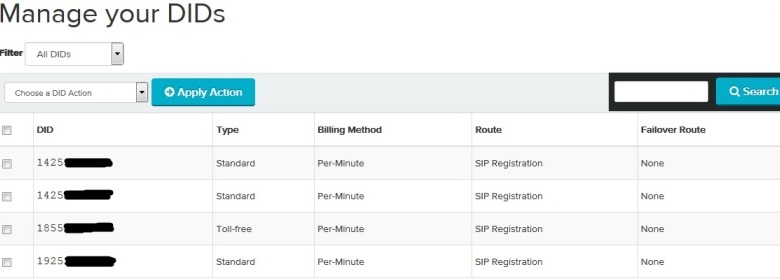
Figure 3: Flowroute DID Management
Finally, I configured the Asterisk SIP trunk in the GUI. This can be found under the Trunks section of the Digium Asterisk GUI. The configuration is highlighted in Figure 4 below.
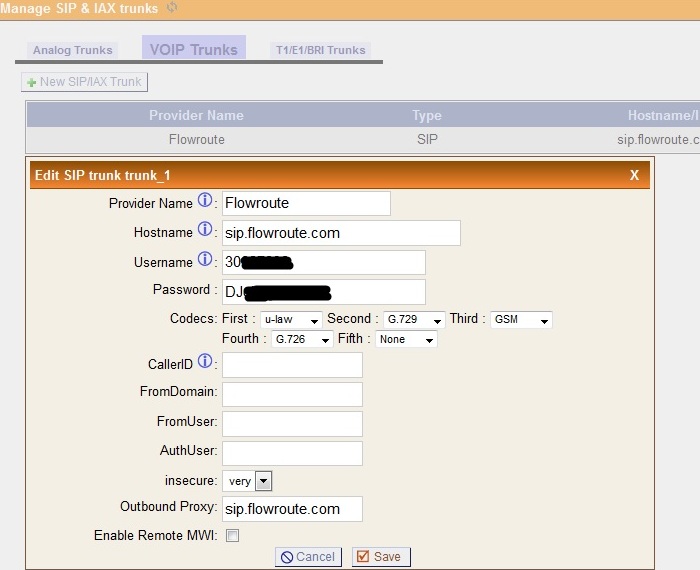
Figure 4: Asterisk SIP Trunk Configuration
At this point, if you followed these steps, you should see a green registered note when you click on system status. This indicates you are connected to the SIP provider's servers. If you are struggling to register, you may need to look into your firewall settings to ensure the SIP ports are being forwarded correctly between the Internet and your Asterisk PBX. In particular port 5060 should have a path through your network. Typically this is not an issue for most setups.
Incoming Calling Rules
Now we are registered with the SIP trunking provider, it is time to setup calling rules for incoming calls. As you can see in Figure 5, I simply mapped one of my incoming DIDs to route through to extension 6000, which I will configure later for my IP phone.

Figure 5: Asterisk Incoming Call Rule
Outgoing Calling Rules
In Figure 6 you can see how I configured outgoing calling rules for my extension. In other words, when I use my extension 6000 and make an external call it will go through the SIP trunk with the caller ID name and number I setup.
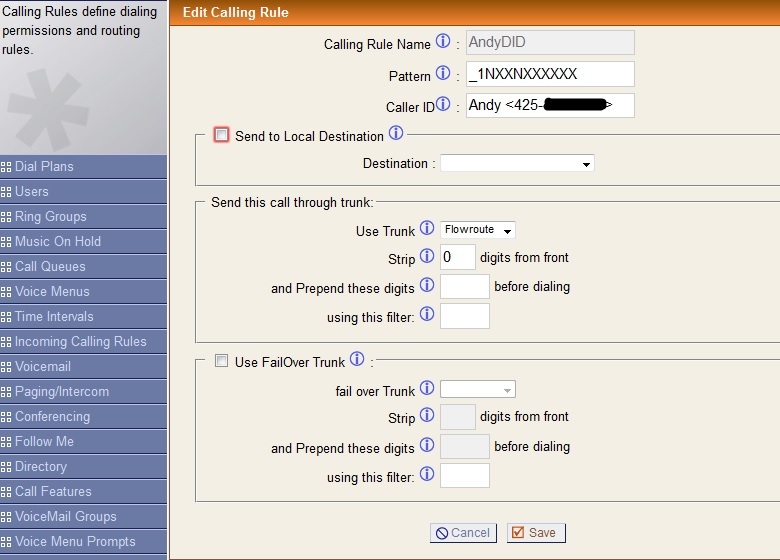
Figure 6: Asterisk Outgoing Call Rule
Dial Plan
The dial plan is essentially a set of rules assigned to user extensions. In Figure 7 you can see that I have assigned this to the outgoing calling rule defined in Figure 6. All access has been permitted for directory, voicemenus, queues etc.

Figure 7: Asterisk Dial Plan
Users
Time to create the users (i.e. extensions) for your business PBX phone system. Figure 8 shows the settings for my first extension, which is extension 6000. Note the extension range can be altered in the global settings for Asterisk.
Most of this should be self explanatory and if you hover over the question marks in each field, additional helpful information is presented. The most important aspect is setting up the MAC address for your device. In my case this is the MAC address of my Cisco SPA-303 IP phone, along with a password. We will configure the SPA-303 later with this information.
Retrieving the MAC address from your IP phone is relatively straightforward but does vary per phone so check the users guide for your phone. For the SPA-303 you can get the MAC address by logging into the phone using a web browser (find the address in the network settings on the phone, usually over DHCP) and looking at the Info tab and then the product information.
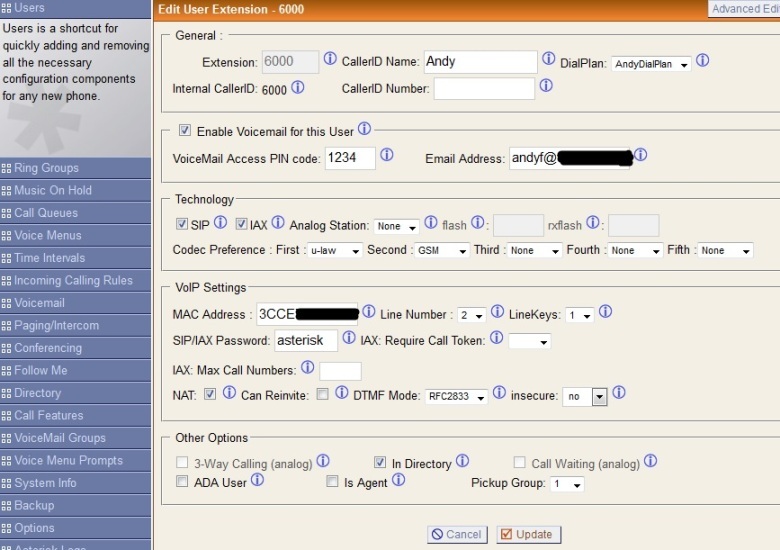
Figure 8: Asterisk User
Useful Features
Although beyond the scope for this article, take a look at the features you can set up in Asterisk. It really is a feature-rich phone system. For example, I set up an auto attendant using voice menus and voice prompts so the caller can hear a menu such as press '1' for sales, '2' for customer service etc. This really does give your business the appearance of a larger enterprise - for more information see our article on auto attendants. Other useful features to explore include ring groups, music on hold, call queues, voicemail to email, directory, follow me and conferencing. They are all relatively simple to set up.
Configuring the IP Phone
Now that the Asterisk PBX is configured and it is registered with the SIP trunks, it is time to configure the IP phones. I have a Cisco SPA-303 phone but you can use any IP phone of your choosing. In fact you could even use a regular analog phone if you buy an Analog Telephone Adapter (ATA). Interestingly, I found configuring the phone more complex than configuring the Asterisk PBX, mainly due to the lack of help for each parameter - thanks Cisco!
Cisco SPA-303 Settings
Perform the following steps in order to configure the SPA-303 Cisco IP phone.
- Power up the SPA-303 and find its IP Address
- Configure the SPA-303 - System Settings
- Configure the SPA-303 - Extension Settings
I connected the SPA-303 as per the users guide that came with the phone (i.e. power device and connect to network with Ethernet cable). Once initialized, press the setup button, then the Network entry. I wanted the phone to use DHCP (Dynamic Host Configuration Protocol) so it received an IP address from my router.
Using the IP address provided by our router and noted in Step 1 above,
I opened up a web browser and entered:
http://10.0.0.26/admin/advanced
This brought up the SPA-303 configuration utility, and when the System tab is selected it should be configured as per Figure 9 below. Also note below that this is in advanced admin mode. This is required because otherwise I would not have access to all the parameters needed.
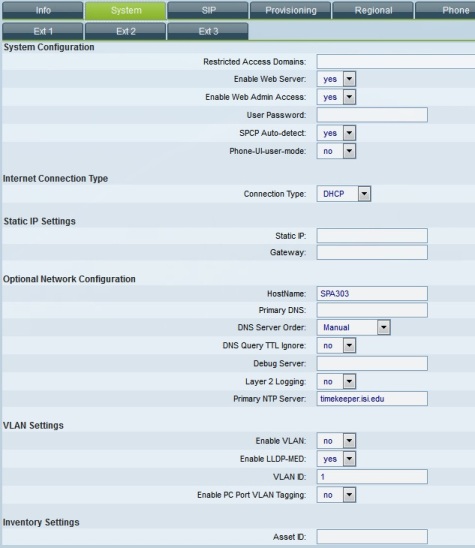
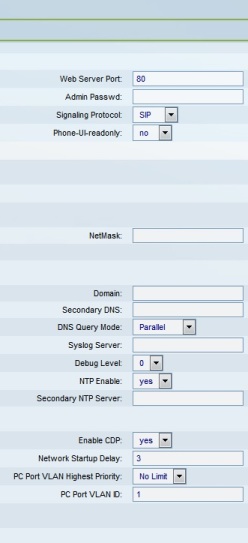
Figure 9: SPA-303 System Configuration
The SPA-303 has 3 lines but for this test I only require one extension, so I chose Ext2 and disabled Ext1 and Ext3. The settings for the extension are highlighted in Figures 10, 11 and 12 below. The important elements here are that the SIP port is 5060, the proxy is set to the IP address of the Asterisk server and the User ID and password are set to be the same as that for the user in Asterisk (i.e. Figure 8). For completeness also set Auth ID to be the same as the User ID. For the dial plan, open it up by setting it to [x*]. where the period is deliberate here.
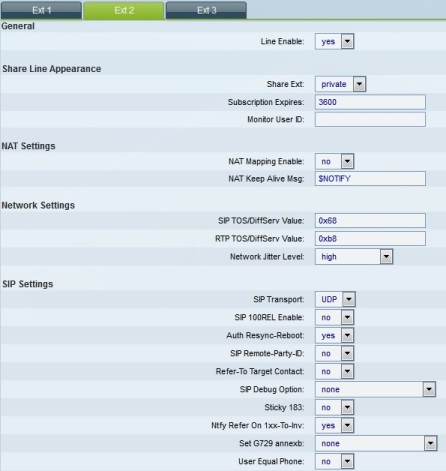

Figure 10: SPA-303 Extension Configuration Part1
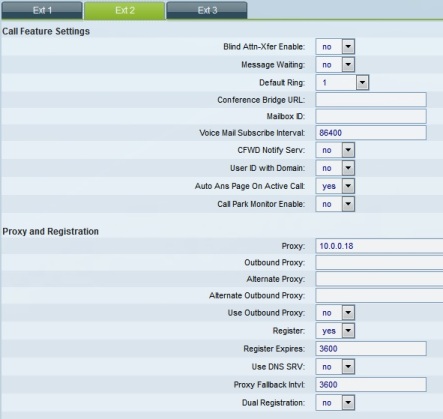
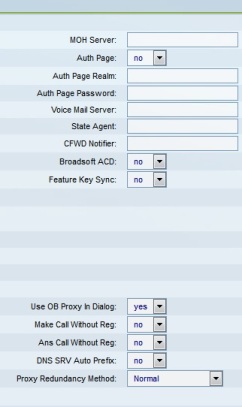
Figure 11: SPA-303 Extension Configuration Part2
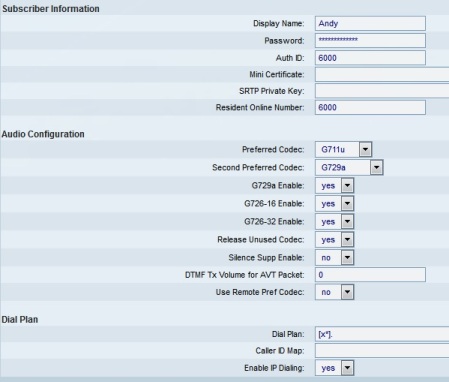
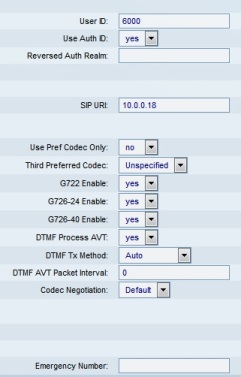
Figure 12: SPA-303 Extension Configuration Part3
IMPORTANT NOTE: Remember to click on "Submit All Changes" at the bottom of the page. This registers all of the information and resets the SPA-303. If you are successful then the light should turn green on the SPA-303 and if you refresh the System Status in Asterisk, the phone(s) should turn green in the extensions area as per Figure 1.
Make that Call
If you have followed along to this point then you should be able to make and receive calls successfully. When I pick up the SPA-303 I hear a dial tone and can dial outside lines (don't forget the '1' for long distance as this is the way the system has been configured and expected by Flowroute). When I make a call it gets routed through the Asterisk PBX and out to Flowroute which then is responsible for routing the call appropriately whether that be to another SIP phone, the PSTN or a cell phone. I set up multiple phone extensions and I was able to make and receive calls to other extensions. The beauty here is that all of these calls are free since they are all routed by the Asterisk PBX on my internal network. No charges are made by Flowroute since the trunk is not used.
Extra Credit - Softphones
Want extra credit, set up a softphone on your smartphone and use it as an extension. You have done well to reach this point so the softphone guide will be left for another day. However, in summary I purchased the Bria softphone application for the iOS (Apple iPhone 5S) and also the Android device (Samsung S4) and configured them as separate extensions of my PBX. The Bria app costs around $8 and is very comprehensive - in fact many providers simply resell this app when they state softphone support on their websites.
Configuring the Bria was relatively straightforward and worked well when in WiFi mode since it was using the same private network so there were no firewall issues. I could perform extension dialing through Asterisk and make and receive calls to the PSTN through the Flowroute trunks.
However when in cell phone mode it was a little more problematic and the actual audio packets were not getting through, though it was registering with Asterisk. This was not an issue with the Bria app, it actually turned out to be a firewall issue on my network and eventually I got it working by enabling SIP ALG on my cable modem/router. Simple.....after 3 or 4 days of troubleshooting!
Update: You can find a brief Bria softphone configuration guide here.
Final Thoughts
The Asterisk PBX is a great money saver for business phone bills and not just for large businesses. With a little computer knowledge, any sized business can get this free software installed on a computer and have it up and running with phone calls in just a few hours.
There is no doubt that a hosted PBX system in the cloud is simpler to use, since the hosted providers take care of the complexities for you, but you will pay a premium for this service. This premium is small when compared to landline costs but an on-premise Asterisk PBX can result in even more savings, if you are willing to maintain the system in your office.