The Raspberry Pi is a tiny desktop computer that can fit in the palm of your hand. It can also be used as a business Private Branch eXchange (PBX) to handle all of your business phone calls by simply installing open-source software from Freeswitch and FusionPBX.
In this guide we will look at a Raspberry Pi 4 kit from Vilros and show you how to install Freeswitch and FusionPBX. We will setup FusionPBX with a couple of phone extensions and use Skyetel SIP trunks to make an outbound call to a cell phone.
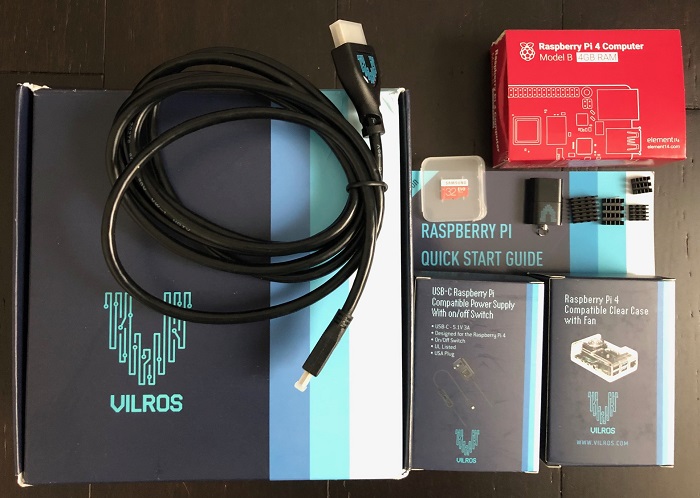
Figure 1: Raspberry Pi 4 Kit from Vilros
Raspberry Pi 4
The Raspberry Pi 4 is a small single board computer. It is essentially a mini-me desktop, not as powerful but still impressive for its size. It is designed by the Raspberry Pi Foundation, a charity based in the United Kingdom with the goal of helping young people gain computing skills in this digital age.
Raspberry Pi 4 Feature Set
The Raspberry Pi 4 has an extensive feature set for such a small device, such as:
- Quad Core Cortex-A72 (ARM v8) 64-bit CPU running @ 1.5GHz
- 2GB, 4GB or 8GB DDR4 RAM
- 2.4 GHz and 5.0 GHz IEEE 802.11ac wireless, Bluetooth 5.0, BLE
- Gigabit Ethernet (10/100/1000Mbs). Also supports Power over Ethernet (POE)
- USB (2 USB 3.0 ports and 2 USB 2.0 ports)
- 2 Micro-HDMI ports for driving displays (at 4K). Also a DSI port for LCDs and CSI for cameras
- Audio and Composite Video port
- H.264 and H.265 video compression built-in to the hardware
- OpenGL ES 3.0 graphics
- Micro SD slot for non-volatile memory storage (i.e. storing an operating system)
- 5V DC via USB-C connector
Raspberry Pi Software Support
A boot-loader called NOOBS (New Out Of the Box Software) is recommended and available for free from the Raspberry Pi website. It can be stored on an SD card, making it easy to swap between multiple operating systems.
The main operating system, again downloadable for free, is the Raspberry Pi OS (previously called Raspbian) but there are also Ubuntu ports, LibreElec ports and many more available. Raspberry Pi OS is based on Linux (Debian) and at this current time it is based on Debian Buster (Debian 10). This lends itself well to installing Freeswitch and FusionPBX since they both recommend Debian 10 as their OS of choice.
Instructions for installing NOOBS and Raspberry Pi OS can be found here but note that when you buy a kit it usually has them pre-installed, which saves some time.
Raspberry Pi 4 Kit from Vilros
You can purchase a Raspberry Pi 4 for around $35 but it is often more economical to purchase a kit as you likely will need additional parts, such as an SD card, cables, power supplies and the likes. For this guide we purchased a kit from Vilros on Amazon for $99. It comes with the following parts, as you can see in Figure 1 above.
- Raspberry Pi 4 Single Board Computer (see Figure 2 below)
- Clear Case with Fan
- USB-C Power Supply with On/Off switch
- HDMI Cable
- 32GB Micro SD Card (pre-loaded with NOOBS, Raspberry Pi OS, LibreELEC (media station) and RetroPIE (arcade games)
- Heatsinks for the main 4 components on the Raspberry Pi (keeps them cool)
- USB / micro-SD extender (makes it easier to download software to the SD card)
- Quick start guide
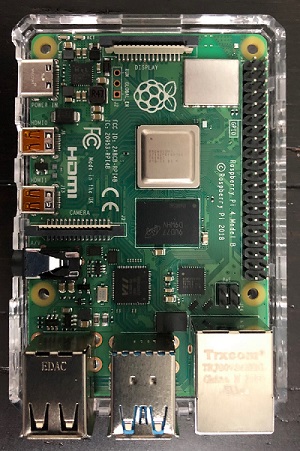
Figure 2: Raspberry Pi 4 Single Board Computer
Follow the instructions from Vilros to place the board into the case and attach heatsinks and power to the fan and then insert the micro SD card. At this time it would be good to grab a USB keyboard and USB mouse along with a monitor. Note that my wireless Logitech mouse worked just fine after connecting the wireless adapter to the USB port.
After connecting the mouse, keyboard and monitor power on your kit. After about 30 seconds the NOOBS loader will display 3 options for Operating Systems. Select the Raspberry Pi OS (based on Debian 10 Buster). After about 30 seconds you should see a lovely desktop display - see Figure 3, which shows FusionPBX up and running which we will do next. Yes I borrowed my son's gaming keyboard!
Now would be a good time to connect to your wireless network (top right of the desktop).
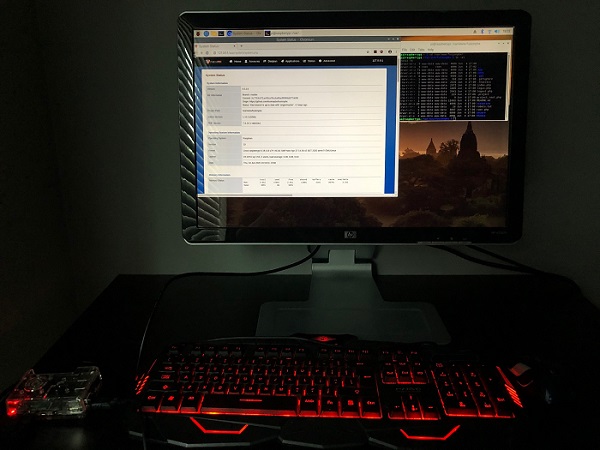
Figure 3: Raspberry Pi OS Desktop
Install Freeswitch and FusionPBX
We are now ready to install some PBX software and make some calls.
The Raspberry Pi OS, Freeswitch and FusionPBX all rely heavily on Debian Buster (Debian 10) so this really does make things straighforward for our software installation.
To make things even easier, the folks at FusionPBX have some great installation scripts to get us up and running without frustration. Anyone that messes with Linux will know that this is rare!
The FusionPBX installation script installs everything we need for our PBX, including the following software packages:
- Freeswitch (PBX switch 1.10.3)
- FusionPBX (PBX high level GUI 4.5.14
- Postgres 11 (database)
- Php7.3 (FusionPBX runs on PHP)
- Nginx (small foot print Web server)
- Fail2Ban (block the VoIP rogues!)
- SNGREP (troubleshoot SIP and NAT issues)
Installation
Bring up a terminal window from the Raspberry Pi desktop and run the following commands to install the PBX software. Note that sudo is used as the installation must be run as a root user rather than the default raspberry pi user.
| Download the install script. |
| cd /usr/src sudo git clone https://github.com/fusionpbx/fusionpbx-install.sh.git |
| Edit configuration file. |
| sudo nano /usr/src/fusionpbx-install.sh/debian/resources/config.sh (change domain field to 127.0.0.1 i.e. local machine and Save/Exit) |
| Run the installation script. |
| sudo /usr/src/fusionpbx-install.sh/debian/resources/install.sh |
This will take quite a long time (at least 30 minutes) as it's installing a lot of packages.
At the end of the installation it will have instructions on how to get to your PBX portal. The IP address will be https://127.0.0.1 and it will tell you the username (admin@127.0.0.1 in this example) and the password for getting into the portal. Make a note of these. It is also worth entering ifconfig at the command line to find out the IP address on the Local Area Network (LAN) for the Raspberry Pi. In my case, the LAN IP address is 192.168.1.40.
You can go to the Raspberry Pi OS Web browser (top left of desktop) and enter the local IP of https://127.0.0.1 to see the FusionPBX splash screen. Alternatively, use the LAN IP address on a different PC on your LAN and enter that in a Web browser, in my case it is https://192.168.1.40
Both ways should work, for this guide I used the latter on a different PC just because I prefer the browser on my PC.
If everything installed successfully you should be presented with the FusionPBX splash screen on the Web browser and it will ask for a username and password. Enter the credentials you were given at the end of the installation. You should be presented with the dashboard. Go to Status > System Status to see the current system status, as shown below in Figure 4.
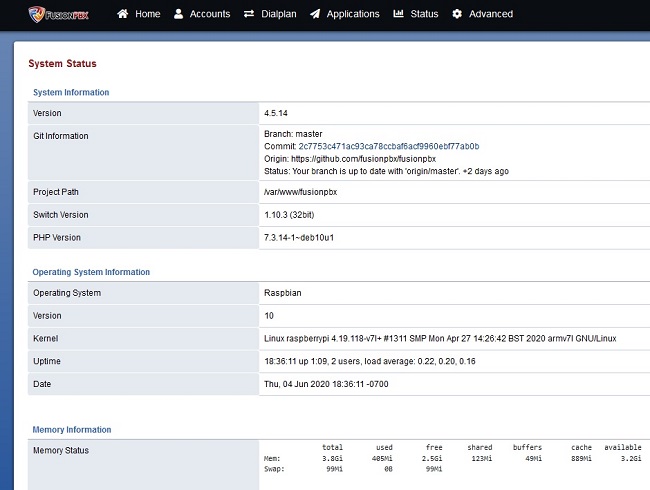
Figure 4: FusionPBX System Status
Configure FusionPBX
Now we have all our software installed, we need to configure our PBX.
Create a New Tenant
FusionPBX and Freeswitch are multi-tenant systems. This means you can configure multiple different tenants (i.e. customers or domains) on a single PBX. For this guide I created a new tenant based on the LAN IP address for the Raspberry Pi 192.168.1.40. This will make it easier to configure our phone extensions since they are on the same LAN as the Pi device. Go to Advanced > Domains and enter the new domain, as shown in Figure 5.
Now select this new domain as the one you wish to work on by selecting it on the top right of the FusionPBX GUI. i.e. click on the domains and select the new domain you just created. We need to do this so we create extensions inside the correct domain/tenant.

Figure 5: FusionPBX Multi-Tenant domains
SIP Profiles
We need to update the internal and external SIP profiles so that Freeswitch is aware that the Raspberry Pi is on an IP address other than just the local default of 127.0.0.1. It needs to be aware of the LAN address https://192.168.1.40 in order to ensure there are no NAT (Network Address Translation) issues.
For both the internal and external profiles (you can ignore IPv6 profiles if you are on an IPv4 network) edit the ext-rtp-ip and ext-sip-ip fields as per Figure 6.
After doing this you will need to re-scan both profiles. To do this go to Status > SIP Status and Re-scan the Internal and External profiles.

Figure 6: SIP Profiles (Internal and External)
Phone Extensions
For this guide we will create two phone extensions inside the 192.168.1.40 domain and we will use Bria softphones for each (free 30 day trial). One extension will be using Bria Mobile (the new version is Bria Solo) on an iPhone and the second extension uses Bria 5 on a PC (can also use Bria Solo for this on the desktop).
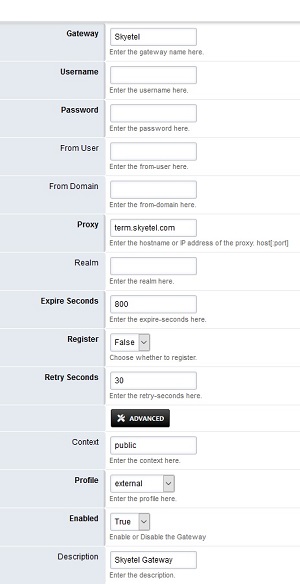
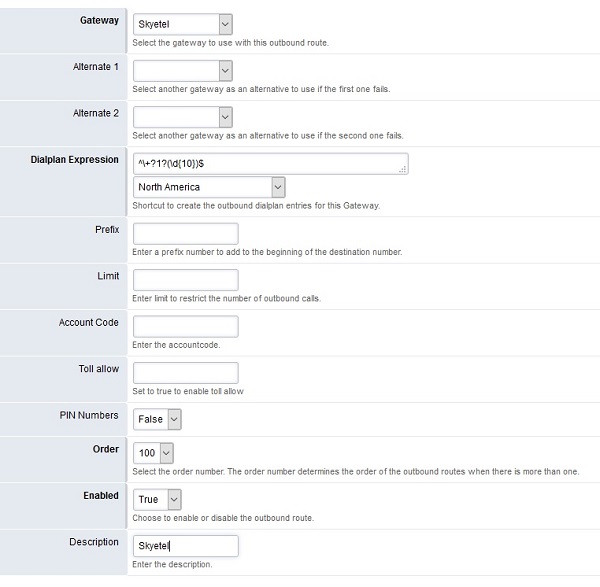
Create each extension by going to Accounts > Extensions and set up the basic settings as per Figure 7 and 8 below. It is recommended that you enter a valid phone number for the outbound caller ID number to reduce the chance of SPAM related issues later when we test external phone calls through Skyetel.

Figure 7: Create an Extension

Figure 8: Two Phone Extensions
The username and password credentials for each extension are used to configure the Bria softphones. You could use actual IP phones for this, we used Bria softphones just because it is likely more accessible to our readers than actual phone hardware.
Figures 9 and 10 show the respective configurations for the Bria 5 on my desktop and the Bria Mobile/Solo on my iPhone.
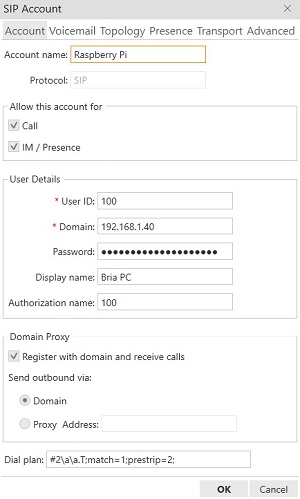
Figure 9: Bria 5 Softphone on Desktop

Figure 10: Bria Mobile / Bria Solo on iPhone
Once the Bria softphones are configured and saved they should register successfully with our Raspberry Pi PBX. In Figure 11 you can see the two Bria softphones register successfully with our PBX since they are both on the same LAN. You should now be able to call each extension (eg dial 101 from extension 100 and vice-versa).

Figure 11: Registered Extensions