Have you ever considered setting up your own business phone system? Perhaps you have thought about this but got frightened by the mysterious lands of Linux and Asterisk. Well, read on, we may just have another solution for you - the 3CX Software PBX (Private Branch eXchange) for Windows.
In this guide, I will walk you through the steps in setting up the 3CX software, using a VoIP/SIP provider to route your phone calls. This system is perhaps one of the most user friendly and accessible systems out there, for Microsoft Windows based systems. By following along with the steps in this guide, you can recreate a similar installation at your office - it is not difficult!
Why 3CX?
It is safe to say that Windows is the most familiar operating system for just about everyone as Microsoft products are common tools for home and business use. Unlike most other systems that run on a Linux Operating System (OS), the 3CX Phone System installs on top of most Windows operating systems, with just a few exceptions. Most 64-bit Windows computers can easily run the 3CX software, turning it into a high performance communication system that is capable of handling all of your telephony needs.
With a little patience, a resourceful person can sift through material on the web to build a functioning calling system and spend very little money doing so. Truly, the only components needed are an appropriate Windows machine and a supported IP phone or softphone.
The following guide serves as a comprehensive walk-through, covering the steps of creating a working 3CX Phone System at your office or home. We will not be able to cover every single feature though you will be able to create a working system with basic functionality using an IP phone, such as the Yealink T22P, and Callcentric as the SIP provider. Fortunately, the system is intuitive so configuring additional features at a later time is not difficult.
Getting Started with the 3CX Software
The first part of the process involves getting a PC ready to run the 3CX server application. Ideally, this should be a dedicated machine that will have the sole purpose of running this application. This is a common practice for server environments as a host running multiple applications is more likely to be unstable so it is best to dedicate one machine to act as the 3CX server.
Initially, I chose a system that cannot support the application. Machines running 32-bit versions of Windows 2000, XP, Vista, Server 2003 and Server 2008 will not allow installation of the application so my x86 XP machine did not work. I attempted this as a first choice simply because these machines are so common, they are usually ideal for such applications or lightweight OS images.
If you decide to go this route, there is likely another step for prepping an XP system. As XP is no longer a supported operating system, a manual install of the current .NET framework is likely required. You can find the instructions here if you decide to use a Professional x64 XP system.
I ended up installing the application on a laptop I regularly use as my "daily driver". Again, I would not recommend doing the same, especially for a long-term solution. However, if you simply want to give the software a try, you can use this method then later on backup the configuration and restore it to a new installation, which we will cover later.
Installing and Configuring the 3CX Software
Installation is a straightforward process as the application installs like most other Windows installations and furnishes a wizard to help you through the endeavor. The first step involves the actual 3CX download � follow this link to obtain the setup files. Fill in the 3 required fields, submit the information then you will be taken to a page as seen in Figure 1 below to download the installation files.
One important point to note here, the basic 3CX package is free to download and use. However, for larger businesses or those requiring additional features, there is a cost associated with the software. However, in my opinion, the 3CX pricing is very reasonable.

Figure 1: 3CX Download Page
Unlike some systems, you only need the one 3CX Phone System Setup File, not multiple packages. It is also advisable to grab the Windows Client while you are on this page.
After the 3CX download is complete, you can begin installing the software. The first few steps are critical to the installation, before the actual configuration can begin.
Initial Settings
First, accept the EULA and continue to the next step where you will select a directory to install the program files. Like most Windows programs, it is best to install the files to a default location so modification and troubleshooting down the line is easier.
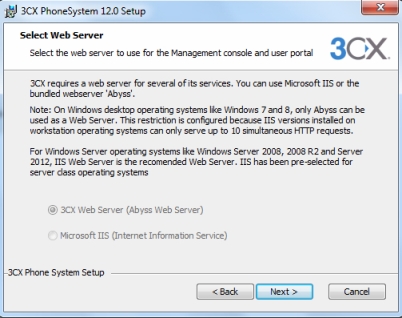
Figure 2: Select Web Server
The step pictured above in Figure 2 involves provisioning an appropriate web server. You have two options:
- 3CX Abyss Server
- IIS
This is a packaged web server that comes with the system. I would recommend going this route unless you are already familiar with IIS. It does not require user intervention and can support more than the limit of 10 simultaneous connections for desktop systems.
If you are using a Windows server OS, IIS is recommended however, configuring this Windows feature for non-server systems is beyond the scope of this article. Using a regular Windows OS will require installation of the service � for XP, you will likely need a disc; instructions for Windows 7 are found here should you decide to use IIS.
Next, you will select whether to configure HTTP or HTTPS for remote access of the management console, as shown in Figure 3, and certain bridge connections, for example, when connecting to a remote offices or devices outside the Local Area Network (LAN). If you do not have an SSL certificate for your FQDN, leave it as HTTP.
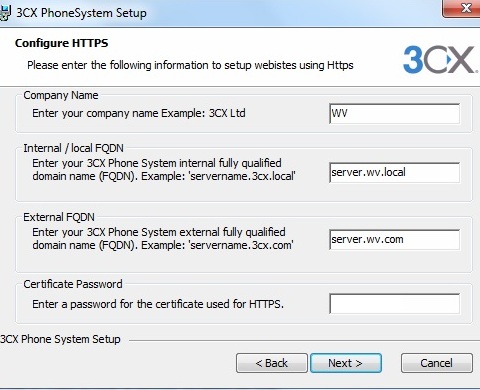
Figure 3: 3CX Download Page
After this step is completed, confirm that the settings are correct and the application will take a moment to configure. Next, a wizard will appear to configure basic settings for the 3CX Phone System.
3CX Configuration
The following steps will configure the 3CX system on your machine. Most of the steps are self-explanatory. Fortunately, these settings can also be modified at a later time should you skip one or make a mistake.
- Language Select � Select your preferred language.
- Local IP Address � Setting should auto-populate with the internal IP address of your machine.
- Public IP � If accessing your system from a remote location, this setting is necessary (e.g. bridging additional offices or using phones outside of the LAN.) We will only cover one network location so this can be left blank.
- Settings � Here is where a backup from a prior installation can be uploaded � since this is a new installation, we will provide a name for the system. A blog for the backup and restore process is available on the 3CX website, though it is outdated for the most recent software version. An executable tool is provided with the installation for backing up and restoring system configurations, so the command line is no longer necessary.
- Extension Format � Specify how many digits will be used for phone extensions.
- Mail Server Settings � If your network has an on-site email system (e.g. Exchange Server), fill in the fields to allow for email notifications. Different providers like Google and Yahoo have the capability to perform SMTP services but each is different so searching for this information on the web will be necessary. This can be fudged for the time being but it can make provisioning of the 3CX softphone more difficult in some scenarios.
- Administrator Settings � Pick a user name and set a secure password for access to the web management console.
- Extensions � Click the "Add" button on the page and create at least one extension for your system by filling in all the fields. It is best to make the Extension Number and Authentication ID the same for consistency as this will help with configuration later. The Authentication Password and Voicemail PIN will auto-populate. The Select Interface correlates with the internal IP address of the system where the 3CX application is installed. The two optional fields are for an IP phone on the internal network where this extension will be used; input this information if available. See Figure 4 below for reference.
- Region � Simply select the country where you are using the system. If you are in the US, the country code 011 should appear in the field near the bottom of the window.
- General Settings � Set the extension where incoming calls will default. It is best to select the extension you created earlier until you are ready to add other extensions or build an auto attendant. The voicemail extension should stay at the default value of 999 though can be changed if you wish.
- Allowed Countries � The country where the system is located should be selected by default but other countries can be selected if you plan to take advantage of international calling.
- VoIP Provider � If you already have an account with a VoIP/SIP provider, supply the credentials now. Many SIP Trunk provider settings are already included in the console, allowing you to select the provider from a menu. The next section will cover setting up a SIP account with Callcentric where we will properly configure the system, after registration is completed. For now, supply a fake number and authentication password � or you can skip to the next section explaining setting up and configuring of a SIP account then return to this step when you have completed.
- Save Configuration � A database configuration based on the information provided in the wizard saves to your machine at this point. If a problem presents itself at this time, it is likely due to a service conflict in your operating system.
- Registration � By inputting your information, 3CX will contact you with various offers for packaged solutions, upgrades (such as the 3CX Pro Edition) and support contracts. This step can be skipped but supplying your information is a good idea if you want to make the most out of the system.
- Finalize � Clicking the "Finish" button will finalize the installation and configuration of your 3CX Phone System.
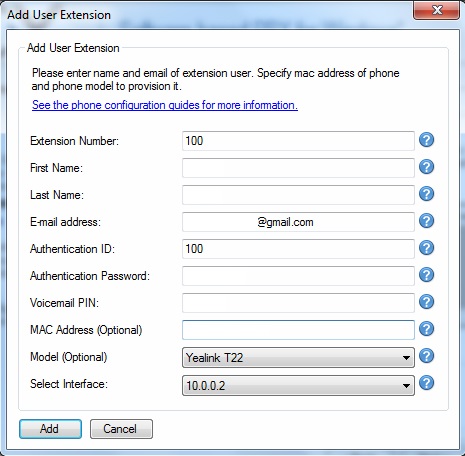
Figure 4: Add User Extension
A good first step to troubleshooting a problem will be to consult the 3CX forum. Both experienced users and technical support staff have effectively answered many questions in this section of the site.


Setting up a Callcentric SIP account
Many SIP providers exist these days and we have tried many of them over the years. Callcentric is one such provider and is incredibly easy to setup and inexpensive to get started. The requirements to set up an account simply involve registering and selecting the required services. Start at the Callcentric website and select a plan. I chose the Pay Per Call plan for the sake of this project but other plans can be selected for low monthly rates.
I added $5 to the Pay Per Call fund to cover calls made to landlines, mobile phones and other VoIP providers. Purchasing a DID number is necessary for incoming calls, which should be selected before you finalize your purchase. I spent a total of $13.77 for the initial setup which included the money loaded into the account for outgoing calls, the DID setup fee plus the first month of service, and of course the mandatory 911 fee.
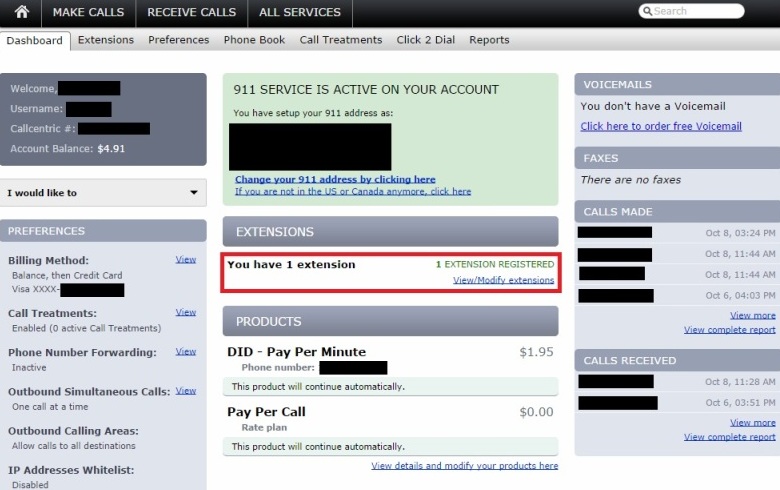
Figure 5: Callcentric Dashboard
Next, modify the extension listed in Callcentric to match the one created in the 3CX system. Click on the link found in the red box (or the tab at the top of the page) as seen in the picture above (Figure 5) to edit extensions connected to the account.
As per Figure 6 below, the value for the Extension field should be the same as the extension (and authentication ID) of the main extension used in Figure 4. Change the password to match the extension as well. For good measure, plug in the DID number for outgoing Caller ID.
Note: You do NOT need to set up every extension inside Callcentric, but it needs one main extension configured so the 3CX PBX can be registered successfully. This is not very clear in the documentation for Callcentric or 3CX, in my opinion.
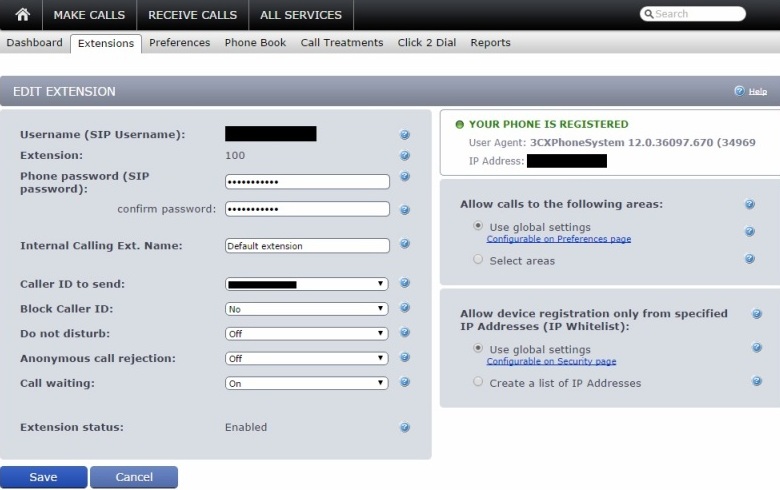
Figure 6: Callcentric Extension
If you skipped ahead to this section, you now need to return to complete the 3CX configuration.
Yealink T22P
Pictured in Figure 7 below is the phone I used for this project: a Yealink T22P IP phone. This phone was selected for a few important reasons. It is one of the many devices pre-programmed into the 3CX Phone System for auto-provisioning, and it has all the bells and whistles of a great IP phone and costs less than $70.
It is PoE (Power over Ethernet) capable but if you do not have a switch or router with PoE capability, a 5V power supply will be necessary � most PoE phones do not ship with a power supply so keep this in mind. All you need to do with this particular phone is plug it into your LAN and it will be ready to configure after a few more steps.
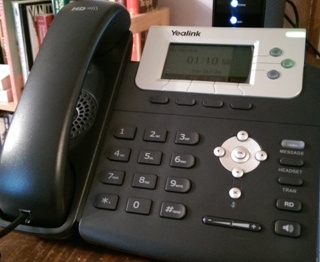
Figure 7: Yealink T22P IP Phone
Configuring the 3CX Console
Before you login to the console and input the final configuration settings, check your firewall(s). Make sure the firewall on your system has all of the 3CX services added as exceptions. Also, make the necessary changes to your internet gateway and firewall appliance, if applicable. Add ports 5060, 5061, 5090 and 9000 � 9049 to your exceptions, otherwise the system will not register with the VoIP provider.
Figure 8 is what you will see when you login to the 3CX console using the credentials you supplied when you created the account. Initially, under the Ports/Trunks Status section, the green box will be red and status will read Not Registered until the final steps are performed.
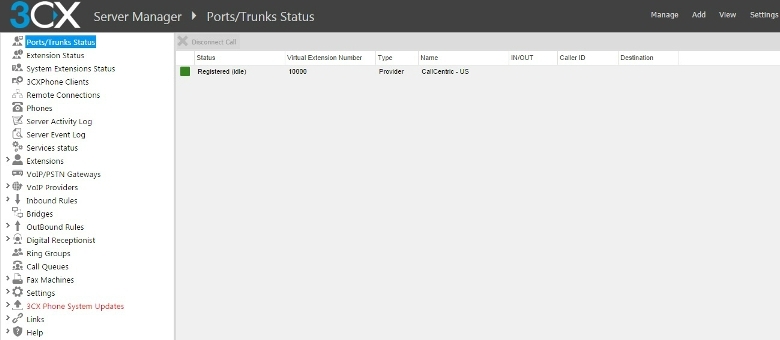
Figure 8: 3CX Console
VoIP Providers Settings
To get your system running properly, first visit the VoIP Providers section as highlighted in Figure 9. Even if you skipped ahead during the initial configuration section, it will be necessary to visit this section and make a couple of changes. Add your Callcentric information to both the External Number and Authentication ID fields (Callcentric numbers should have a 777 area code), append your extension number (i.e. 1777XXXXXXXEXT) and input the password for that extension.
Next, go to the Advanced section. Add GSM-FR to the Assigned Codecs area as this will be necessary to make calls to mobile devices. Figure 10 highlights the settings for the codecs.
NOTE: Make sure to click the "Apply" button at the bottom of each section after making any configuration changes.
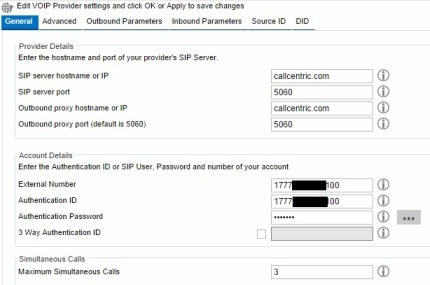
Figure 9: VoIP Provider Settings

Figure 10: Codec Settings
Inbound and Outbound Rules Settings
Now go to the Outbound Rules and configure a calling rule. Name it whatever you like � the most important part is ensuring Callcentric (or your choice provider) is configured for Route 1. You can also select a number to dial outside lines in the Calls to numbers starting with prefix area. The number 9 is commonly used for outbound calls; if you change this field, make sure you set Strip Digits to the number of digits you use for this setting. Note that the Calls from extension group is set to DEFAULT in my screenshot in Figure 11 but this is not necessary.
Go to Inbound Rules, as per Figure 12, to configure a rule for incoming calls. Make up a name, plug in your DID number and select Callcentric (or other provider) in the Available ports section. Though not pictured, you can configure where calls route by default, by scrolling down the page. It is easiest to just select your main extension for now.
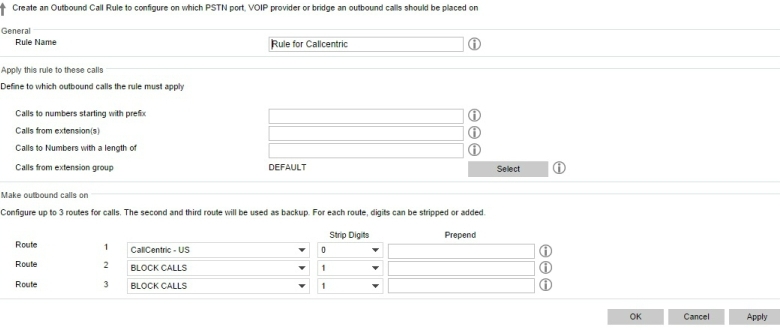
Figure 11: Outbound Rules
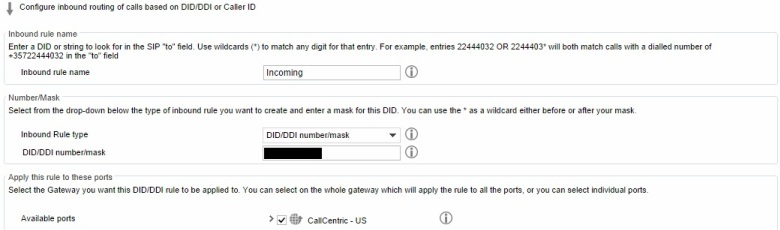
Figure 12: Inbound Rules
Phone Provisioning
Now we will provision the IP phone on the network. There is a large set of 3CX supported phones, so auto provisioning works in most cases, where the 3CX configures your phone as needed.
Essentially, anything on the LAN � whether an IP phone, a PC running the 3CX for Windows softphone or a mobile device running the 3CX softphone � should appear in the Phones section. Click on the phone you want and a submenu will appear. Click "add extension" and it will provision the phone for you, as shown in Figure 13. If the option to auto-provision does not appear, most devices and the 3CX softphones will offer to do so upon booting, if not already registered to an extension. If this option does not appear, find the account settings in the application or device and supply the credentials for the extension.

Figure 13: Phone Provisioning
In all honesty, the 3CX softphones for my Android were a little temperamental so I had to manually provision them. Notice the 3 vertical dots at the bottom of the screenshot below (Figure 14). Tap this area to find the settings menu and supply the extension you wish to associate with the device.
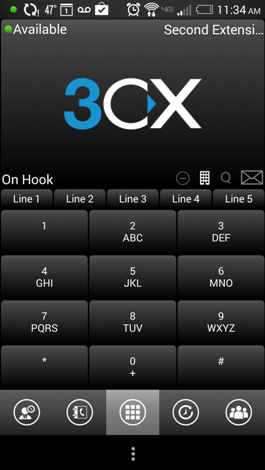
Figure 14: 3CX Softphone
After these steps are complete, you should be able to make calls through your 3CX Phone System!
For additional devices and phones, just go to the Extensions section and add as many as you like � the process is virtually identical to the setup described above. It really is that simple!
Final Thoughts on 3CX
With very little time or expense, it is possible to create a very powerful business phone system using the 3CX PBX software. The free version works great for small businesses and the price is very reasonable should you need a larger phone system. The software runs on Windows so any PC can be transformed into a fully functioning PBX.
By following this guide from start to finish, you should experience few problems. If you have any questions, feel free to send them my way using the comments form at the bottom of this page.
This guide used Callcentric for the SIP routing but there are many providers in this market.