Counterpath has recently released its Bria Solo, Bria Teams and Bria Enterprise softphones to the mass market. Learn more about this product line, compare the differences and see how easy it is to set it up in the cloud.
What is Bria Solo and Teams?
Counterpath, the designers of the Bria softphone, have released their next generation product line for their softphones. The previous generation was known as Bria X-Lite or Bria 5, for PC based softphones and Bria Mobile for cell and tablet devices on iOS and Android platforms.
The new product line is known as Bria Solo for individuals, Bria Teams for businesses and Bria Enterprise for larger enterprises.
For each variant you can install on iOS, Android, PC and MAC. With the exception of the free version (Bria Solo Free) you can actually install the App on all of the aforementioned platforms with the same user account.
Bria Feature Comparisons
If you only need to make audio calls from a PC, MAC or mobile device the Bria Solo Free version should suffice. Surprisingly, Counterpath has included Push service even for the free version. This is important because it maximizes the chance of success for incoming phone calls to your mobile device and greatly reduces battery usage. If you have ever owned the Bria Mobile App and used it without push notifications you will understand why this is important.
The only downsides are that you can only have 1 account and 1 device configured and there is no video support. You can also only use standard PCM CODECs (i.e. not High Definition audio) and there is a limited feature set (i.e. no call transfer, call waiting etc). There is also no external contact management and no encryption for your calls. If all you need is to make and receive audio calls reliably while away from the office it works great and is completely free.
If you are looking for the ability to have multiple devices supported (up to 3) and multiple SIP accounts configured (up to 5), the Bria solo paid version will meet your needs. It costs $2.95/month or $35.40 per year. It also provides full HD audio and video along with a rich feature set for handling calls. It also provides multiple ways to handle contacts through Apple, Microsoft and Google and adds encryption for your calls (for control and media i.e TLS and SRTP).
Bria Teams costs $4.95/month or $59.40 per year and adds additional features such as team voice and video, file transfers, chat rooms, text messaging, presence, screen sharing, and call analytics.
Bria Enterprise adds additional messaging capabilities such as SMS, LDAP for contact management and some additional tools for remote debugging. No price is listed for the enterprise option.
A full comparison of the features between the different variants can be found on the Bria website.
For the purpose of this article we will be using the free version of Bria Solo. This should work for nearly all VoIP providers, providing you can get your service credentials from your provider (i.e. extension number, password, url etc) to use for the Bria setup.
Setting up Bria Solo
One big change that Counterpath made for the Bria Solo, Teams and Enterprise line is the ability to configure your credentials in the Bria cloud portal and it will then provision your device after installing the softphone and logging in with your Bria cloud credentials. This is great if you have multiple devices as it means you now only need to configure your credentials once in the Bria cloud portal and it will be used across all of your devices.
Create a Bria Cloud Login
First steps is signing up for an account. We will be using Bria Solo (Free) but what actually happens is they give you a free 30 day trial of the full Bria Solo variant and then after 30 days drop you down to the free version. It is important to know this so you don't get used to some of the additional features available to you as otherwise you will need to sign up for a full subscription of Bria Solo. Note that no credit card is necessary to sign-up!
To sign-up for an account go to their sign-up page and select Bria solo.
Now enter a username and password and make a note of these as they will be needed later.
Configure your Account
You should now be in the Bria cloud portal and will be presented with the option to configure an account, as shown in Figure 1 below. If your provider is already partnered with Counterpath you can select your provider but in most cases you will manually enter the SIP settings for your account, so click on Configure SIP Settings. You will need to get your credentials from your VoIP provider for this next step.
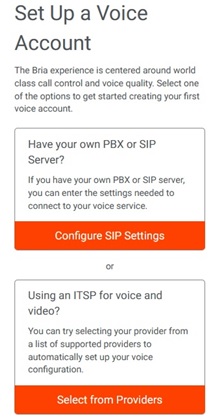
Figure 1: Bria Solo Setup
Enter the credentials you received from your VoIP provider, as shown in Figure 2.
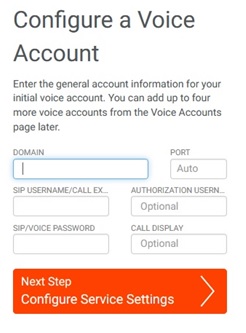
Figure 2: Bria Solo Configuration
- Domain - this is usually a format such as bloggs.myprovider.com
- Port - often this is 5060 but varies by provider
- SIP Username - this is usually your extension number, such as 300
- Authorization Username - this is usually the same as the SIP username above
- SIP Password - this is the password for your account with your provider
- Call Display - optional
Click on Next Step to configure other items for your service.
Now enter the additional service settings, as shown in Figure 3. You should get these from your service provider.
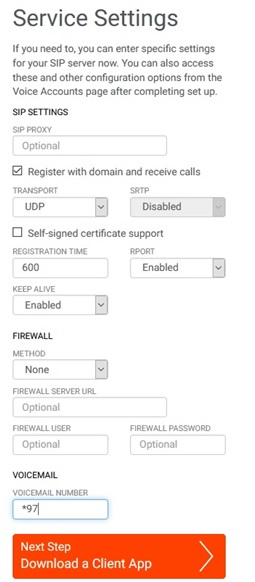
Figure 3: Bria Solo Service Setup
Some standard options are as follows (if a field is not mentioned leave as its default):
- Register with Domain and Receive Calls - Checked
- Transport - UDP
- SRTP - Disabled
- Registration Time - 500
- Rport - Enabled
- Keep Alive - Enabled
- Firewall Method - None
- Voicemail Number - *97
Now click on Download a Client App to save the settings and pick the platform you wish to install the App on.
Install Bria Solo
Pick the platform you need to install Bria Solo on and follow the instructions in the cloud portal. We selected iOS for this guide. Search for Bria in the Apple Store and select the App shown in Figure 4 below.
Figure 4: Bria Solo App
Log into the App and Enable Push
Open the App and login using the Bria cloud portal details created at the start of this guide. It will now configure the App on your device using the details you set-up above for your VoIP provider.
Finally, ensure that Push service is enabled as shown in Figure 5. Your VoIP provider may suggest a different option for Push from the default. We have found with our tests that Single Device Emulation and NAT Emulation disabled tends to work best for our PBX system.
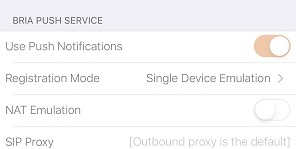
Figure 5: Bria Solo Push
That's the configuration complete. If you have entered the correct credentials your softphone should register with your VoIP provider's servers and you will be able to make and receive calls.
If you are having issues getting it to work, double check the steps above and get additional support from Bria's support site.
Final Thoughts
We really like the new Bria solo, Teams and Enterprise suite of softphones from Counterpath. They provide something for everyone, from residential or SOHO users all the way to the enterprise level. It is relatively simple to configure and the new cloud portal makes it easy to enter your credentials once and then configure multiple devices. In our testing we have found it to be reliable both on the PC and on iOS and Android devices. Being able to take our phone service on the road has proven to be very useful.