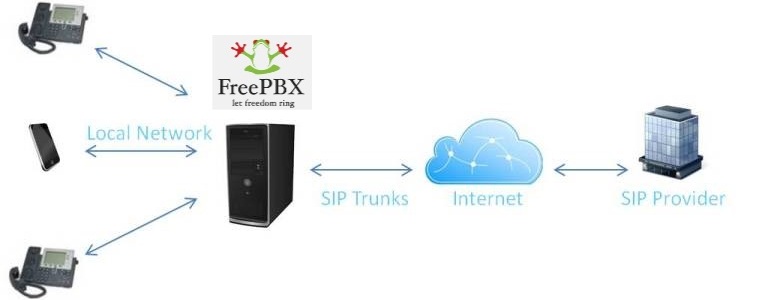
Business and residences alike have turned to VoIP for a multitude of reasons, such as cost effective communication capabilities and the rich feature sets included with most systems. Though many will select hosted services in the cloud, it is very possible to create your own modern day phone system without a strong knowledge of communication technology and a little patience.
In this FreePBX tutorial, we will walk you through the steps necessary to install, setup and configure a powerful IP PBX phone system. The system's design is such that it runs on top of a dedicated Linux machine but does not require a well-versed technician to setup the system. This type of solution can save your business a significant sum of money on your phone bills.
Why FreePBX?
Linux can appear very intimidating as not all distributions offer a stock GUI component, thus requiring the user to interact with the system via the command line. Though FreePBX itself is not graphical in nature, an intuitive web management console is packaged in the software making it accessible for a broad range of users.
Since the distribution includes all the necessary server applications and an underlying operating system, installation is a breeze. After installation, another computer on the LAN is used to access it via a web browser to create all the necessary configurations for a functional calling solution, in a graphical environment.
FreePBX is a very powerful system, including far more features and settings than we can cover in a single article. By following the instructions in this guide, you will find how simple it is to create a basic solution that allows users to easily call other extensions on the network at no cost and inexpensively call external phone numbers, mobile devices and landlines via a wholesale VoIP provider (VoIP Innovations).
Preliminary Steps Before Installation
A dedicated machine is required to run the software - virtualization applications like VMware Workstation (and vSphere, for that matter) also work. If you do not have a specific machine to run the system, free applications like VirtualBox can be a good option. This article ONLY focuses on configuration of a dedicated machine.
Fortunately, only moderately powered hardware is needed so the computing component does not have to be expensive. I used an older system with a quad core AMD processor and 2GB of RAM that was originally built for XP Professional and created a 300GB partition from unused storage. My processor meets hardware pre-requisites but I technically only had half of the RAM required (2GB instead of 4GB). The preferred storage reserve for the system is 250GB, but this assumes use of call recordings and voicemails so it can vary quite substantially.
Ideally, this system should be the only OS that is utilized on the machine and it must always be running for your phone system to function. When installing the platform distribution, you will have the option to completely wipe the drive (which is recommended) or install it alongside another OS.
FreePBX Distro Install
In this guide, we will be using a FreePBX distro package that includes both a supported operating system (CentOS) and the main application. This package is free and available directly from Schmooze Com.
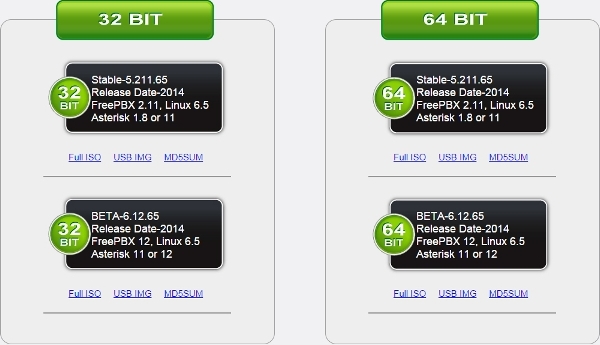
Figure 1: Pick a FreePBX Distro Package
By navigating to the FreePBX download, you will find the current distro's - keep in mind, these will change over time as new versions are released. Select Full ISO from the stable 64 bit option for the best performance. The USB IMG option will work as well but depending on your system, it may be more difficult to install.
You can burn the image natively with most operating systems but for Microsoft OS's prior to 7, you will need a 3rd party app like ImgBurn or UltraISO (beware of packaged Adware with some hosts!) These are all good options, regardless of native burning apps since disc recording speeds may be lowered for more accurate media.
Boot into the disc on the machine where you want to install the software. The first screen you see will ask you to select between an older or newer version of Asterisk and the method of installation as seen in figure 2.

Figure 2: Select Installation Method
Assuming you chose the stable version of the distro as earlier indicated, you should choose the newest version of Asterisk and the Full Install - Advanced option. Walk through the following steps to install the full system to your machine.
- Configure TCP/IP - We will be using IPv4 for our setup. Keep the default options for both settings meaning DHCP for IPv4 and Automatic for IPv6.
- Select location - Choose the closest city to your geographic location in your time zone.
- Set password - This will be the password for the root user (named root) of the machine when logging on locally or via a terminal emulator like PuTTy.
- Type of installation - You will see the following screen as shown in figure 3.
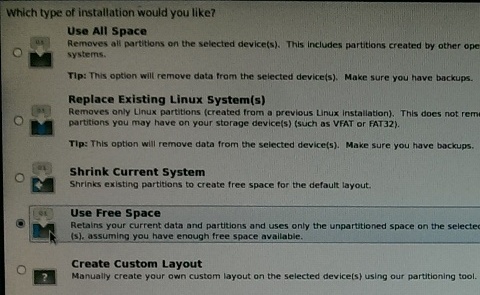
Figure 3: Installation Location on Local Machine
It is recommended you use the whole hard drive as this is more secure and the machine must be up for the system to work. If you want to keep the existing system(s) on your machine, use the Shrink Current System. If a suitable chunk of unused space is already available, choose Use Free Space and select the desired space.
The system will proceed to install the software, reboot once then load up the welcome screen. Essentially everything you need to do from here will be done via a web browser so logging into the machine and poking around is not necessary, as this will likely do more harm than good, especially if unfamiliar with the command line for Linux.
FreePBX Setup
After the installation, you will be able to access the web management console from a browser on another machine within the LAN. Type the IP address of the machine into your browser to get started. The first page you see should look like the one shown below in figure 4.

Figure 4: Admin Setup
Enter the required information by creating an administrator name and password. For email to function properly, you will need to configure an SMTP connector. In a Windows server environment, an admin can easily create an account for such purposes in Microsoft Exchange. Using a 3rd party email such as Google is also possible but doing it ideally requires use of Google Apps for Work.
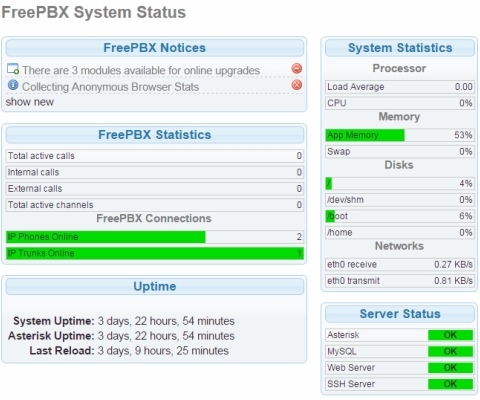
Figure 5: System Status Page
When navigating to the system via a web browser, you will land on a splash page with four main options. You will select FreePBX Administration for configuration. After logging in for the first time (and each subsequent time) you will land on the system status page as shown in figure 5.
Initial Setting Changes
Take a look at the notification area in the top left corner. One of the first messages you should see recommends changing the password for the Asterisk server as the default password is common knowledge. You can change this by going to the Advanced Settings option under the Settings tab as can be seen in figure 6 below.

Figure 6: Change Asterisk Password
IMPORTANT: Before performing the following step - and especially in the future - visit the Backup & Restore page under the Admin tab to create a backup. Create a name, slide Full Backup into the Backup Items field, move the Local Storage (local) option over to the Storage Servers location and hit Save at the bottom. This can save a lot of headaches in the future, trust me!
Updating FreePBX modules (i.e. system features) is an important practice as this ensures certain tools remain operable and further reduces the chance of a system exploitation. To upgrade modules, visit the Admin tab and select Module Admin. Click the Check Online button to receive the most current information then check the box for Show only upgradeable. Click the Upgrade all hyperlink then the Process button on the following page.
A couple of things to note at this point: you can add additional modules from this point but it is not necessary as the required features for voice and video are already installed. The following steps do not necessarily require completion in the same order but if you are attempting to mimic my setup, it is best to complete in the same order.
Local Network Settings
Next we will configure the network settings inside the console as a measure to prime the system for connecting to our wholesale provider, VoIP Innovations. The first area we will configure is related to settings for the LAN. This will provide functionality for your phones and softphones on the local network so if you are not planning on connecting a SIP account at this time, you can skip to the Configuring Extensions section.
Navigate to the System Admin module found under the Admin tab at the top. On the right side of the page, you will see a box for additional sub settings. First, select the DNS and make the following changes as seen in figure 7.
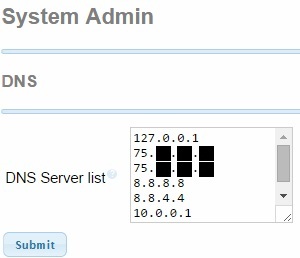
Figure 7: DNS Settings
Order is not too important as long as a few entries are added to the box that normally do not populate automatically. The two beginning in 75 related to my Internet Service Provider (ISP). You can find this and other network info by running cat /etc/resolv.conf on the local machine (or other UNIX like system on the network, including a Mac) or ipconfig /all from a Windows machine. These addresses and the public DNS entries (the two that begin with 8) are mostly for good measure - as long as your loopback address (127.0.0.1 - this reserved address is always the same) and default gateway (in my case, 10.0.0.1) are included you should be ok.
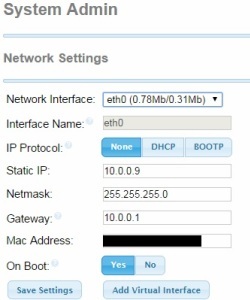
Figure 8: Network Settings
When you finish adding DNS entries, go to the Network Settings section and add missing information. Make sure the IP protocol is set to None and configure the Static IP setting to the local address of the machine that is running FreePBX. Make sure the rest of the information matches your local network, as viewed in figure 8.
SIP and Additional VoIP Settings
The next steps prepare your system to connect to the SIP or Wholesale provider that will be handling calls outside of your PBX. Go to Settings tab and then select Asterisk SIP Settings to make the following configuration changes.
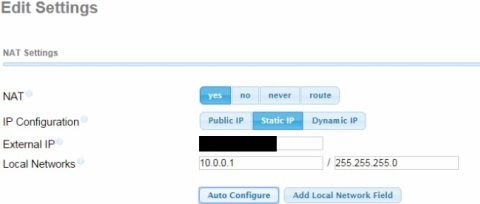
Figure 9: NAT Settings
In figure 9, notice that the NAT setting is set to yes and the IP Configuration setting is defined as Static IP. You will also need to find the external IP of your network - the easiest way to accomplish this task is to visit Google and type 'what is my ip.' A box should appear in the top result with your public (i.e. external) IP address that you will enter into the External IP field.
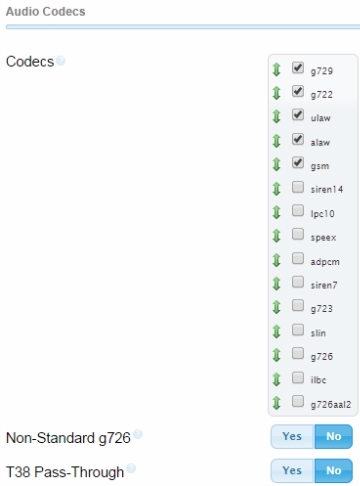
Figure 10 - Allowed Codecs
The codecs used for audio compression should be set based on the capabilities of your SIP or wholesale provider. VoIP Innovations use codecs G729 and G711 (G711 is not an option, but its variations ulaw or u-law - pronounced "moo law" - and a-law are available) so these should be selected. G722 is a successor, in some sense, to codec G711 and GSM is often needed to communicate with mobile devices hence the reason both are selected.
BONUS: For fun, you can turn on the video codecs located in the section just below the regular codec section. This will enable the use of video calling between properly configured softphones!


Connecting to the Outside World
It is likely you will want to connect your PBX to the outside world. After all, it is tough to run a business purely on internal calls! To do this you need either a wholesale or a SIP trunking provider. These providers essentially route your calls to their intended destination and in the opposite direction, assuming you own Direct Inward Dial numbers (DIDs), they will also route calls to your phone system. Your newly setup on-premise PBX is then responsible for switching the traffic inside your network.
We chose VoIP Innovations to handle origination and termination for this project, as they provide a great wholesale communication service, and their per minute rates are some of the lowest you can find in the market. Not to mention, their console is very easy to navigate making it a perfect complement to this system. We also highly recommend Skyetel.
After logging into VoIP Innovations, you will be presented with the main dashboard, as highlighted in figure 11 below. This gives you a great snapshot of your account. Some useful features of their service are as follows:
- Order DID numbers � You can order local and International Direct Inward Dial (DID) phone numbers and view existing DIDs.
- E911 � Setup E911 for your phone numbers.
- Rate Query Tools � Tools to view rates for US/CAN and International routes.
- LNP (Local Number Porting) � Port numbers over from old providers.
- Setup Endpoints � This is where you add endpoints for authentication so you can route calls worldwide from your PBX. See next section.
- CDR � Call Detail Records (CDR) are available for all calls.
- APIs � APIs are available to manage your portal through software rather than using the portal.
- Resell � Want to get into this business? Resell the service and manage customers directly from the portal.
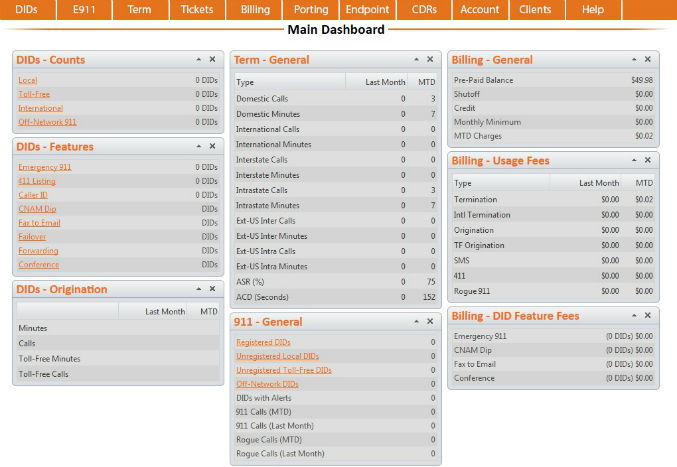
Figure 11: VoIP Innovations Dashboard
Configuring Endpoints
Endpoints is the terminology used by the wholesale provider and refers to your endpoint, in this case the FreePBX system. In order for a wholesale provider to accept traffic from your PBX, some form of authentication must occur. This can be performed either through usernames and passwords or through IP address authentication and in the case of VoIP Innovations, IP authentication is used. Think of this as a whitelist of IP addresses similar to your network router's firewall. In other words, you tell the wholesale provider the only IP addresses (or endpoints) that should be accepted for SIP traffic on your account. After all, you don't want hackers making calls on your dime!
Figure 12 highlights our endpoint that was used for this test, with our public IP address masked off for privacy. When a new endpoint is created, there are a few fields that must be entered, namely the group name (for the endpoint), the SIP port (usually 5060), whether to strip the plus and International characters, any number pre-pend and of course your public IP address from figure 9.
Finally, for IP authentication, make a note of the IP addresses given to you by the wholesale provider for origination and termination at their side, since they will be required in the following sections.
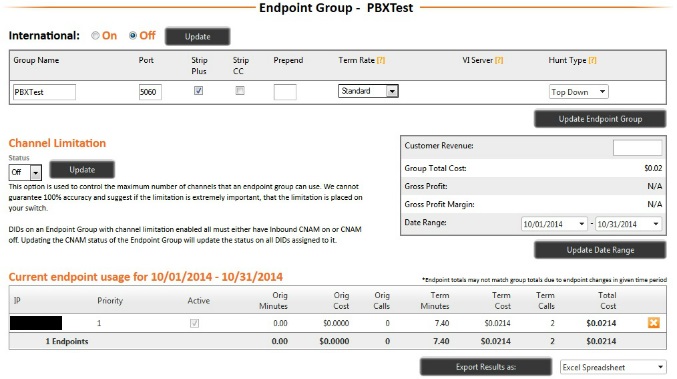
Figure 12: Configure Endpoint
Configuring Extensions Inside FreePBX
The Extension module under the Application menu item offers many configuration options but most settings should remain their default value. After clicking this item, your existing extensions will populate in the box on the right (you should not have any just yet) and may be edited at a later time, if needed. The dropdown box on the left will present several options - we will choose Generic SIP Device to configure all our extensions.
Each item in this module (and the rest of the system) has a small "?" next to the field so if you are curious, you can find a brief synopsis of each setting by hovering your mouse pointer over this icon. For now, we will only focus on the important fields.
- User Extension - Other extensions will use this value to connect to the device associated with this number - this is also used by SIP devices and applications for registration.
- Display Name - The name that appears to other devices in the network.
- Outboud CID - Entering a name defines what appears on a caller ID - this setting can be overridden when configuring outbound routes and also by the SIP trunk.
- Assigned DID/CID - These 3 fields can be used if you purchased origination services from a provider. We are only using outbound calling for this test however, you can map a purchased DID to route directly to this extension if desired.
- Device Options:
- Secret - Under the device options, a lengthy, secure password is generated in this field. It is best to change it to something secure but much shorter as the string is quite long.
- DTMFmode - Make sure "RFC 2833" is selected from the dropdown menu.
- NAT - Ensure "Yes" is selected.
- Voicemail:
- Status - Select "Enable" from the menu to use voicemail.
- Voicemail Password - Create a short PIN number that you can enter from a phone to access voicemails. Dialing *98 will access your systems voicemail system - from here, enter the extension you want to check and provide the password to listen to messages.
Final Configuration Steps
The last steps require inputting the wholesaler or SIP trunk information into the console and defining outbound rules to make calls and configuring DIDs for incoming calls.
Configure SIP Trunks
Under the Connectivity tab, select Trunks from the dropdown menu. Here you will select the Add SIP Trunk to configure settings for your trunk connection to VoIP Innovations. At the top of the page, make a name for your trunk, pick an outgoing number to display for caller ID and set the maximum channels to as low a setting as you may possibly need for concurrent outgoing calls.
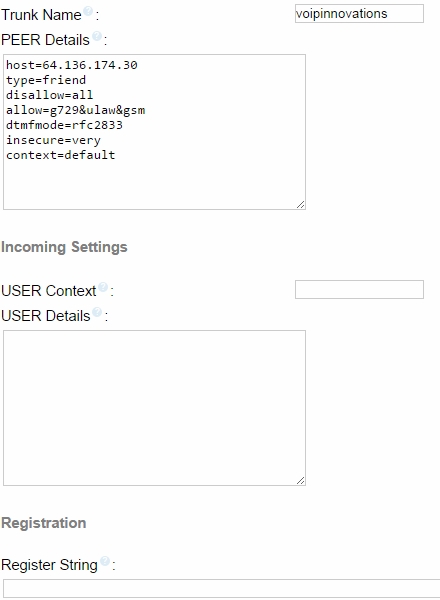
Figure 13: Configure Trunk
Figure 13 shows the authentication details needed for this specific provider, under "Peer details". Rather than use a Register String as seen in the blank field at the bottom of the image, the FreePBX is connecting to VoIP Innovations using IP authentication, as described earlier. These settings must be copied exactly as shown for your setup. Keep in mind, other providers will use different settings and possibly different authentication models.
Configure Outbound Calling
The last step required for making calls is to set up an outbound route. Under the Connectivity tab, select Outbound Routes and create the rules as seen above. The top of the page simply requests a name for the route - any name will do. You may also configure a CID for this route that can override an extensions setting but will not override the SIP configuration if a number is specified for your trunk.
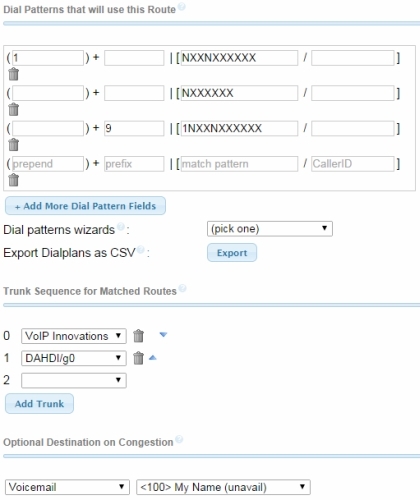
Figure 14: Configure Outbound Calling
Unlike some IP PBX systems, dial patterns must be defined or the numbers dialed will not pass through to the SIP provider. The settings in figure 14 will work for virtually any scenario. Finally, make sure you select the SIP trunk you created prior to the step and set it as high (meaning the lowest number possible) in the Trunk Sequence for Matched Routes setting. Note that the DAHDI setting is predefined in the system - it does not make a difference whether it is included or not for this project.
Note: Make sure your firewall is forwarding port 5060 to your server or external calls will not complete!
Now your system should be configured and you can successfully make calls outside your network. Feel free to try this now, before we look at incoming calls.
Configure Inbound Calls
In order to receive incoming calls you will need a phone number, also referred to as a DID (Direct Inward Dial). The DID from your SIP Trunking provider will allow outside callers, meaning those calling from other VoIP setups, mobile networks and the PSTN, to reach your phones or IVR menu by dialing a number purchased from your trunking or wholesale provider. FreePBX allows you to assign this DID to reach a specific phone extension or an IVR (Interactive Voice Response) menu.
Configuring a DID
A few steps must be completed to setup a DID inside FreePBX. We will start with configuration for a regular phone extension.
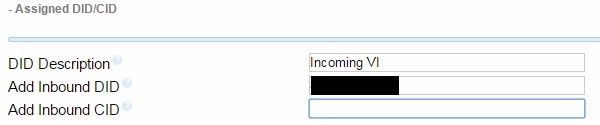
Figure 15: Configure a DID
To configure a DID to go straight to a phone extension, navigate to the extension desired and scroll to the Assigned DID/CID section. Create a name for the DID to be used (this will make an Inbound Route, found under the Connectivity tab) and input the phone number provided by your SIP Trunking service, as highlighted in figure 15. Optionally, you can create a CID to be used as the call is passed between internal routes although this is not a best practice.
Configuring SIP Trunks for Incoming Calls
Depending on your service provider, this section can vary quite substantially. Since we are using VoIP Innovations in this guide, these settings apply specifically to this provider. This wholesale provider uses a few different IPs for termination and origination (i.e. calling out and inbound calls, respectively.) To accommodate the authentication process for incoming calls, a NEW trunk must be created to function correctly. To do this you will follow the steps that were performed earlier when setting up a trunk for outgoing calls. In other words, under the Connectivity tab, select Trunks from the dropdown menu. Here you will select the Add SIP Trunk to configure settings for your trunk connection to VoIP Innovations for incoming calls.
VoIP Innovations uses a unique server for incoming calls so configuring a new trunk to name the host found in the PEER Details area is necessary. Input the same items as seen below in figure 16, and in the blacked out sections type your DID. Note that adding items from the Incoming Settings area to other VoIP Innovations trunks will not hurt.
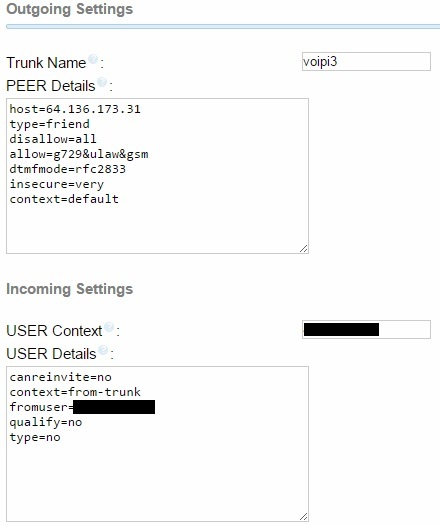
Figure 16: Add SIP Trunk for Incoming Calls
After applying these settings to your system, a caller dialing your DID will reach the extension where the number was assigned. Since most will want this number to direct to an IVR menu (i.e. an auto-attendant), the next section will cover the basics for configuring this number to an IVR system.
Applying a DID to an IVR
Under the Admin menu is a sub-item called System Recordings. This is where custom recordings are uploaded to supplement default recordings. You can add a recording, as shown in figure 17.
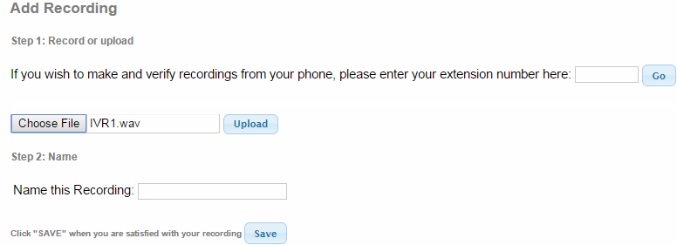
Figure 17: Add an IVR Recording
The FreePBX system only accepts certain recording formats. Your recording should be .WAV format at 16-bits at 8000 Hz to play properly. If you do not have access to a conversion program, free tools are available on the Internet for this function. Choose an appropriate file then select upload and the page will refresh. Give the file a name and click Save to store the recording on your FreePBX system.
You are now ready to add the IVR. To add an IVR, first go to the Applications tab and select IVR. Make a name for this IVR and add a description if desired. Configure the following items, as shown in figure 18:
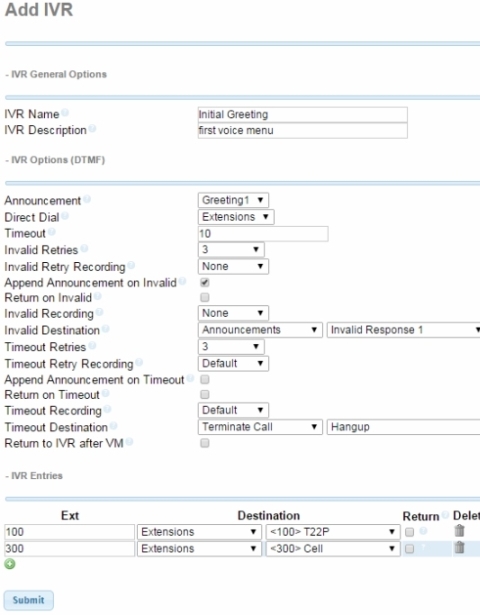
Figure 18: Create an IVR
- Announcement � This recording is selected to play when the call hits this menu.
- Direct Dial � If you would like a caller to manually direct to another place in the system, select an item such as Extensions from the drop down menu (as seen above in figure 18) and a caller will be directed to extension dialed.
- Timeout � The length in seconds until the menu reaches timeout status.
- Invalid Retries � How many chances a user has to select a correct item.
- Invalid Retry Recording � A system recording may be selected from this menu. In this case, None is selected for the sake of using an Announcement which is explained after this section.
- Append Announcement on Invalid � Checking the box for this particular instance allows Greeting 1 to play again in this particular setup.
- Return on Invalid � By checking this box, an invalid entry will return the user to the previous IVR used in the system. Never check this box unless another IVR immediately precedes the one configured.
- Invalid Recording � When a user inputs an invalid entry, a recording may be selected. However, this setup uses an Announcement instead.
- Invalid Destination � Figure 19 shows the configuration screen for an Announcement which is found under the Applications tab. On an invalid destination, the system directs here then returns to the same IVR used in this example. Note: If following this guide from start to finish, select another destination in the meantime and configure this later as you will not yet have an Announcement to choose. Leaving the IVR configuration page will delete any changes so pick anything else (e.g. an extension) for now.
- Timeout Retries � How many times a caller may let the menu reach timeout.
- Timeout Retry Recording � A recording may be played to inform the user timeout has been reached.
- Append Announcement on Timeout � Replays the selected Announcement should the caller timeout.
- Return on Timeout � Sends the user to the last IVR menu at timeout if selected. Only select should a caller reach an IVR item just prior to the one being configured.
- Timeout Recording � When the caller runs out of retries, the selected recording will play.
- Timeout Destination � This is where the call is sent at timeout. In this case, the call is disconnected.
- Return to IVR after VM � If the destination above ends in a voicemail, selecting this box returns the caller to this menu.
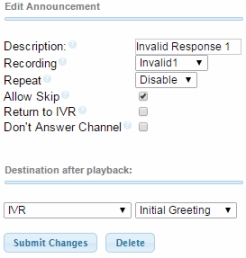
Figure 19: Announcement Configuration
The IVR Entries is where items are entered to guide the user. Essentially, any number may be selected as an option. When the user presses a combination of buttons defined in the first field, it directs to the following sections. In the example above, the combination "100" goes to extension "100" and "300" arrives at extension 300. These fields may be configured to navigate to almost any existing item created under the Applications tab. That's about it for the IVR, give it a try.
Note: Make sure to select the appropriate destination for inbound calls when completed from the Inbound Routes item under the Connectivity tab.
Additional Softphone Option
For additional phone options, consider using ZoiPer as a softphone for your mobile devices as well as Windows and Mac workstations. Simply create an extension and match the settings in the application to those of the extension. An example of the account settings for the Windows ZoiPer softphone is shown below in figure 20.
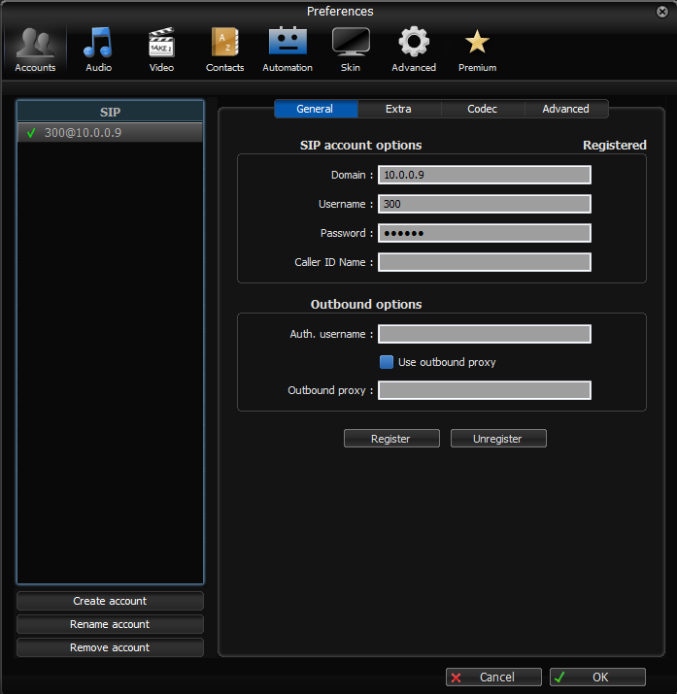
Figure 20: ZoiPer Windows Softphone
Final Thoughts
For a low price and a little time, you can create a very powerful communication system with FreePBX. The system truly harnesses the full power of Asterisk in every way imaginable - in fact, we merely scratched the surface in this guide!
Keep in mind, some devices can be picky when it comes to registering the device to the system and other problems can arise because of network settings at your location. Isolating issues by ruling out one setting or another is the best way to go about troubleshooting. There are also lots of resources online that can be found using your favorite search engine. Just make sure to back up a working system before updating modules or any major configuration changes so you can revert back if you have issues.
If you have any questions, feel free to send them my way using the comments form at the bottom of this page.