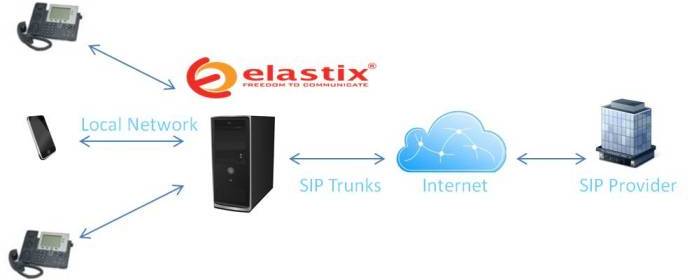
A successful business is often one that can adapt to changing conditions and take advantage of new technologies that enhance productivity. One such technology is VoIP and businesses can download open-source software such as the Elastix PBX, install it on a standard PC and be running their entire phone system in just a few hours.
In this guide I will show you how straightforward it is to setup an Elastix PBX to handle all of your phone calls. I will be covering the installation and configuration of the PBX software and highlight the steps needed to setup phone extensions and make calls to the outside world. We will also demonstrate how to set up basic XMPP messaging.
What is Elastix?
PaloSanto Solutions is responsible for one of the most recognized and well supported communication systems in the market today. Backed by a team of engineers and training curriculum, this system has become the choice solution for many companies the world over. In fact, over 3,000,000 Elastix downloads have been made and over 50,000 registered servers highlight the popularity of the Elastix PBX software. It also helps that the Elastix PBX software is open source and therefore free to use.
The company offers hardware specifically designed to support the platform and give a little color to your server cabinet with a very recognizable orange case design. The hardware is geared mostly toward the mid-size business and larger as they offer specific components for features such as redundant power supplies, hot swappable drives and multiple telephony connections, among others.
Of course, the hardware is not entirely necessary as I will be using a fairly basic computer for this guide to demonstrate how to properly setup an Elastix system. There are so many Elastix features that it will be impossible to cover much beyond the core features of the software. However, by following the instructions in this guide, you can quickly produce a functioning phone system for your business.
Elastix Setup Preparation
Like many other systems, it is best to dedicate one machine for this project, unless you are comfortable adjusting partitions so that you have access to an adequate amount of free space. It should also connect to the same LAN that the phones will connect to.
A smaller business can make use of a low powered machine (by today's standards) for this PBX software, allowing several concurrent calls. For example, a machine with 2GB of RAM and a dual core processor with at least 1.5 GHz per core can easily support a system of 50 active extensions and 10 concurrent calls. Truthfully, this setup would support much higher volume calling but it never hurts to have extra processing power available.
It is also wise to either reserve IP addresses in DHCP or assign static addresses in your router for devices such as phones and the server itself. This should ensure that the devices do not suddenly stop working because of a communication error with the network.
Port forwarding may be necessary to allow the SIP trunks to function, for receiving and making phone calls to the outside world. By default, this is port 5060 (sometimes other ports are used as well) so make sure to forward UDP traffic on this port in your gateway or router, to the IP address of the machine used for the Elastix server. Doing this should ensure that your Elastix setup goes smoothly.
Install Elastix
The first step for the Elastix install is to acquire the files. You can easily find various distributions on the Elastix download section of their website. Ultimately, you will be directed to SourceForge to download the installation file.
Currently, 4 versions are featured on the website for download. For this experiment, I will be using the 64 bit version of Elastix 2.5. Originally, I attempted to use the 3.0 beta version but there were some issues encountered during installation. In any case, it is best to select non-beta software simply for the fact that stable versions are less buggy.

Figure 1: Install Elastix
After burning the image to a disk and booting into the system, you will encounter a screen similar to that seen in figure 1. Simply press Enter to continue the installation in graphic mode. Note that different versions may have varied graphics or the order to the steps may have slight variations.
The following steps should be performed to install the system to your machine:
- Configure TCP/IP - The easiest thing to do for now is select "DHCP" for IPv4 and "Automatic" for IPv6. I will look at how to change these later to improve performance.
- Language Select - Pick the language you speak or intend to use with Elastix.
- Keyboard Layout - This should ideally match the language selected.
- Partitioning Type - Here you should select the disk or RAID array you will use for the installation. If you have multiple disks, be sure to select the fastest drive (e.g. an SSD over a traditional platter drive.)
- Partitioning - Choose or edit the available partitions on the drive. You can see in figure 2 below that I have an existing Linux install based on the "sda1" option. The best bet is to delete all partitions and use all available space. The next sub steps will want you to choose a format so select "ext3" for the file system when given the option and type "/" to define your mounting point.
- Configure Network Interface - Select "yes".
- Network Configuration for eth0 - The system should choose the name "eth0" for the network port on your system. If you have more than one, they will be numbered sequentially. Make sure to select all options on the next subpage if the system did not automatically do so.
- IPv4 Configuration for eth0 - If you already know the addresses to be used for your static network input these values now. If not, leave it at DHCP and change these setting later.
- IPv6 Configuration for eth0 - It probably is not necessary for you to use IPv6 since it is very likely that your network is using IPv4 addressing. You may leave the "Automatic neighbor discovery" selected then move to the next step.
- Hostname Configuration - Since I am using DHCP for the moment, leave the automatic setting checked unless you want to configure a name manually.
- Timezone Selection - Pick the closest city to your time zone.
- Root Password - This will be the password to login to the operating system for the user "root". It will be very unlikely that this is ever needed but nonetheless, make sure not to lose this information. Avoid logging into the system just to "look around" unless you know what you are doing.
- MySQL Password - Elastix relies on MySQL as a database for Asterisk (yes it is based on Asterisk). Pick a password and make sure to save it somewhere.
- Web Admin Login - This password is used to log into the web management console where the system is configured. Create a secure password for your administrator.
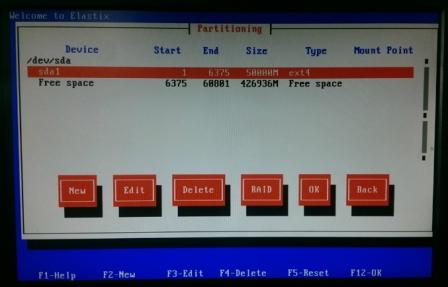
Figure 2: Partition the Selected Drive
After these steps are completed, the system will begin to install the software to your machine. When completed, the machine will reboot. Make sure you can boot to your disk and allow the system to fully load before attempting to make configuration changes in the web management console.
Configuring the Elastix System
Find another computer on the LAN where the Elastix system is installed and type the IP address of the machine into the URL bar of your choice browser. This takes you to a login screen that requires you to enter the web admin credentials configured earlier.
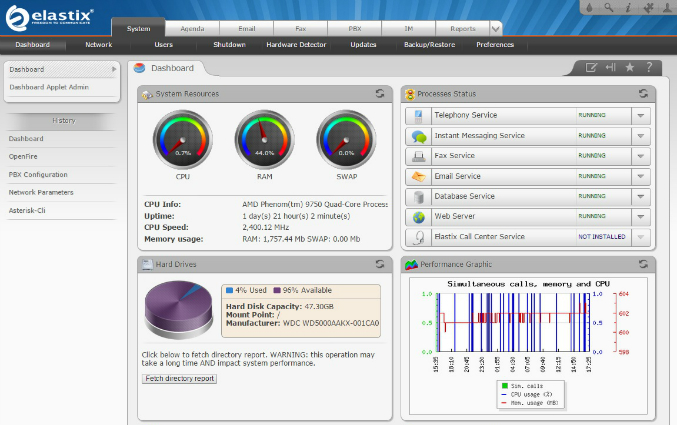
Figure 3: Elastix Dashboard
The landing page you will see immediately after each login is the Elastix Dashboard (figure 3) � a customizable area that provides quick overviews of system information depending on the applets selected. These applets can be rearranged and also you can add or drop by selecting the Dashboard Applet Admin from the menu on the left side of the screen.
The first item to configure is the network settings found in the Network sub tab under the System menu. I am going to disable the DHCP server I previously activated during installation. On the left side of the screen, click the DHCP server menu item and select the button that reads Disable DHCP after the page loads. Click the Save/Update button after disabling DHCP then go back to the Network Parameters page.
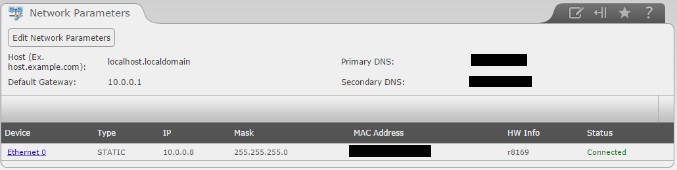
Figure 4: Network Parameters
Most of the information seen above in figure 4 should auto-populate because of the steps taken during the initial setup. Under Host it should read "localhost" unless a name was manually configured with a FQDN. The Default Gateway should reflect the address of your router and both DNS values should be those used by your Internet Service Provider (ISP). If these values are blank, run "ipconfig /all" in the Command Prompt on a Windows system or "ifconfig �a" in Terminal on a UNIX like system such as a Mac to find the missing information (some systems, like Linux, may require you to run "cat /etc/resolv.conf").
Next, I will select our network interface � you can see above that in my setup this is Ethernet 0. Select this link, change the system to Static and ensure that the proper IP address and network mask are in their respective fields. Now would be the time to log into your router or gateway and reserve this address in DHCP or switch everything to static.
Extension Settings
Arguably, the most important part of the system is the extension configuration module. These are assigned to various devices from IP phones to softphones. To configure your extensions, select PBX from the top menu and Extensions from the menu on the left.
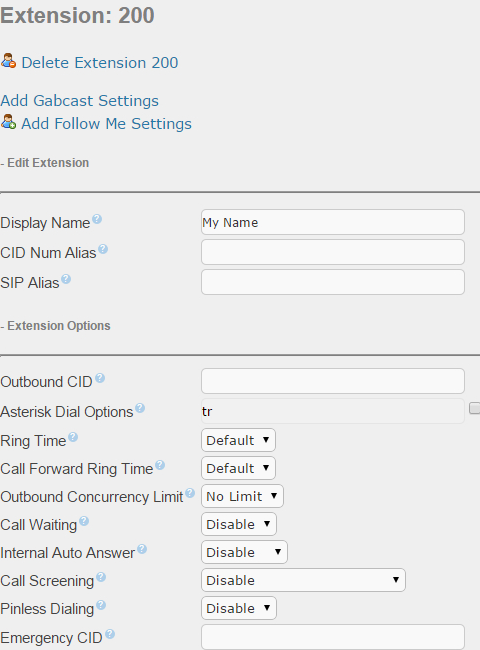
Figure 5: Configure Extension
From the drop down menu, select "Generic SIP Device" and then click on the Submit button to continue. You will notice that there are several settings however, most I will leave untouched. I will not cover every option � if curious, hover your mouse pointer over the question mark next to each item for a brief description.
As seen in figure 5, pick a display name for this extension. If the CID Num Alias, SIP Alias or Outbound CID are important to you, feel free to input values for these fields, otherwise leave them blank.
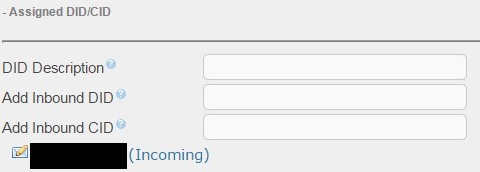
Figure 6: Add a DID
The Direct Inward Dial (DID) is a number assigned to you by your SIP trunking provider (or wholesale provider) to allow for incoming calls to your phone system and I will be using VoIP Innovations for this tutorial. A detailed explanation for setting up an account with VoIP Innovations can be found under the "Connecting to the Outside World" section in our FreePBX Setup Tutorial article.
If you have not setup a SIP trunk/wholesale account just yet, you may need to skip the section seen in figure 6 above until later. When you have a DID from a provider, this is how you will map it to an extension. This will also automatically create an inbound route for
your DID.
NOTE: Inbound routes can be easily modified at a later time to point to other destinations such as a group or
an Interactive Voice Response (IVR). Configuration of an IVR is self-explanatory � simply record a menu and upload a WAVE file of the recording under the System Recording module then setup the actual menu in the IVR module.
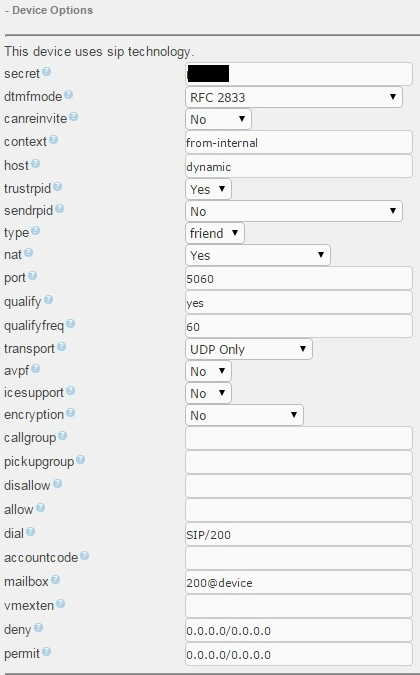
Figure 7: More Extension Settings
Most of the items you see in figure 7 should remain at default. Change the secret to something a little easier to input but still secure (Elastix creates one automatically but it is very lengthy). The rest of the settings should remain at the Elastix default � check to make sure dtmfmode is set to RFC2833 as this is the standard used by most devices.
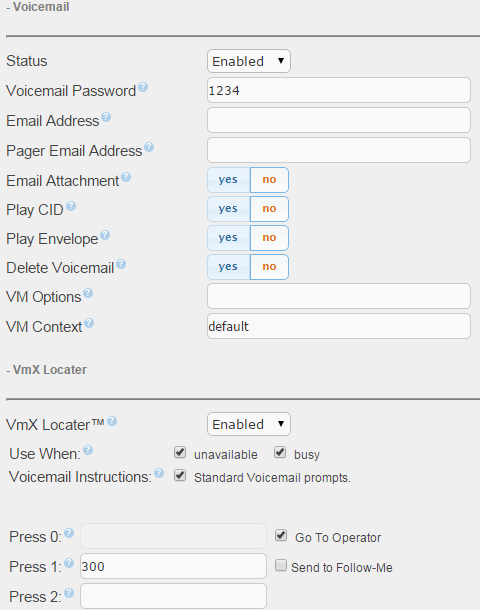
Figure 8: Configure Voicemail and VmX Locater
Enable your voicemail and choose a numerical password to access your messages as in figure 8 above. You will access your voicemails by dialing *98 from any phone and then typing in your extension number. The Voicemail Password should be longer and more complex than the example above to prevent unwanted parties from accessing your mailbox.
The VmX Locater is a feature that provides call routing options. The user can input one of the numbers above to send the call to a different destination based on the definitions shown in Figure 8.
After completing the setup of the extension, click the Submit button at the bottom of the page and then click on the red box that appears at the top of the page that you are directed to, that says Apply Config, to lock changes. Take this time to configure as many additional extensions as needed. Next, return to the extension and optionally, click the new link near the top of the page to configure Follow Me settings.
The Follow Me feature is very useful if you are in and out of the office a lot, as it will ring additional phones defined in the Follow-Me List, based on the time set in the Initial Ring Time. Towards the bottom of the page, you can also specify a location to route the call if the call goes unanswered. Change these settings to meet your needs and be sure to save the settings. An example is shown in figure 9 below.
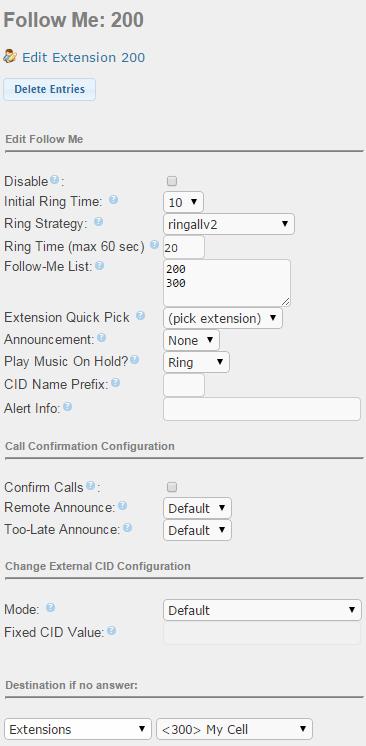
Figure 9: Follow Me Setup
Trunk Settings
Your devices should now all be able to communicate with each other on the LAN. In the next step, I will connect our trunking provider (in this case VoIP Innovations for origination and termination) though feel free to select any provider you like. Keep in mind, the settings will likely be vastly different for another provider. Sometimes it is necessary to contact support for the trunk provider, in order to gather the credentials you need in order to connect to the outside world.
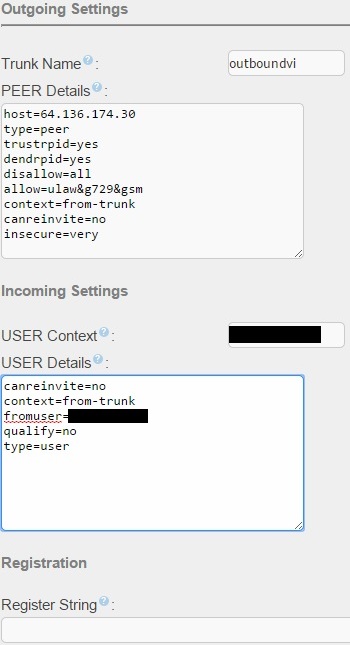
Figure 10: Configure the SIP Trunk in Elastix
Under the PBX tab, go to the Trunks page on the left. Select Add SIP Trunk and start by giving the trunk a name. You can set a number for the Outbound Caller ID or leave it blank depending on how your extensions and outbound routes are configured. Do not worry about adding dial patterns here as this will be configured in the final step. Copy the same settings as seen in figure 10 above if you need to connect to VoIP Innovations � the blacked out areas should match your DID.
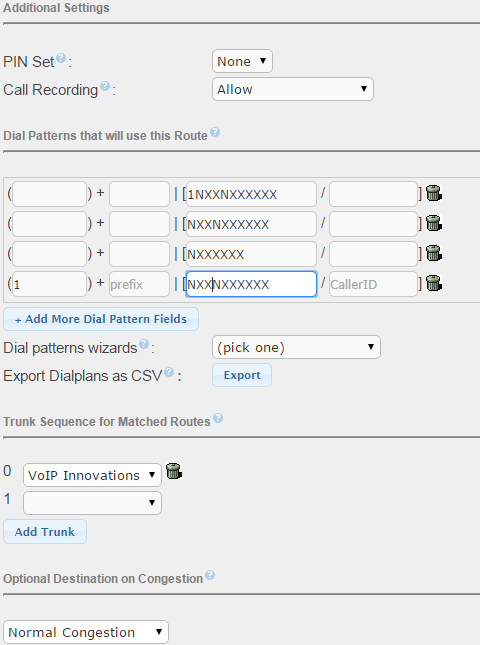
Figure 11: Outbound Routes
Finally, go to Outbound Routes, found on the left side of the PBX area and proceed to setup a new route. Give this route a name and define your caller ID, if required. Make sure to configure dial patterns as seen in figure 11. Pick the SIP account you configured earlier under the trunk sequence area and hit save.


Configure Phones
In this setup, I only used one IP phone. Each phone will be slightly different but the premise is the same. Refer to the review for the Yealink T22P as it includes guidelines to setting up the device with a PBX. Essentially, most phones just need to know the IP of the PBX server and a few other network settings. Authentication is made by providing credentials for a configured extension, that includes the number (extension) and a password.
I configured the rest of my extensions to work with a softphone known as ZoiPer available for iOS, Android, Windows, Linux and Mac. This is one way to effectively utilize the Follow Me feature found in Elastix. By configuring additional devices such as mobile devices or tablets, you can easily reach others when they are out of the office and not tethered to a desk.
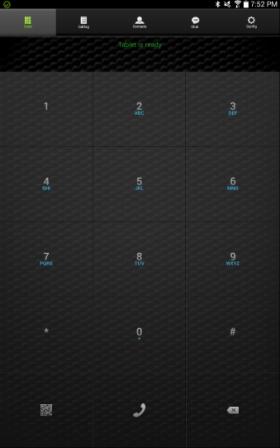
Figure 12: ZoiPer
ZoiPer is incredibly simple to setup with most systems. You add an account under the Config menu, give it a name, plugin an extension and password and the device should register with your PBX as long as you are on the LAN. To connect when on another network or using mobile data, input the public address of your network into the Outbound proxy setting to always stay connected. If you have issues, it is most likely a port forwarding issue inside your router.
OpenFire Plugin for XMPP Messaging and Presence
From a technical standpoint, OpenFire serves as an XMPP (aka Jabber) server. Casually, this means it provides the capability to process text-based data for instant messaging services and presence detection (plus some other valuable features) alongside the VoIP services accommodated by an Asterisk based PBX.
The system is developed under the GNU license and has been adapted to fit a handful of systems built under the same model, for example Elastix. This means development is at the mercy of the user community � though a double-edged sword in some respect, the benefits are quite substantial in this particular scenario.
The software is produced as an open source platform and is free to use as is all (well, most) supporting software. The community is quite large meaning that bugs are quickly rectified and documentation is readily available for most applications. The only problem lies in the fact that many tutorials that are written assume the implementer has experience with these systems; as such, we will go through the entire process by filling in the blanks that most others miss.
Installing Openfire
Sure, guides are available for installing the application but a presumption of technical experience with these systems is implied. We are going to assume this is a complex casserole and your experience is limited to the microwave.
The first step is to create a database manually. Worry not as this is not as bad as it sounds.
You can do this one of two ways. One such way is to log into Elastix with the credentials you created during the installation, as documented in our Elastix guide. Another way to accomplish this task is to use a terminal client like PuTTy (Figure 13) to access the software directly.
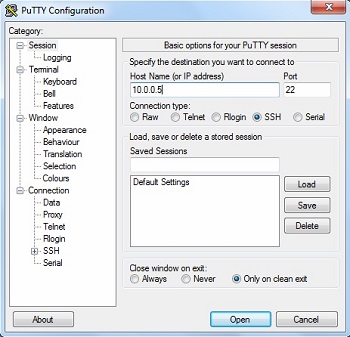
Figure 13: PuTTy
Elastix is accessible using Secure Shell (SSH), a secure protocol for accessing a shell session meaning you can access the command line for the Elastix software. Type the IP address of the Elastix machine, as seen in Figure 13 above, when connected to the network where the machine resides and click the Open button.
[root@localhost ~]# mysql -u root �p
The command seen above (following the '#') allows you to login to MySQL with the username root. The password created during the Elastix install must be entered at the next prompt.
After a successful login, you will simply see the mysql>. Enter the command create database openfire; including the semi-colon, and the line beginning with Query will appear followed by another mysql> prompt in the next line. This means you are done with the database creation. Not so bad, right?
After completing this step, login to the Elastix console with your web browser of choice. On the top most menu bar, click the tab that reads IM. A message should a appear that states the OpenFire service is not active so click the blue link to begin configuring the application and a screen similar to the one in Figure 14 will appear.
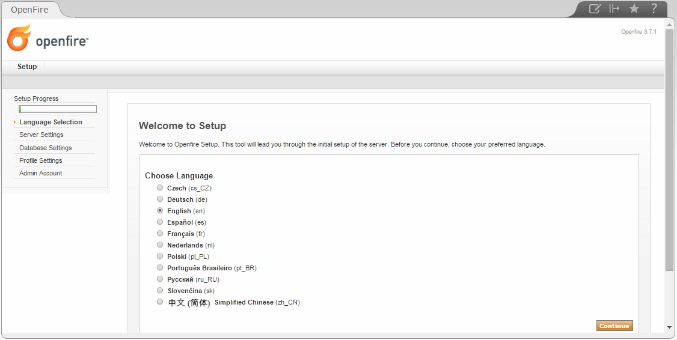
Figure 14: Select a Language during OpenFire Install
The next steps should be completed as follows:
- Choose a Language � A language you speak fluently will be easiest.
- Server Settings � If you used the default settings during the install � meaning you did not add a domain � your system name should appear as localhost.localdomain. If you used a domain, it should read localhost.yourdomain where yourdomain matches the name of your company domain.
- Database Settings � Here is where the command line step above for the MySQL database comes into play. Pick Standard Database Connection and continue to the next step.
- Database Settings � Standard Connection � Notice the line that reads 'Database URL' in Figure 15. Where it says localhost, this replaces what will initially read [host-name] or you will use the unique name of your system if one was provided during installation. The part reading openfire will replace [database-name] unless you used a different name for the database during the prior steps.
- Profile Settings � For the sake of this tutorial, select the Default. Alternatively, if you are confident enough to integrate Active Directory, pick the Directory Server (LDAP) setting and plugin the hostname for your domain controller (i.e. the server where active directory resides.)
- Administrator Account � Input an email from the FQDN you have used during the process or a dummy account if nothing is configured. Either way, the user name will be admin and the password will be the string provided during this step.
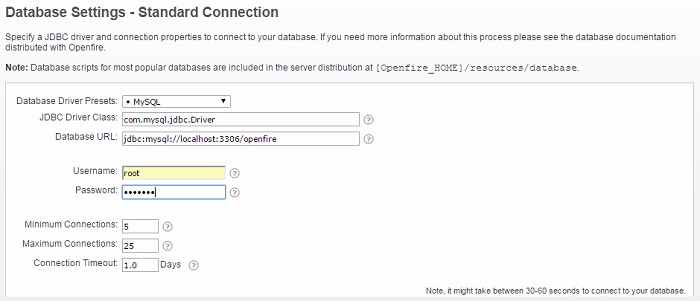
Figure 15: OpenFire Database Settings for a Standard Connection
At this point, you have completed configuration of the server. If you used Active Directory, the users in your system should populate and you will be able to assign each an account. If not, you will need to make user profiles for everyone manually under the Users/Groups tab by using the option in the sidebar that reads Create New User.
Using Openfire
In order to use OpenFire, you need to install Spark so you can take advantage of the UC features, such as instant messaging and presence. Download the file and install the application, preferably to a default location. The Spark splash screen can be seen in Figure 16.
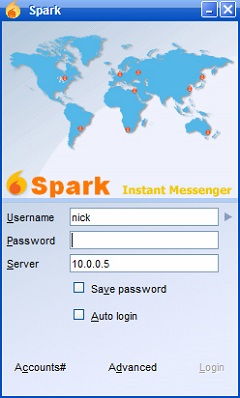
Figure 16: Spark Client
This is pretty straightforward - login by using a name and password combination created in the console for a user of choice. Other people on the system may be found after logging in by clicking the Contacts tab at the top of the window and Add Contact. Type the requested user name into the User Name field then hit the Add button. After a request is sent, a pending mark will appear next to the user name until the request has been accepted on the other user�s end.
By selecting the arrow next to your user name, the presence of your account is modifiable � notice my presence is set to Online indicating I am available for conversation. Other user names appear under your account name allowing a conversation to be initiated or continued from a previous session as seen in Figure 17.
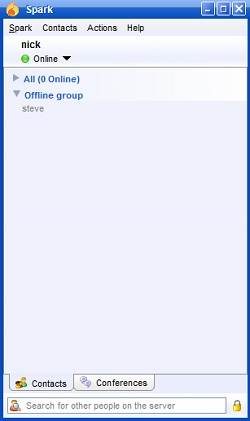
Figure 17: Logged Into Spark
After clicking on the name of the user, whether active or inactive, several options appear. The text box allows you to send a text based message. Other options can be selected from icons at the top of the window including a multi-user conference, file transfer, capturing a screenshot, reviewing conversation history and establishing an encrypted connection.
Final Thoughts
Any business willing to give a custom PBX solution a try should strongly consider Elastix. I only covered the most basic settings in this guide but a whole realm of telephony and Unified Communications can be configured with this system. In addition we showed how the open source XMPP server plugin known as OpenFire can be used to send text messages to other users or cell phones.
The Elastix setup was very straightforward and really there were no gotchas along the way. With just a little technical knowledge, and a few hours of time, you could save your business a small fortune on your monthly phone bills, and with very little ongoing overhead.
If you have any questions, feel free to send them our way using the comments form at the bottom of this page.