- Online VoIP Comparisons since 2005
- 26.5+ Million page views: Testimonials
The Yealink CP920 conference phone is aimed at the small to medium conference room size with up to 8 to 10 people. At about a third of the price of the impressive CP960, it is an affordable option for smaller businesses, while still benefiting from the stylish design and features like HD audio, Yealink Noise Proof Technology, and built-in WiFi and Bluetooth.
| Phone | Our Rating | Write a Review |
|
CP920 |
|
|
Use the tabs below to navigate to various information options.
The Yealink CP920 IP Conference phone is an affordable and feature rich option for any small to medium sized business. Keep reading to see what our thoughts were, as well as setup information.
| OVERALL RATING | |||
| Performance | Installation | ||
| Voice Quality | Durability | ||
| Features | Ease of Use |
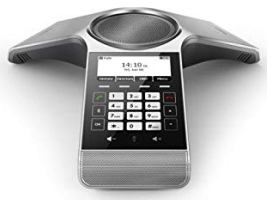
The design of the CP920 is similar to that of the CP960, with a Y-shaped design (signifying the "Y" from Yealink) that is very stylish and probably, in our opinion, the best looking conference phone on the planet today. The metallic silver finish combined with the speaker grills and round speaker in the middle, plus the touch-key pad provide a modern and sleek look.
This model is aimed at the small to medium sized conference rooms and has a built-in 3-way microphone array covering a 20 foot 360 degree voice pick up range. Their Noise Proof Technology (noise reduction) has been integrated and provides two important functions. Firstly, it reduces any constant background noises such as keyboard typing, humming power supplies, air conditioning etc. Secondly, it automatically mutes the microphones while no one is talking in the conference room, and then unmutes when a human voice is detected again.
The full duplex speakerphone system (56mm diameter and 5 Watts), with Acoustic Echo Cancellation and HD audio, provides a clear and crisp sound. The 5 Watt speaker provides enough loudness for smaller rooms but may struggle in larger, more open rooms.
The phone is based on the Linux operating system and features a 3.1 inch 248x120 pixel, monochromatic graphical LCD with backlight.
The touch-sensitive keypad includes 25 keys. There are 4 soft-keys underneath the display and a standard number pad with 0 to 9 plus * and # keys. Below the number pad is a volume up and a volume down key, and one for microphone mute. To the left of the number pad are three keys, one for Bluetooth, an OK key and an on-hook key. A quick note, having a specific key on the keypad to enable and disable Bluetooth is a nice convenience, so no need to go through the menus to find it. To the right are up and down navigation keys, and an off-hook key. There are also two additional mute buttons, one on each branch of the Y shape. One note is that the default setting includes a beeping sound everytime you touch a button. This can be easily disabled under the Basic Settings menu (Menu -> Settings -> Basic Settings -> Sound -> Touch Tone), in case this becomes annoying.
The phone includes built-in Wi-Fi (2.4GHz, 802.11.b/g/n) and Bluetooth (4.0), as well as 1 USB device port (2.0) and a security slot for making sure it does not go walkabout! The WiFi option allows for wireless connection to your network (great if you do not have a local Ethernet port in your conference room).
The CP920 includes one VoIP account plus many standard phone features like call hold, mute, call forward, call transfer and do not disturb. It can handle up to a 5-way conference call (so five different parties at five different locations at any one time on the same call). Other features included such as intercom, paging, anonymous call rejection and distinctive ringtone. A local phonebook directory is included, capable of up to 1000 entries, as well as call history information. Call recording is another feature available in combination with an external USB storage drive connected to the USB port.
The conference phone is Power over Ethernet (PoE) capable. However, one thing we really liked about this model is that it comes with a power supply, great for those that do not have PoE setups (often the case in small business setups).
The built-in Bluetooth allows you to pair your Smartphone or PC/laptop/tablet, turning the CP920 into a speakerphone and microphone for use with an existing call or conference you may have already started or joined on your local smart device.
If you still use analog landlines while you migrate to VoIP technology you can still use the CP920 with an add-on Yealink PSTN box, the CPN10. Or even if you decide to keep both technologies for your business. We did not test it during this review.
There is not much in the way of bad things to say about this conference phone. The power supply cable could be longer perhaps as many conference rooms have power outlets located around the walls. If you are placing the device on the middle of a conference table then it needs to be able to reach an outlet without creating a hurdle and causing a trip hazard!
There is no built-in Ethernet switch like in all their desk phone models, although this seems typical for conference room phones. This always seems odd to us as often people will use a PC in a conference room, sometimes just to drive a projector for meeting presentations etc.
In comparison with other conference phones the CP920 provides good value but it is still in the region of $350.
The CP920 is an affordable and stylish looking conference room phone. Aimed at the small to medium sized room it provides a 3-way microphone array with 20 feet, 360 degree coverage. Yealink's Noise Proof Technology helps to reduce background noises for other participants on the conference call and the 5W speaker provides clear audio. The touch-senstive keypad helps to also keep external background noise to a minimum and adds to the ease of use. Some bonus features for a conference phone in this price range include WiFi capability, Bluetooth 4.0 capability and an included power supply. All in all this is a great entry level option but with features that typically come with more expensive solutions. This is a formidable replacement for the CP860.
The below list details what comes in the box and Figure 1 and 2 provide pictures.
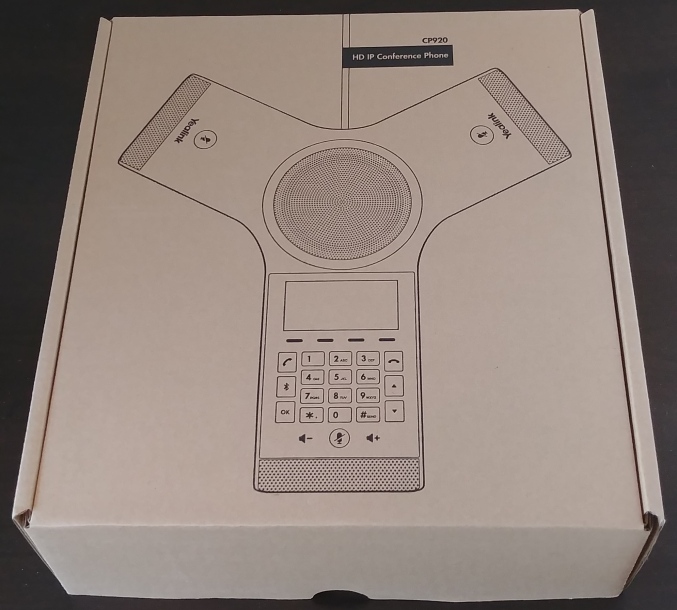
Figure 1: The Box
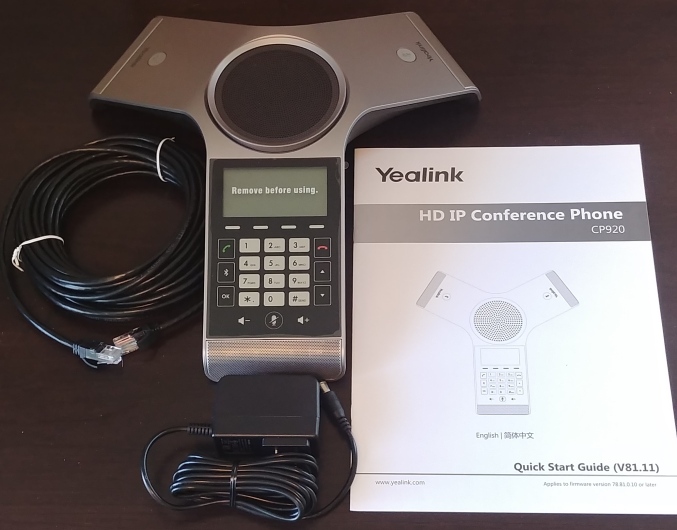
Figure 2: What Comes In The Box
There are several options for setting up the CP920 to work with your phone system. If you are buying the device directly from your VoIP service provider then it will most likely be delivered to you pre-programmed to work on their system. If you are buying the device yourself but your provider supports the Yealink RPS (Redirect to Provisioning Server) service then they can program your CP920 remotely following power up. Quick Tip: If you buy a used device you should always make sure it is factory reset. Touch the "OK" key for 10 seconds and it will give you the option to factory reset.
If you need to set it up yourself then you can provision manually through the device itself, or set it up through the available web user interface. Both options are relatively straight forward and we will go through them below.
This is probably the most cumbersome way to provision your device. Using the web interface, detailed below, is a much easier method. Navigate to Advanced Settings by touching the "Menu" softkey, then using the down arrow key to select "Settings", then select "Advanced Settings". Enter the password (default: admin) to get into the advanced settings section.
Once you are in the advanced settings section you have two choices for provisioning the device. You can use the "Accounts" option to manually set up the extension credentials, or you can use the "Auto Provision" option to set up auto-provisioning of the device if your provider supports that or if your local system is set up for that option.
To manually set up an account touch on the "Enter" softkey for "Accounts" and then "Enter" again to create an account. Complete the following fields as appropriate for your setup.
Once you have entered all the information in the fields above touch on the "Save" softkey. The phone should now register with your PBX server. If the phone has registered successfully you will see a phone icon at the top left of the display. If it failed it will say "No Service".
You can use the "Auto Provision" option as an alternative to the above. Select this option under Advanced Settings and then complete the following fields as appropriate.
After entering the appropriate information press the "Save" softkey. As above, if successful the phone will show as registered with a small phone icon in the top left of the display. If unsuccessful then it will show "No Service".
Using the web interface is generally an easier approach than going through the phone menus. All you need to get started is the phones IP address. Once the phone has been plugged in and powered up it will acquire an IP address from your network router. To find out what the IP address is simply press the "OK" button and it will be displayed. Enter this IP address into your favorite browser address bar to access the web interface.
You will be presented with the login page, as shown in Figure 3 below, which requires a username (default: admin) and a password (default:admin). Enter the username/password and then click on "Login" to access the menus. There are two options for programming the phone through the web interface just as there was through the phone itself, either by setting up the extension information for the phone or by setting auto provision parameters.

Figure 3: Web Interface Login Page
Enter the same information as detailed in the section above for provisioning from the device by navigating to Account -> Register, as shown in Figure 4 below. Enter the settings for "Account1" as required. Click on the "Confirm" button and the phone should successfully register if everything in the system is set correctly.
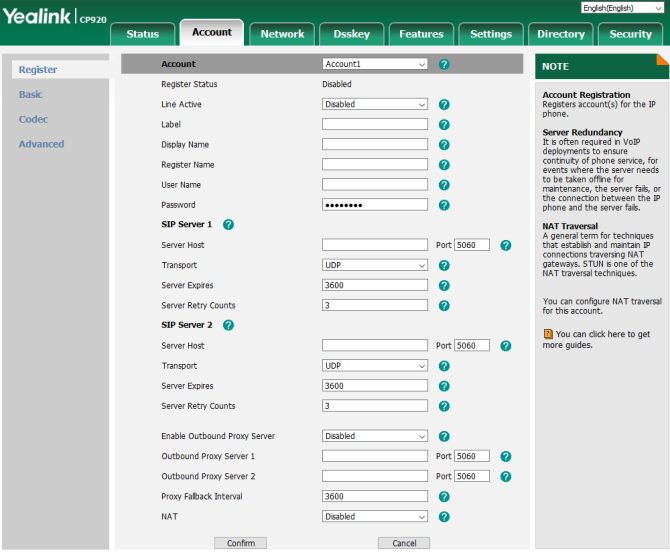
Figure 4: Web Interface Device Register Page
If you are going to enter auto-provisioning parameters instead then navigate to Settings -> Auto Provision, as shown in Figure 5 below. Enter the appropriate auto provisioning server URL, username, and password credentials supplied by your provider or IT person. Once entered click on the "Confirm" button and then the "Auto Provision" button to complete the setup. The device should reboot and successfully register as above.
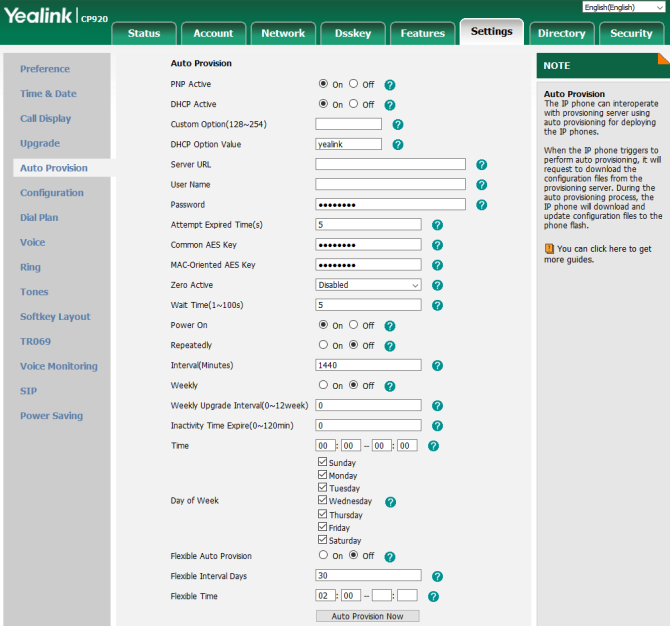
Figure 5: Web Interface Device Auto Provision Page
We hope this review and set up guide for the Yealik CP920 has been helpful for you. If you have any questions please contact us and we will be happy to answer as best we can.
Published by WhichVoIP
We're sorry, there are currently no user submitted reviews for Yealink CP920 matching your search criteria at this time. Please add your own review or check back later as reviews are being submitted often.
Disclaimer: The opinions, views and ratings expressed in these reviews are those solely of the reviewer who submitted the review. WhichVoIP does not necessarily agree with any of the expressed opinions, view or ratings.
© 2004-2026 WhichVoIP.com