- Online VoIP Comparisons since 2005
- 26.5+ Million page views: Testimonials
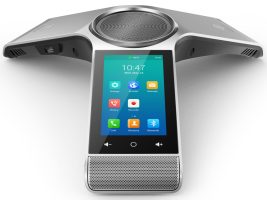
The Yealink CP960 conference phone is part of the next generation Yealink IP phones that utilize the Android operating system. The touchscreen LCD display, Harman co-engineered speaker system, wide range voice pickup and noise reduction technology, as well as an impressive metallic silver design style make this an outstanding choice for mid and large sized conference rooms anywhere in the world.
| Phone | Our Rating | Write a Review |
|
CP960 |
|
|
Use the tabs below to navigate to various information options.
The Yealink CP960 enterprise grade IP Conference phone is very impressive to say the least. Read on below to find out what we thought were the good and bad points, as well as setup information.
| OVERALL RATING | |||
| Performance | Installation | ||
| Voice Quality | Durability | ||
| Features | Ease of Use |
First off, we have to mention the style and look of this latest product from Yealink. We all agreed here that it just happens to be the best looking conference phone we have ever set eyes on. It's metallic silver finish, round central speaker, and Y-shape design with built in touchscreen LCD display really set this phone apart style wise.
This model is aimed at the medium and large sized conference rooms with its built-in 3-way microphone array covering a 20 foot 360 degree voice pick up range. There is an optional wireless expansion kit that includes two microphones, each with a 10 foot, 360 degree pick up range. Utilizing Yealink's DECT technology they can be placed up to 66 feet away from the phone. Their Noise Proof Technology (noise reduction) has been integrated to make annoying background noise on conference calls a thing of the past. It also automatically mutes the microphones until it detects attendees talking.
The full duplex speakerphone system (56mm diameter and 10 Watts) was co-engineered with Harman (well known audio specialist) using their acoustic technology to provide a clear and crisp sound. The phone is based on the Android 5.1 operating system and has a 5-inch high resolution 1280x720 touchscreen LCD display providing intuitive touch control. Volume (up/down) buttons and a Home touch button are available below the display. The phone includes Wi-Fi (802.11.b/g/n/ac) and Bluetooth (4.0) built-in, as well as 1 USB device port and an audio out port that allows connection to an external speaker for larger conference rooms. It is capabale of up to 100 hours of call recording locally and can also record to externally connected USB devices.
It includes 1 VoIP account plus many standard phone features like call hold, mute, call forward, call transfer and do not disturb. It can handle up to a 5-way conference call (so five different parties at five different locations at any one time on the same call). Their new Active Speaker feature indicates who is currently talking on the call, eliminating those unsure moments! The Yealink Pentagon Meeting Room feature provides an intuitive and easy way to create meetings, invite up to five (5) participants and allow parties to join. This is based on the conference phone's ability to have up to five separate callers on one call (5-way conference call).
Power over Ethernet (PoE) is required and a special Yealink adaptor is needed if you do not have that capability in your network. Make sure you order the adaptor if you need it (Yealink YLPOE30).
The built-in Bluetooth allows you to pair your Smartphone (or smart device) to the CP960. Once paired you can utilize the CP960 speaker/microphone for your Smartphone voice audio and/or media audio. You can also do this for your PC/laptop/tablet by using the USB micro-B port (for devices that do not have Bluetooth). This can be useful if you are using your smart device for an existing conference call (for example Skype for Business) and want to bring the meeting into the conference room with others to participate in the call.
There is really not much bad to find with this phone. One thing to be aware of is that it requires Power over Ethernet. So if you do not have that available in your network then you will need to buy an additional special adaptor (a PoE injector, the Yealink YLPOE30) that adds power to the Ethernet connection. The CP860 came with its own power supply included, which when you are paying this kind of money for a phone seems a no brainer. Without Power over Ethernet this becomes an expensive paper weight, albeit a very stylish one.
Most businesses use a Conferecing service provider so a typical scenario is simply calling into a provided conference bridge number by participants. This kind of makes a few of the more fancier features, like Active Speaker, a little redundant in these scenarios.
Android users may be use to using a back key that is typically located bottom left of the display. You might find yourself automatically looking for that when you enter an App, or setting screen, as it is top left more like a browser window.
One other item that seems a little odd to us was that WiFi is available for connectivity but you still need PoE for power. If you plan to use the WiFi connectivity remember to order the optional PoE injector for powering the phone.
Aimed at the medium to large conference room it has a 20 foot 360 degree voice pick up range plus an expansion kit available with two wireless microphones that can extend coverage up to 60 feet. Their Noise Proof Technology does a good job at filtering out background noise providing more focus on the participants voice. Utilizing Android 5.1 operating system seems like a smart move by Yealink and combined with the high resolution and vibrant touchscreen LCD provides intuitive fingertip control. The addition of Bluetooth 4.0 allows easy connection for Smartphone and similar devices. Overall, the CP960 is a very stylish looking enterprise grade conference phone packed with great functionality.
The below list details what comes in the box and Figure 1 and 2 provide pictures.
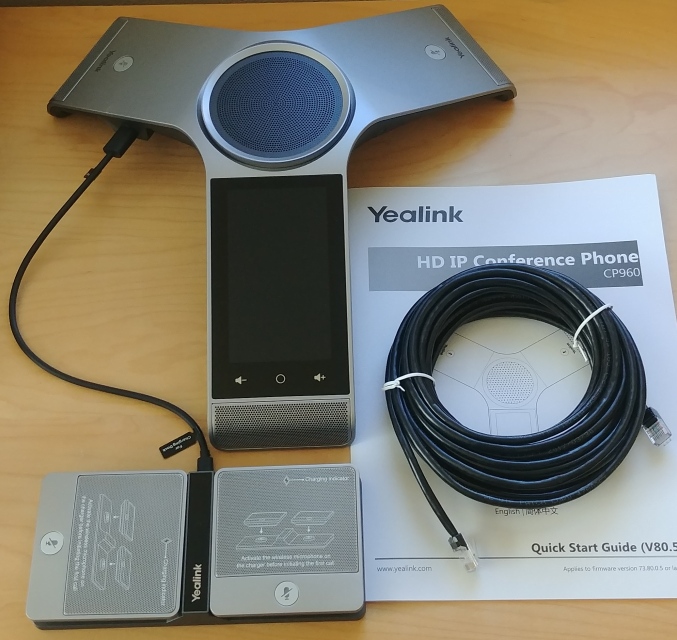
Figure 1: What You Get in the Box
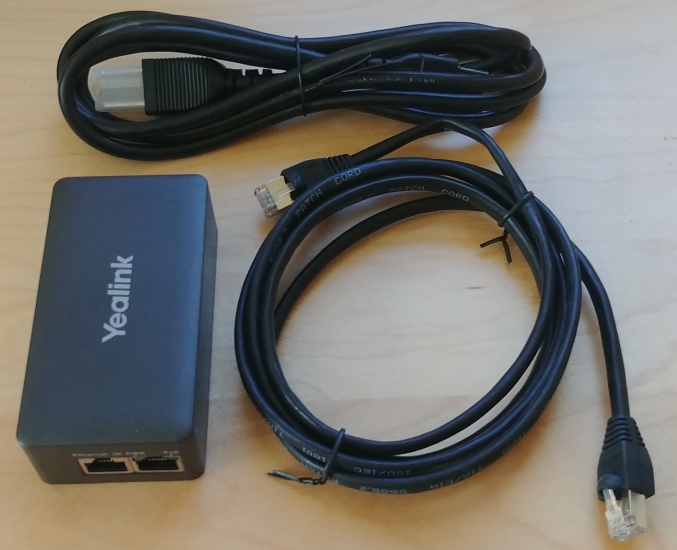
Figure 2: YLPOE30 PoE Injector
There are several options for setting up the CP960. The large touchscreen provides a very easy interface for either setting up an account or setting up auto-provision information directly on the phone. Alternatively you can access the phone through a web browser connected on the same LAN. Both options are straight forward and are described below.
You can easily set up an account using the touchscreen display. Each field brings up a keypad to use, just like texting on Smartphones. The interface is very intuitive if you have ever used a Smartphone. Touch on Settings, then scroll down to Advanced and enter the admin password (admin). From this menu touch on Accounts. The CP960 has only 1 VoIP account so click on the number 1 account (should say empty). Then complete the fields as described below.
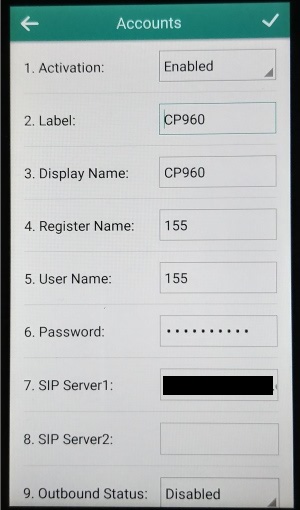
Figure 3: Account Information ScreenShot
Once you have entered all the information in the fields above touch on the check mark in the upper right corner of the display to save your settings. The phone should now register with your PBX server. You can use the back arrow in the upper left corner to navigate back to various menu levels or touch the Home (circle) touch button below the display to get back to the main display page. If the phone has registered successfully you will see a green phone icon at the top of the display.

Figure 4: Successfully Registered Phone
It is also easy to program the phone using the web user interface. The first thing is to find the phone's IP address by touching Settings and then General (under Status). Note down the IP address and enter into the address bar of your favorite browser on a computer device connected to the same network that the phone is. Enter the username (admin) and password (admin) into the login page displayed. Once logged into the phone click on the Accounts tab and then Register on the left side menu. Complete the fields as described above under the phone interface setup instructions. Click on the Confirm button when done and the phone should register successfully. If successful you will see a green phone icon at the top of the home screen (see Figure 4).
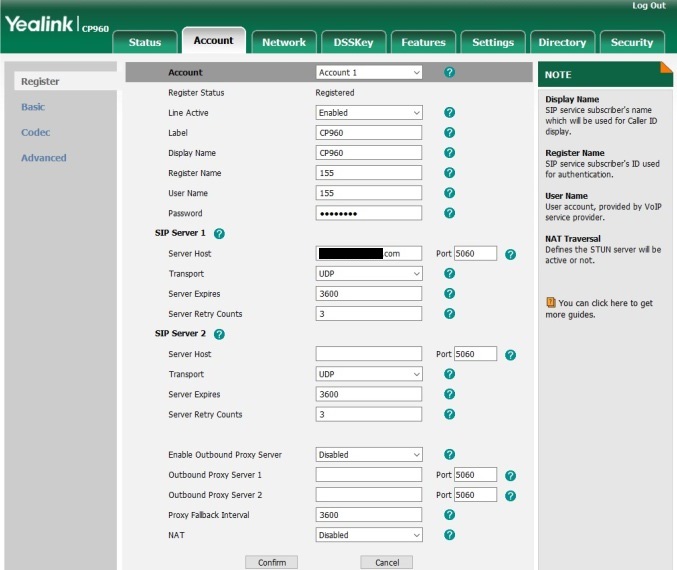
Figure 5: Web User Interface Set Up
Auto provisioning can be acheived in multiple ways. The phone may already be delivered provisioned to you by your service provider. In which case you simply need to plug it into your network, power up and away you go. If you are setting it up yourself it can be done directly through the phone interface or through the web user interface. Whichever method you use you will need the Server URL, Username, and Password from your service provider. Via the phone interface you can access the auto-provision set up through the Advanced menu. If using the web interface then click on the Settings tab and then Auto Provision from left hand side menu. Select Confirm and then Auto Provision Now. If successful you will see the green phone icon on the home screen as shown in Figure 4.
The CP960 is a very easy phone to set up and overall it should not take long if you have the required account informtion on hand.
Published: by WhichVoIP
We're sorry, there are currently no user submitted reviews for Yealink CP960 matching your search criteria at this time. Please add your own review or check back later as reviews are being submitted often.
Disclaimer: The opinions, views and ratings expressed in these reviews are those solely of the reviewer who submitted the review. WhichVoIP does not necessarily agree with any of the expressed opinions, view or ratings.
© 2004-2026 WhichVoIP.com