- Online VoIP Comparisons since 2005
- 26.5+ Million page views: Testimonials
The Polycom SoundPoint IP550 is a four line SIP phone capable of supporting up to 24 concurrent calls per line. Supporting a comprehensive feature set and HD quality audio, the IP550 packs a punch and at a reasonable price.
| Phone | Our Rating | Write a Review |
|
IP550 |
|
|
Use the tabs below to navigate to various information options.
Take me straight to the 3 User submitted reviews >>
For this WhichVoIP phone review we are focusing on the Polycom Soundpoint IP550 4-line phone. Below you will find our high level summary for this phone, followed by a list of pros and cons and then some deeper dive guides on installation and configuration.
| OVERALL RATING | |||
| Performance | Installation | ||
| Voice Quality | Durability | ||
| Features | Ease of Use |
The voice quality is excellent, which is typical of most Polycom phones. They spend a lot of R&D money on their acoustics and have patented technology to ensure high clarity audio on their IP phones. Note that I am referring to the audio quality using the handset rather than the speakerphone. Some users have complained about the quality of the speakerphone, which does seem pretty average to me.
The IP550 has a large display (320x160 pixels) which can be very useful even if it is non-touch and monochromatic. For example a large display means that longer labels can be utilized when multiple lines are configured. It also just makes it easier to read in general.
It contains a built-in Ethernet switch (two 10/100 ports) which may save the need for adding a discrete switch on your desk. It also supports Power over Ethernet (PoE), which reduces wiring mess if your switch supports PoE.
Numerous headsets have been tested with this phone (see info tab above for some useful downloads) and even if you have a headset that is not RJ-9, there are many adapters that can be used to make it work.
Up to 4 lines and 24 concurrent calls per line are supported on this device. By adding an expansion sidecar to support all of these calls (i.e. additional buttons for parking, transfer calls etc), this should suit the needs of most business front desks. It is also feature rich and supports Busy Lamp Field, presence, contact lists and text messaging. I like that it has 26 dedicated hard keys and 4 soft keys, as it makes things easier for the end user. Of course the slight downside is the size of the phone, as it is large and takes up a lot of room on a desk.
A web browser is all that is needed to access the phone portal and it is relatively intuitive. I like that all of the settings have help tips next to them (take note Cisco!) and they have really thought about troubleshooting. The diagnostic logs are displayed directly on the browser rather than having to export to view them, this can save a lot of time.
Firmware upgrades are also made easy with Polycom phones. All firmware versions can be viewed and downloaded direct from the phone portal using a Web browser which looks at Polycom servers to see upgrade (and downgrade) options. However, make sure you read all of the release notes first as it can be confusing since some firmware updates are only for Lync service.
If you do not have a PoE switch, you will need a power supply. This is a separate purchase from the phone and I find that frustrating. If I am paying $200 for a phone, surely they can throw in a $5 power supply.
If you need to auto provision this phone with your own PBX and need security (which you should) expect to spend many hours learning about SSL certifications and uploading them to your phone so a secure connection can be achieved. Alternatively you can use FTP or HTTP but it is riskier since password information is not encrypted. Yealink phones give you the option for secure HTTPS provisioning but without expensive certificates (i.e. trust the server you are connecting to). Surely Polycom could do the same. Of course if you are purchasing this phone from a service provider they will take care of this for you.
Network Address Translation keep-alive settings are not per line. If you have read some of our articles on this site you will have a familiarity on some of the things that can go wrong with VoIP. One classic way to ensure a reliable connection is NAT keep-alives, which keeps a pin-hole open through your firewall for a given port. For some reason Polycom has a generic keep-alive setting rather than per line which means if you are using multiple SIP accounts on the phone you cannot send keep-alives to each server. Other phone manufacturers have this setting per line.
I had issues trying to log into the phone portal for the IP550 using Internet Explorer. Firefox and Chrome seemed fine.
Some users in the past have complained about the boot-up time when the IP550 is reset or power cycled. This may have been an issue with older firmware as mine (v4.0.11.0583) took a mere 30 seconds from power cycle to active registration with the PBX we used.
The IP550 is an impressive phone and reasonably priced. It will meet the needs of nearly all users in a business and the sound quality is very good.
It is a large phone however, so make sure you have plenty of room available on your desk. The built-in Ethernet switch and PoE capabilities could remove the need for an Ethernet switch on your desk and reduce wiring clutter.
The installation of the IP550 and setting it up to communicate with a provider is relatively straightforward. For the purpose of this review we manually configured the phone on line 1 to communicate with a PBX.
First of all you need to connect the device to your network. Simply attach the stand to the phone, connect the handset to the RJ11 jack on the back of the phone (the one with the handset icon on it, not the headset jack). Next connect the CAT5/6 cable to the phone (the RJ45 jack that has the switch symbol, not the PC symbol) and connect it to your modem or router. Finally, connect the power supply and the device should boot-up.
After the phone has powered up, it defaults to DHCP and should be served an IP address by your router. In order to access the phone portal you need to find out the address your router served. This can be retrieved as follows:
Using a PC or laptop that is connected to the same LAN as the phone, open an Internet browser and type the IP address of your phone into the Address Bar and hit enter. You will see the login screen of the Polycom phone portal, as shown in Figure 1 below. To login in as an "Admin" simply enter "456" as the password and then press the Submit button (use "123" if logging in as a user).
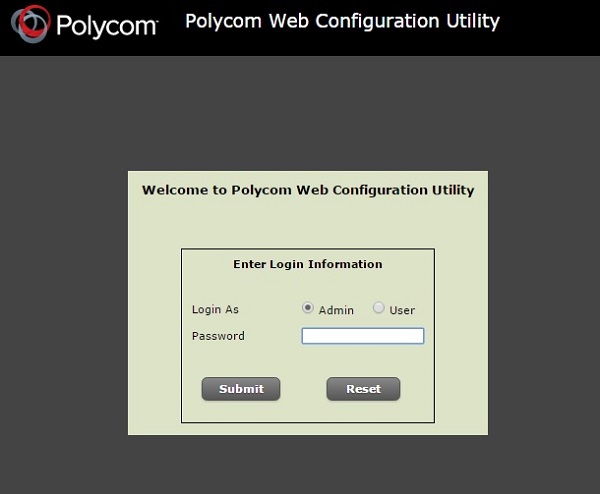
Figure 1: IP550 Phone Portal Login
Now that you are inside the portal, navigate to Settings > Lines > Line 1 so we can configure Line 1 to point to our PBX server, as shown in Figure 2 below.
NOTE: Depending on the complexity of your PBX and network, you may be able to use the Simple Setup link in order to get the phone to register with your PBX. It basically consists of the same fields described below, plus a time synchronization field.
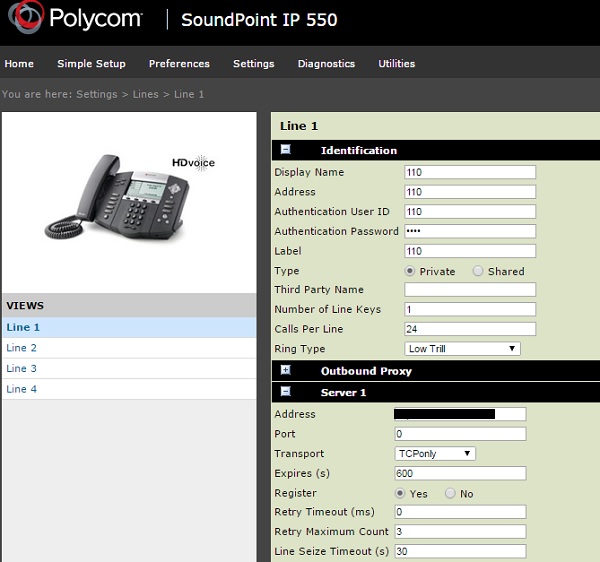
Figure 2: IP550 Line Configuration
The following fields should be configured at a minimum.
Now press Save at the bottom of the phone portal and the phone should try and obtain registration with the server (it may reset on its own accord or ask you to restart, depending on your firmware version).
If successful, the label should appear on the phone next to the Line 1 button and it should show a symbol of a phone with the handset down, indicating that successful registration with the PBX server occurred.
You should now be able to make and receive phone calls with crystal clear clarity on your Polycom IP550.
Hopefully you found this review useful. If you have questions, feel free to use the Q&A tab at the top of this page and ask anything you wish. We will respond promptly. Similarly, if you have ever used this phone, please consider adding your review and ratings using the "Add Review" button at the top of this page.
Published: by WhichVoIP
Polycom IP550 reviews are listed in chronological order.
#3 : NOV 1st, 2013 : Mike
Recommended: Yes
This phone handles all of our day to day needs. Speakerphone quality is as good as a corded phone call. Very flexible unit. Has a great LCD screen to display lots of information.
#2 : SEP 19th, 2012 : Dale
Recommended: Yes
The phone has the ability to provide 4 lines although I use only one. The other features of the phone exceed what I need but those I have used are easy to access and to use. Sound quality is good however the one "con" I can think of is that the hand receiver needs to be held just right for best sound quality, i.e. holding on your shoulder puts the microphone in a less the optimum sound position. As I use the speaker phone generally this is not a problem for me.
#1 : SEP 12th, 2012 : John
Recommended: Yes
Just switched over to this new IP550 from Polycom. Was using ATA before that. Very simple to get this setup and running. A quick update of the MAC address in our VoIP provider config menu followed by a reboot and it was up and running perfectly. The phone has fairly basic features but does make using the full complement of available features (offered by our VoIP provider) a lot easier. The Cisco phones that I have used in the past are a bit fancier with more features but they were also more expensive and more higher end than this one so not really a fair comparison. Overall pretty happy and most importantly, hands-free speaker is very clear and loud.
Disclaimer: The opinions, views and ratings expressed in these reviews are those solely of the reviewer who submitted the review. WhichVoIP does not necessarily agree with any of the expressed opinions, view or ratings.
© 2004-2026 WhichVoIP.com
