Overview
- Are you currently using an AT&T U-verse bundled service and are getting frustrated with what seems like ever increasing monthly bills?
- Did you know that you could instantly reduce your bill by more than $400 per year by replacing the U-verse voice service with a third party VoIP service?
- Have you already thought about doing this but have concerns about how to make this change and setup a third party phone service?
The answers to these three questions is quite often a somewhat surprising "YES". So what is stopping people from replacing U-verse voice with a third party VoIP service and saving money? Please read on and we will explain exactly how to go about this and what the pro's and con's are.

The AT&T U-verse product offers Television, Internet and Phone services and competes with companies such as Comcast, Verizon, Time Warner and Cox to be your provider of choice. In most cases, your choice of cable or telecom provider will be limited to two or three options based on your location. We will now take an in depth look at AT&T U-verse service while primarily focusing on the best phone service option, setup and configuration that works with the U-verse product. The scenarios we will look at are listed as follows:
- Voice service as part of your U-verse package (bundled in a triple play package with Internet and TV).
- Voice service separate from your U-verse service (for this discussion we will be focusing on Phone Power VoIP service). In this section we will go into detail on the following subjects:
Identifying the best home network setup - basically where you should plug your telephone adapter in to get the best performance.
Decide if Bring Your Own Device (BYOD) is the right choice for you - this section looks at the BYOD process.
Linksys PAP2T as your ATA - Evaluation of Phone Power service with a PAP2T device from Linksys.
Grandstream HT502 as your ATA - Evaluation of Phone Power service with an HT502 device from Grandstream.
Free lease ATA - A look at some pro's and con's of going with a leased adapter from a service provider.
Manual configuration of an ATA - Information on how to manually configure an HT502 ATA with Phone Power service.
Do you have AT&T U-verse? Let us know what you think of the service and what you use for your phone calls by adding a comment.
Include Voice service as part of U-verse Package
There are quite a few options for people to choose from when selecting a TV and Internet service. These options include services offered by cable, telecom and satellite companies. There are even more options to choose from when selecting a phone service, but the good news is that if you like to bundle these services with a single company, then it is easy to do so, and AT&T offers very competitive packages. The critical thing is that you DO NOT stick with your regular land-line as it is likely costing you in the region of $60 per month including taxes and surcharges.
With U-verse, AT&T will provide a router that will act as your master control system. This device is usually a 2-wire 3800-HGV-B. The Internet is connected via the RJ-11 phone line and is a DSL type service. The TV is interconnected throughout a house via co-axial cable. The phone is directly connected to a phone port on the 2-wire device. As such, there are no other items of equipment required for both phone and Internet, while a separate set-top box is required for each TV that is connected to this master controller. The 2-wire router also acts as a wireless access point to enable a wireless network throughout your home.
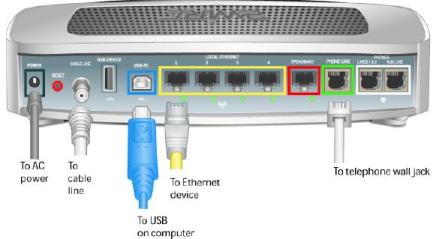
Accessing the 2-wire device
The device has a user interface that can be accessed by entering the following url in a browser window 192.168.1.254 - If you have a basic network setup, there should be no need to ever access this menu after the installation technician has set everything up for you.
The bottom line
Whether you decide to bundle your voice service with U-verse or not, the bottom line here is that you need to get rid of the old land-line phone service if you still have it. However, bundling with U-verse is not necessarily the best option so let's look at using a VoIP service for your phone that is unrelated to your U-verse.
Voice Service kept separate from U-verse - Phone Power VoIP and U-verse

Let's assume that you currently have the triple play bundle from AT&T that includes U-verse voice. The service is working well but you have taken a closer look at your monthly bill and realized that the phone service part of the bundle is costing you $40 per month. Although a nice reduction over a land-line service, it is still extremely costly when compared to VoIP service offered by a company such as Phone Power, for around $6 per month for the first two years (please note that most residential VoIP providers offer monthly service packages for under $10 per month). So the choice is obvious and you decide to cancel U-verse voice and sign-up with Phone Power or a similar service. What you may not have realized is that this will impact your home network setup and you need to be careful about how and where you add the new service. Let's now look at how to setup VoIP with AT&T U-verse Internet service.
How to add your New ATA (Analog Telephone Adapter) to your Home Network
A telephone adapter is a relatively simple device that is used to convert analog signals to digital signals (and vice versa). Despite this simplicity, there are actually a number of different makes and models to choose from. If you are interested in comparing some of these adapters and the features, please read our comparison of home telephone adapters.
We have provided a lot of information in this section and admit that it can be confusing. As such, if you want to just skip our long explanations, then we recommend that you connect your ATA into your home network as per option 3 or 4 below.
First of all, lets look at some options for where to add the ATA to your home network. This might seem pretty obvious at first, but if you start to think about the potential options, it can get confusing, as each method can directly impact your call quality in either a good or bad way. Our home network setup page goes into the details of some setup options, but for this discussion, let's look at a few specific options.
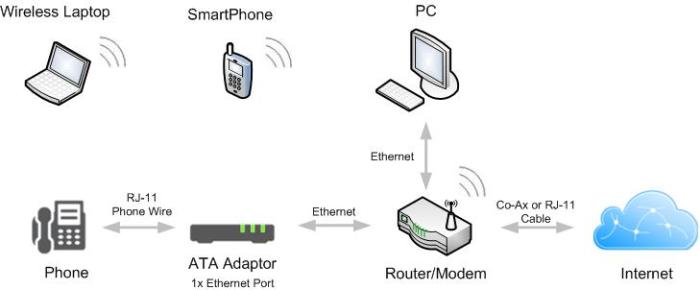
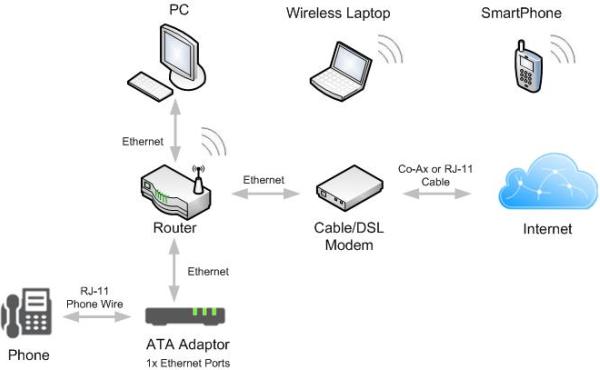
- Option 1 - Connect (via Ethernet) the ATA directly to your 2-wire 3800-HDV box and only have the phone connected to the ATA. No downstream network devices from the ATA but there are network devices downstream from the 2-wire. The setup diagram for this scenario is as follows:
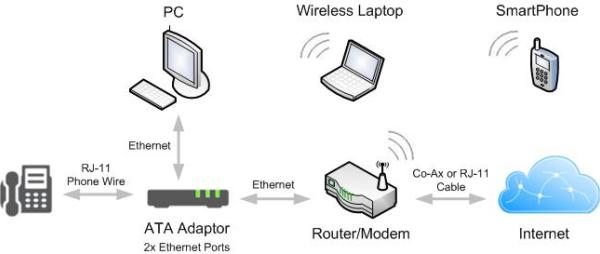
- Option 2 - Connect (via Ethernet) the ATA directly to your 2-wire box but also connect your home network to the LAN side of the ATA. This setup requires an ATA with both a WAN and LAN Ethernet port and nothing else is connected the 2-wire router. The setup diagram for this scenario is as follows:
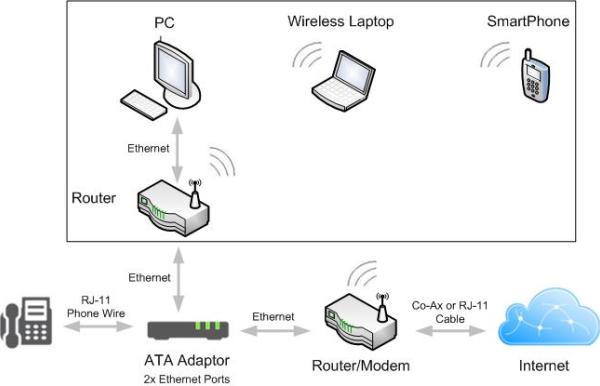
- Option 3 - Connect the Ethernet LAN port of the ATA to a separate router and connect the Ethernet WAN port of the ATA to your 2-wire box. This means your entire network (excluding the 2-wire box) is downstream of the ATA, so it is critical that the ATA supports QoS (Quality of Service) to prioritize the voice traffic over the data traffic. The setup diagram for this scenario is as follows:
- Option 4 - Similar to option (3) but connect (via Ethernet) a separate router directly to the 2-wire box and then connect the ATA to this second router. For the purposes of this discussion, we are assuming that this router supports QoS. The setup diagram for this scenario is as follows:
Placement of the ATA in your home network is a critical decision, as putting it in the wrong location could affect your voice quality, and you may start to blame the VoIP provider for having lousy service, when it is not their fault. Our research on the 2-wire 3800-HGV indicated that it does not have configurable QoS, so there is no apparent way to perform voice traffic prioritization. The following table looks at each of the aforementioned options:
| Potential Issue | Option 1 | Option 2 | Option 3 | Option 4 |
|---|---|---|---|---|
| Avoids potential for voice traffic contention with network traffic going to 2-wire box. | (contention with wireless traffic) |
(if ATA supports QoS) |
(if 2nd router supports QoS) |
|
| ATA is NOT a single point of failure for your entire home network. | ||||
| Recommended setup |
Although option 3 introduces a single point of failure in your home network, we do not consider this to be an issue worth worrying about, as if your ATA goes down, you can simply bypass it and connect your 2nd router directly to the 2-wire box. We recommend option 3 if you have a dual Ethernet port ATA and option 4 if you have a single Ethernet port ATA.
Should I go with the Bring Your Own Device (BYOD) Telephone Adapter option?
If you decide to skip the free ATA lease from your VoIP provider (we have used Phone Power for this evaluation), and Bring Your Own Device (BYOD) instead, you will need to perform the following steps:
- Perform a hard reset on your ATA to get it back to the factory default settings. This ensures that the admin password is the default password for the device.
- Add the adapter to your network and ensure that all of your existing laptops, PCs, etc can reach the Internet.
- Contact Phone Power (we recommend using their live chat feature) and inform them of the make, model, serial number and MAC address of your ATA.
- Run the synchronization script to configure the ATA with the Phone Power SIP credentials. This information can be found here for all supported adapters.
- Access your 2-wire router (remember this is done by entering 192.168.1.254) and move your ATA device into the DMZ. Instructions on how to perform this can be found at this location. This is an important step as otherwise the firewall in the 2-wire may block ports and prevent the voice traffic from communicating correctly with the telephone adapter.
- Wait 10 minutes and your phone service should be up and running. It takes a few minutes for the ATA to be correctly configured and for the FXS phone port to register with the Phone Power server.
BYOD is a good option that many people choose if they want to own the adapter outright. However, there are definitely some pro's and con's so continue reading for more details.
Using a Linksys PAP2T
Telephone Adapter

Although the PAP2T device is no longer sold by Linksys (or Cisco), we have included it here as it is still widely offered by VoIP providers on a free lease basis, and there are a lot of them in circulation. In the perfect world, you should never have to access any configuration menus on this device, but if you do need to, we have included a copy of the PAP2T user manual to help with this.
When we tested the PAP2T with the Phone Power service, although the device performed consistently well, we were unhappy with the amount of time it took for a 7-digit call to be connected. This was due to the default setting of the Inter-digit long timer being 10 seconds, which meant that the call waited 10 seconds after the 7th digit was pressed before dialing. This was an annoying delay and although the setting can be changed in the devices admin menu, the admin menu is locked after the Phone Power configuration is run. The only way to be able to manually make this modifications, is to start from scratch again and add the SIP credentials for the ATA manually, instead of running the auto-config script provided by Phone Power. As you can imagine, this is opening up a can of worms for what should have been a simple configuration change. When we contacted Phone Power support, they would not provide the admin password. One other way around this is to press # after the 7th digit is dialed and the call will skip the timeout timer and connect immediately.
Another issue with PAP2T device is that it only has a single Ethernet port that must be used to connect to the Internet (or WAN). For this reason, we connected the device directly to an Ethernet port on the 2-wire device. Over a long period of time, we found that this setup, on rare occasions, experienced one way calling issues where a caller could hear, but not be heard. This was most likely due to the lack of Quality of Service (QoS) configuration on the voice path to the Internet. This configuration is as per Option 1 in the above table.
In summary, we do not recommend this device for use with the 2-wire device and U-verse.
Using a Grandstream HT502
Telephone Adapter

This Grandstream adapter has the additional benefit of having an extra Ethernet port when compared to the PAP2T. This means that it can be installed upstream of your home networking equipment and be an in-line device. As such we installed this device in addition to a 2nd router as per Option 3 in the table above. The addition of a new router to the network enabled us to disconnect all devices from the 2-wire router (except for the ATA), and turn off the wireless. The new router was then connected to the LAN Ethernet port of the Grandstream ATA and all existing network devices were connected to this router. This meant that all wired and wireless data connections were now downstream of the Grandstream adapter, which effectively means that all traffic must now go through the ATA to reach the Internet. The Grandstream adapter performs QoS and prioritizes voice traffic over data traffic, thus ensuring that the home network cannot impact the voice quality.
Additionally, the annoying 7-digit issue we had with the PAP2T went away as the default timeout (known as the "no key entry timeout" in this case) for the Grandstream device is 4 seconds. After running the Grandstream adapter with Phone Power for a number of weeks, there are no reported issues.
In summary, we do recommend this adapter for use with the 2-wire device and U-verse.
Should I use the Free Lease Adapter offer by the VoIP Provider?

We contacted Phone Power and asked which make and model of adapter they are currently providing on a free lease basis with its service. The device offered is currently an Innomedia MTA6328 which has two Ethernet ports, routing capability and QoS support, making it appear to be comparable to the aforementioned Grandstream device. Out of interest, we took a look at the admin guide to find out what the default inter-digit-timeout was and it appears to be set at 16 seconds. We did not actually test this device so would like to hear from anyone that is using it and if they have any issues. Please add a comment to let us know.
Although, there are typically some shipping costs involved with a free lease, a great benefit is that it makes the VoIP service effectively plug and play as the device arrives on your doorstep already configured. Just plug it into your network and you should be and running and making calls with minutes.
How to manually configure your phone adapter (ATA) with Phone Power.
What if you Bring Your Own Device but the Auto-Configuration does not work?
If this happens, then you will need help from customer support. Don't panic though as they will likely walk you through a few simple steps to manually configure your device such that it can register with the VoIP server. Here are some of the steps that Phone Power provided when we tested this on the Grandstream HT502:
To connect to the HT502 device:
- Connect an Ethernet cable to the LAN port of the ATA and connect the other end to a laptop or PC.
- Go to your 2-wire menu to find the IP address of the HT502 and then enter xxx.xxx.xxx.xxx (your IP) in a browser window.
- The default password to access BASIC SETTINGS is 123 and the default password to access ADVANCED SETTINGS is admin.
In BASIC SETTINGS tab:
- Go to PREFERRED DNS SERVER and enter IP address 208.67.222.222 then hit UPDATE
In ADVANCED SETTINGS tab
- Go to FIRMWARE SERVER PATH and enter provision.phonepower.com:4192/UPGRAYEDD/HT502
- Go to FIRMWARE SERVER PATH and enter provision.phonepower.com:4192
- Go to FIRMWARE FILE PREFIX and enter 05072013
- Go to CONFIG FILE PREFIX and enter HT502Prov.php?hwid=
- Go to ALLOW DHCP OPTION 66 to OVERRIDE SERVER and set it to NO
- Go to ALWAYS CHECK for NEW FIRMWARE at BOOT UP and select it.
- Go to AUTOMATIC FIRMWARE UPGRADE and select YES and enter 4320
- Go to NTP SERVER and enter the address us.pool.ntp.org
- Go to SYSLOG SERVER and enter address 208.64.8.6 and set SYSLOG LEVEL to INFO
- Select APPLY and then REBOOT
Conclusion and Recommendations
The bottom line here is that a separate VoIP service can and will work well with AT&T U-verse Internet and the associated router and modem that comes with it. Here are some of the key takeaways from this evaluation:
- For good voice call quality, it is critical to ensure that you setup your home network correctly and add your new telephone adapter at a point in this network where voice traffic will be prioritized over data traffic.
- A free lease adapter from a VoIP provider will come pre-configured and it will be just a matter of adding it to your network to get up and running.
- Although BYOD has benefits in that you actually own the device, there is some minimal configuration effort involved. Choose the make and model wisely though.
- Most importantly, we recommend that you skip the triple play bundle and save yourself a lot money by going with a separate VoIP provider. There is simply no denying that taking this route will result in much lower costs and many more calling features. Would you rather spend $40 per month for just a few calling features, or $6 per month for over 40 calling features.
If you need help with any of this setup or configuration, please visit our troubleshooting and setup pages that are listed in the following resources list. If you still need help, please feel free to ask us using the comment form below.