- Online VoIP Comparisons since 2005
- 26.5+ Million page views: Testimonials
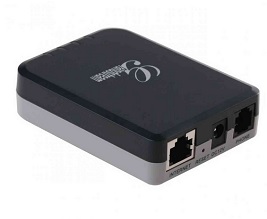
The Grandstream HT701 is an Analog Telephone Adapter (ATA) that is used to connect a standard analog phone to an IP phone network. It has one FXS phone port and one 10/100BaseT Ethernet connection to connect to the Internet.
| Make/Model | Our Rating | Write a Review |
|
HT701 |
|
|
Use the tabs below to navigate to various information options.
Take me straight to the 1 User submitted reviews >>
Below you will find our ratings for the HT701 ATA, followed by a more detailed review of this device, including setup and provisioning.
| OVERALL RATING | |||
| Performance | Installation | ||
| Voice Quality | Durability | ||
| Features | Ease of Use |
The HT701 is one of the least expensive ATA devices you will find in the market place, and can be purchased for around $35.
Despite its small price tag and form factor, it really does pack a punch. It supports most of the standard Codecs, such as G711, G723, G726, G729 and iLBC. Dynamic jitter buffers are supported, along with echo cancellation. Fax relay and pass-through are available using T.38 and G.711, respectively.
The HT701 graphical interface can be accessed using a browser. The GUI is very simple to use and Grandstream has provided access to hundreds of configurable settings. Some of these will be discussed later in this article but be very careful when editing settings, in the wrong hands the ATA could quickly become a paper weight. A regular analog phone can also be used to gain access to some of the more basic settings. Connect the phone to the ATA and dial *** to reach the voice prompt menu. This can be useful for simple configurations.
Auto provisioning can be performed using HTTP, HTTPS, TFTP or TR-069. This is an important feature for service providers as they can set up the ATA before shipment and the customer simply needs to connect to the Internet and power-up the device. It will then automatically connect to the providers servers and download all of the necessary configuration files for that customer. TLS certificates can be uploaded for further security, ensuring that all data is encrypted during provisioning. On a similar note, the actual audio packets can also be encrypted during calls, using SRTP.
Firmware can be uploaded from a local directory or it can be set to automatically check a server at predefined intervals to see if new firmware is available. Again, this is a very useful feature for service providers.
Faxing can be problematic over VoIP but I have found the Grandstream ATAs to be more successful than others when trying to send or receive faxes. If your provider supports fax relay using T.38 I would recommend this approach.
Documentation from Grandstream is very comprehensive and they provide datasheets, quick start guides, user manuals, forums, FAQs and much more on its website. You can access the key documents for the HT701 using the Info tab above. Support is available through a ticketing system on their website and a live chat is also provided for basic questions.
There is only one Ethernet port in this family of devices, even for the HT702 and HT704 which can handle 2 and 4 SIP accounts respectively. Some other ATAs, including the Grandstream HT50x series have two Ethernet ports. This is a very handy addition as it means you can connect the WAN port to your Internet and the LAN port to a PC or laptop downstream. To be fair, this is a low cost device, hence the reason they likely removed the Ethernet switch functionality.
WiFi would be a great feature to have, even if it was an add-on cost such as a USB WiFi adapter. Some ATAs, for example the ones from Obihai, have the ability to add WiFi adapters and even Bluetooth adapters, which can be useful for pairing your cell phone.
The HT701 is a well designed adapter for connecting your analog phone up to a VoIP service. It is a very small form factor, one of the lowest cost ATAs in the market place and loaded with features.
Grandstream provides hundreds of settings in their GUI to fine tune the ATA, as required. This may be overwhelming to some users but I personally like the flexibility it provides. For basic setups, a simple voice prompt menu is offered which may be good enough for some users.
First of all you will need to setup your ATA by connecting it to the Internet and to an analog touch-tone telephone. This should be self-explanatory since there are only two connectors on the HT701, an RJ-11 port for the phone and an RJ-45 port for an Ethernet cable to your modem or router (i.e. to connect to the Internet). Finally, insert the 12V power adapter and connect it to a wall outlet.
The next step is to provision the device, which will depend on your particular scenario. For most people, they will have received the ATA from a service provider and simply following the steps above and power cycling should be enough to get a dial tone. In other words the ATA will auto provision with the service providers servers and download all of the information it needs to configure your SIP account. Alternatively, if you Bring Your Own Device (BYOD) to a new provider, you may need to manually configure the ATA using either voice menu prompts on the phone or using the Graphical User Interface (GUI) via a web browser. We will touch on both of these options, but my recommendation is to use the GUI.
For very simple setups, you may be able to just use the connected touch tone analog phone to provision the device. This step may also be required for your setup, depending on whether you are configured for DHCP or not. If you have a router that has a DHCP server then this is likely your best option as it will serve your ATA with an IP address.
To connect to the voice menu prompts, call *** from your phone. Your options at the prompt are as follows:
In most cases you will not need to do any of the above commands. Usually I use this for DHCP mode and use option 02 to retrieve the IP address of the ATA so I can then log into the GUI using a web browser. See the next section for this.
Once you know the IP address of your HT701 on your network, you can log into the GUI using your favorite web browser. See the notes in the above section if you need help finding the IP address. Simply open up your browser and for the URL enter the IP address, as shown below in Figure 1.
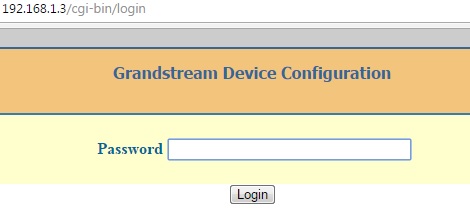
Figure 1: HT701 Web Login
A couple of notes on the login screen. If you use option 02 from the phone voice prompt to determine the IP address, the IP announced is 12 digits long so drop the leading zeros. e.g. 192.168.001.003 should be entered as 192.168.1.3 in the web browser, as highlighted in Figure 1. Secondly, the initial password for this device is admin (or 123 for very basic user level).
If you received the device from a service provider, the password was likely changed by them so you would need to contact them for access. They may not be willing to give you this as the settings inside the ATA must match their PBX settings and they may not want you messing with them.
Once you are logged into the GUI, you will be presented with the status window, as shown in Figure 2.
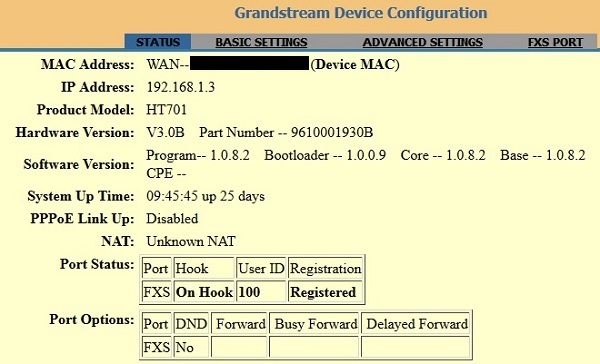
Figure 2: HT701 Status
Note that this shows I am already registered, because this is a working system. If you click on the Basic settings you will see a screen similar to Figure 3 below. This is where you can change to static or DHCP mode and set your timezone.

Figure 3: HT701 Basic Settings
The advanced setting tab is used for auto provisioning, as highlighted in Figure 4. This is likely configured by your service provider or if you are doing BYOD to another company, you would enter their server details here. Essentially, what happens here is that your ATA will send an auto provision request to the server address stated in the Config Server Path field. It passes its MAC address to the server during this handshake. Assuming you have an account setup with the service provider and it is aware of your HT701 MAC address, it responds with the configuration file and loads it into memory. This usually happens after a power cycle or at predefined periods. It is not shown, but this screen is also where you could upload SSL certificates, change call tones and perform manual uploads (and downloads) of configuration and firmware files.
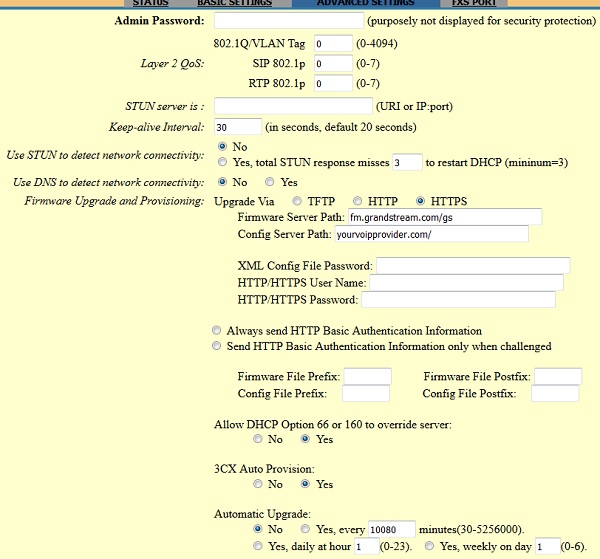
Figure 4: HT701 Advanced Settings
Finally, the FXS port tab is used to set specific parameters related to your SIP account. It is also where you would manually set up your SIP account if no provisioning was necessary i.e. enter your SIP account username and password details. If auto provisioning was performed it would load the correct values into this tab. Figure 5 shows the top part of this window, but there are a lot of settings that can be altered in this tab. The most important settings are the Primary SIP Server address, SIP Transport, NAT Traversal, SIP User ID and Password. Getting these to match your service provider is usually enough to at least get you a dial tone.
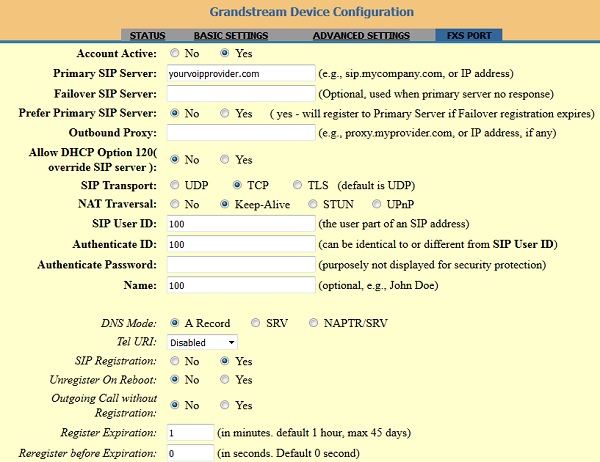
Figure 5: HT701 FXS Port Settings
I noted earlier that there are an abundance of parameters that can be modified in the HT701. Without going through all of them, I did want to highlight a few that may be useful to understand, especially if you are troubleshooting issues.
Hopefully this guide helped you to setup and configure your HT701 ATA successfully and you are making and receiving calls. If you have any questions or comments feel free to send them to us using the Q&A tab above.
Published: by WhichVoIP
Grandstream HT701 reviews are listed in chronological order.
#1 : JAN 8th, 2016 : Ryan
Recommended: Yes
I bought the HT701 a few months ago and use an Asterisk PBX and some cordless phones. It was easy to setup and only $35 on Amazon. Also it's tiny so doesn't take up much room. Impressed so far.
VISITOR/PROVIDER FEEDBACK:
Steven (Dec 2nd 2017) : Great article. Helped me set up adapter and get rid of those annoying ghost calls.
Disclaimer: The opinions, views and ratings expressed in these reviews are those solely of the reviewer who submitted the review. WhichVoIP does not necessarily agree with any of the expressed opinions, view or ratings.
© 2004-2026 WhichVoIP.com