SipXecs is a powerful open-source IP PBX phone system that is built on top of the popular FreeSWITCH platform. It essentially gives you a Graphical User Interface (GUI) for the text based FreeSWITCH software, and adds many additional features.
One common complaint with sipXecs is that its lack of documentation can make it difficult for beginners to setup a working system. In this guide I will show you how to do this, step by step, on a bare-metal machine.
| EDITOR UPDATE - APRIL 2015: SipFoundry is no longer sponsoring SipXecs, in fact no documentation can even be found on their website now. It appears
that eZuce, who was supporting this product through SipFoundry, will be forking all of the project repositories over to a new organization in Github called sipXcom. WhichVoIP plans to write a setup guide for sipXcom
and we will add a link here when it is ready. We just wanted to let you know, in case you planned to use this guide and set up your own sipXecs PBX. You may want to wait until this has been resolved. MAY 2015: You can find our SipXcom article here. SEP 2015: It appears that SipFoundry is back on-line again. It will have a paid support business model. I would recommend you read this Blog post before you jump in. |

What is sipXecs?
SipXecs is a GUI that sits on top of FreeSWICH. Unlike most systems based on Asterisk, the FreeSWITCH architecture differs in a few fundamental ways. Most importantly, signaling is separated from the media, ultimately allowing for more concurrent calls. Moreover, the software breaks into more separated components compared to Asterisk (i.e. more dedicated server applications) catering to providers serving distributed groups and customers.
In co-operation with the FreeSWITCH project, sipXecs builds on this platform to provide a graphical environment for configuration of one or multiple phone systems (also referred to as multi-tenant, which is essentially a means of segregating tenants, or customers). Unlike popular Asterisk systems and 3CX, the initial installation is more involved but fortunately we have produced a walk-through guide to help with the intimidating aspects as well as the basic setup for making phone calls. SipXecs is supported by SIP Foundry, and it is worth noting here that professional support is available from them, for a fee, should you require it.
Before you Dive in
A few matters should be considered before diving into the installation and configuration of this system. Unlike much lighter systems we have covered in the past, more powerful hardware is needed for sipXecs to function as intended. A moderately powerful dual core processor, 4 GB of RAM and at least a 40 GB hard drive are considered the minimum hardware pre-requisites for a standalone machine. Otherwise, though the software may install, some strange issues may surface (e.g. kernel panicking, inability to update dependencies etc). Also note that this installation will perform a fresh install so all data on an existing machine or partition will be removed.
What I assumed would be a fairly quick setup and configuration process it actually took considerably longer due to troubleshooting problems (hopefully you will benefit from this guide and save time!). The ISOs (i.e. the software image representing the software archive of an optical disc), at the time this guide was written, do not work. This is not necessarily SIP Foundry�s fault as a current known issue with the CentOS 6.3 installer made it into the distribution and further, fixing it is not a priority, which you can read about in this SIP Foundry thread. Documentation is quite scattered, however, I feel this guide should solve many problems that arise due to the lack of instructions available to users.
Note: Future versions may have ISO software distributions that work without a hitch. If you are reading this when the most current version is beyond 14.10, simply burn the image to a disc and install to a machine. The bulk of the configuration will take place under the heading Configuring sipXecs section.
Installing CentOS 6.6 Minimal
Perhaps the worst thing about the configuration process is the initial installation. The software design is such that it only works with CentOS, though it is said to also work on ClearOS. This guide will cover the installation of sipXecs on the minimal distribution of CentoOS 6.6.
The first step is to acquire the image from a mirror listed on the CentOS website and create media using an application such as UltraISO or ImgBurn. After booting to the installation media, the screen seen in Figure 1 should appear.

Figure 1: Install of CentOS 6.6 Minimal
Like many Linux systems, this is the first screen to appear during the installation process. Select the top item to continue. The following setup is almost verbatim to other systems in the market, this portion essentially sets the base parameters for the operating system. The following steps should be configured as follows to mimic our setup:
- Disc Found (Media Test) - Skip this part. If it does not install, try a different kind (i.e. brand) of media classified as either a CD or DVD �R.
- Language Select - Pick your preferred language.
- Keyboard Layout - Select something functional for your installation language.
- Type of Device - Choose Basic as this guide implies installation on a physical, non-cloud machine.
- Computer Name - The name should default to localhost.localdomain. Leave as-is and click the Configure Network button in the lower left-hand corner of the screen. Select your network adapter named eth(x) and then the Edit button. Check the box to connect automatically, click the Apply button and continue.
- Timezone - Pick the closest city in the list for your time zone.
- Root Password - Create a secure password you will remember to access the console. This will be needed later.
- Type of Installation - Pick the top option as this type of system truly requires an entire machine.
The resulting window indicates all data will be removed for the installer to appropriately create and install the OS. Select Write Changes to Disk and take a break while the system installs. Reboot the system after it finishes and prepare to install the sipXecs platform via the command line, as per the following section.
Installing sipXecs
To install the platform, you either need to use the physical machine or an application like PuTTy from a computer on the same LAN. Log into the machine or SSH into the console with PuTTy by typing the IP address of the machine into the Host Name (or IP address) field and click the Open button.
The user name is "root" and the password will be the one created during the initial setup. The following steps must then be performed at the command window in order to install sipXecs 14.10.
| This is mostly for good measure as we left the network settings configured for DHCP. |
| dhclient |
| The YUM command is the primary tool for acquiring and installing the packages used by many kinds of applications such as sipXecs. The command may ask for a "yes or no" response at certain points. Let it run and log back in when the updates complete. |
| yum update && reboot |
| Here, YUM installs the WGET function, allowing you to download files from the web. |
| yum install wget |
| This simply changes to the directory where the software will be downloaded and then installed. |
| cd /etc/yum.repos.d |
| Downloading the file needed to install sipXecs takes place here. Note: If the most current version is no longer 14.10, the portion in red must match the most current version. |
| wget http://download.sipfoundry.org/pub/sipXecs/ 14.10/sipxecs-14.10.0-centos.repo |
| Clean out the cache for YUM which is always a good practice before installing an application with this command. |
| yum clean all |
| This begins the installation process for sipXecs. It will take a while and will issue some "yes or no" prompts, all requiring a "yes" response. |
| yum install sipXecs |
| This pulls the setup file from storage and runs the preliminary configuration for the console. The first question encountered asks if you want to configure your systems network settings. Use 'y' to indicate yes and proceed to the sub-configuration for your network adapter, as per the next section. |
| usr/bin/sipxecs-setup |
Preliminary sipXecs Configuration
Unless placing the system on a unique network (or sub-network), static configuration will be the most reliable way to connect devices. Pick the first option for Device configuration then select your network adapter from the next screen (likely referred to as eth0.) Items should be configured unique to your network as seen in Figure 2.
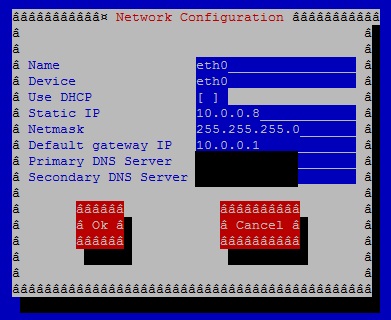
Figure 2: Network Settings
In the following steps, you are asked to define a few more settings. We will not cover system clusters so use 'y' for yes when asked if this is the first server in your cluster. Remember earlier we chose the default name localhost.localdomain for the system name. In the following few steps, components of this name should auto-populate for the final few questions as seen in Figure 3. Essentially, all values can be left at default by just pressing the enter key. However, I noticed during my setup (depicted in Figure 3) when asked for a domain, it did not pull localdomain.com so make sure that this is entered manually.
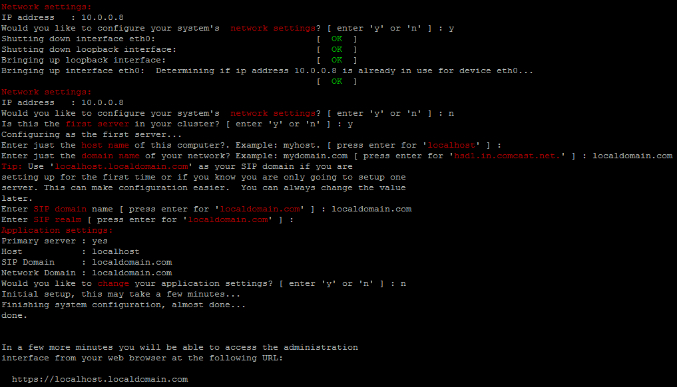
Figure 3: Preliminary Configuration of sipXecs
Now, you are ready to configure the system and begin making calls. Though it says to login using the link produced at the end of Figure 3, DNS is not used intra-LAN. Instead, replace the host name with the IP address of the machine.


Configuring sipXecs
Navigate to the appropriate address in a browser window and note that many browsers will throw an error saying that the page is not secure. Ignore this message and click whatever link is necessary to proceed. The first page you see will resemble Figure 4, which asks you to create a password for the root user of the web configuration console called "superadmin".
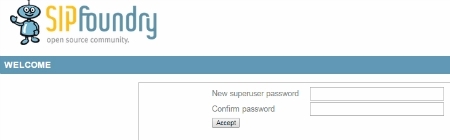
Figure 4: Create a Password for User "superadmin"
The first step after successfully logging into the console is adjusting a few preliminary settings. Navigate to the Servers options under the System tab. In the left hand menu, find the Core Services and apply the same settings as seen in Figure 5.
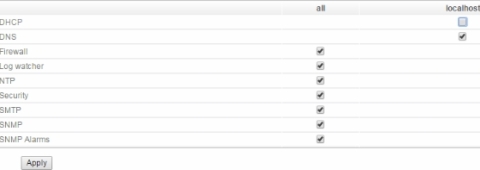
Figure 5: Core Settings
Next, select the Telephony Services from the menu on the left and apply settings as seen in Figure 6. Note that the system has many more features than we cover in this guide but these are the most basic so it is best to configure your sipXecs like so, for the time being.
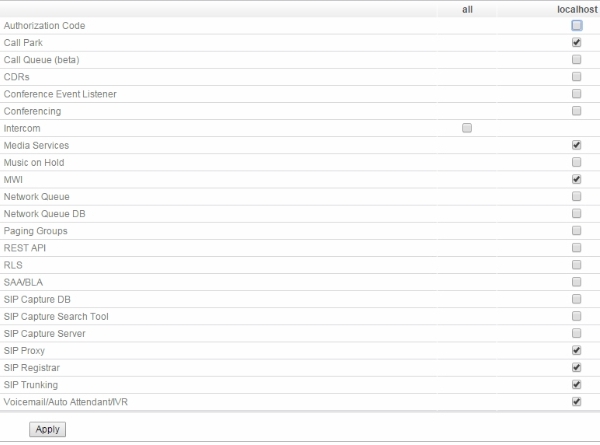
Figure 6: Telephony Services from the System Tab
Also under the System tab, the Dial Plans sub-item must be configured. Navigate to this option and enable as many kinds of dialing types as possible by clicking on each item and checking the Enabled box. The recommendation is to match the settings as seen in Figure 7 and enable the Emergency dial plan as well if this is included with your SIP Trunking service.
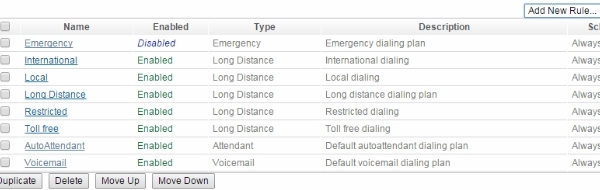
Figure 7: Configuring Dial Plans
Next, hover over the Users tab and click the Users sub-item to create an extension. Configure a user as per Figure 8 below. Notice that many more fields are available compared to those completed. The most important (i.e. the required fields) are completed in order to obtain a functioning extension.
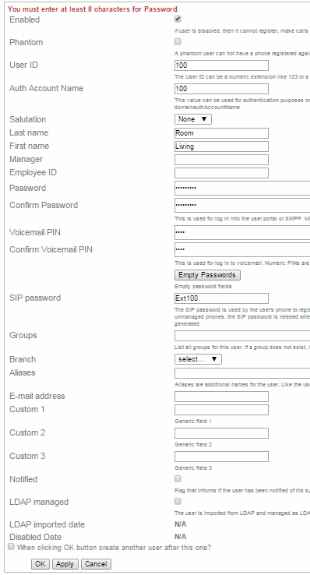
Figure 8: Configuring a User
The User ID is essentially the display name while the SIP password authenticates a device with the system. The "name" fields are not necessary however, the regular Password is required and simply allows the user to access their account via the user portal. Make sure to assign a SIP Password as this allows a device to authenticate with the system. The Aliases field is optional though it is a good idea to assign a value if this user will pair with a soft-phone.
After this, we create a device, allowing for the user we created to make a call. Under the Devices tab, click the sub-item Phones. Here, the visible drop-down box will allow you to select a phone connected to your network. Select the box then select your phone and you should find yourself on a page as pictured in Figure 9.
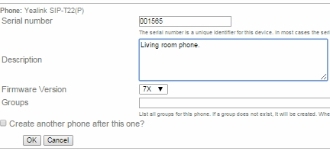
Figure 9: Add a device
The Yealink T22P that I use for many projects is found, but the information is not quite correct. The serial number is roughly half the actual numbers as seen in the top box of Figure 9. Make sure any physical device on your network is identified with an exact serial number and matching firmware. If using a soft-phone, select the Bria option as a generic template (note you can use most open source softphones, even if not from CounterPath) and simply match the Serial Number portion to either the name or alias of the correlating user.
While in the device settings for the phone, click the link in the side menu that reads Internet Port (WAN) and you will be presented with a screen similar to Figure 10 below. Assign the device a static IP along with the correct subnet mask and default gateway values. The sipXecs system handles DNS resolution so make sure these values match the IP address of the system. You can see the system IP is identified as the default to the right of the field. After applying these settings, click on the Dial Plan tab and check to make sure the dial plans enabled earlier are added and if not, make sure to activate these plans for the device. Either apply these settings to your device from the phone menu or web console to register the phone (check out our guide for the Yealink T22P for a baseline tutorial).
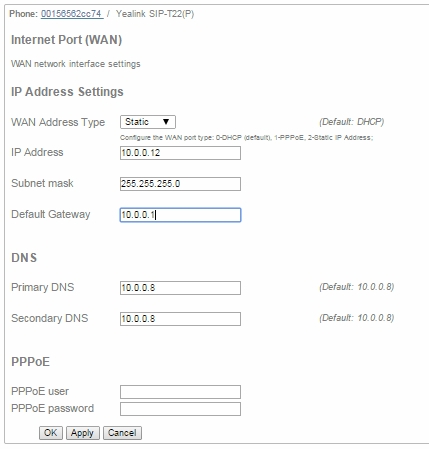
Figure 10: Device Network Settings
One great component of sipXecs is the inclusion of a free STUN server from eZuce. Typically, the default settings of an installation utilize this service rather than requiring custom Network Address Translation (NAT) settings under the System tab. This means that your devices should be set to point to stun.ezuce.com.
The example shown below in Figure 11 shows the STUN settings applied to my Yealink T22P. Keep in mind, different devices will have different devices for applying these settings so make sure to research how to accomplish this task for your particular device.
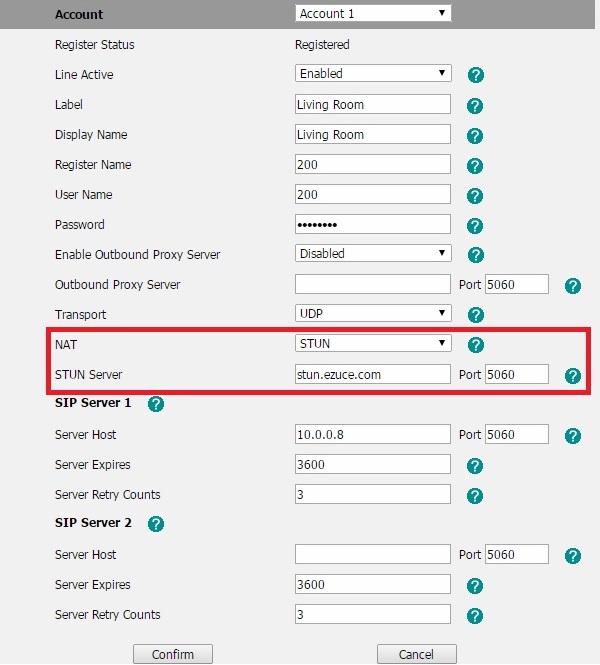
Figure 11: Configure Yealink T22P for STUN Server
Under the Device tab in sipXecs, click on the Gateway sub-item and pick the Other option from the dropdown menu. Flowroute was utilized for this project as seen in Figure 12. One of many great aspects about this provider is that documentation is available for almost every system on the market. You also get a $0.25 credit when you sign up so this is a great solution if you do not yet have an account with a SIP provider.
Enable the account by checking the top box and add a unique name for the trunk. Leave the box checked for the SBC and leave the template setting to "None" since Flowroute does not currently have a template. Since we will not cover the multi-tenant capabilities of this system, the box for sharing may remain checked. Add a description too, it does not need to be detailed.
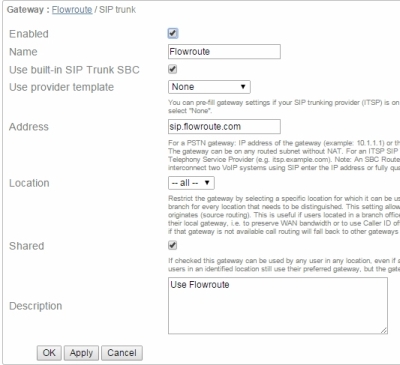
Figure 12: Configure A SIP Trunk
Finally, go the ITSP Account link found in the left side menu. Add your unique user name and password to the fields, given to you when you signed up with Flowroute. Also, check the box for Register on initialization, as seen below in Figure 13. Make sure to also open up ports 5060, 5061 and 3000-31000 on your Internet gateway for the service to work.

Figure 13: ITSP Settings
Congratulations, you have now successfully configured a basic sipXecs system! You should now be able to make calls to other VoIP carriers, mobile phones and the PTSN. By adding more users and devices, you will be able to call between devices on the same network by simply dialing the extension number of the user, and best of all, these calls are free!
Final Thoughts
The most challenging part of the project proved to be picking through the fragmented documentation on the web. Unfortunately, even with a decent working knowledge of Linux, it was still a hassle to install the system. Further, some of the existing documentation, including this nice tutorial video proved to be a little misleading in regards to what actually worked. With that said, the working system is marvelous. Because a STUN service is included, sipXecs circumvents much of the troubling signaling and NAT issues that often hinder other systems.
Despite some frustration, it was well worth taking the time to troubleshoot this system until it functioned correctly and hopefully this guide has saved you some effort.
We only scratched the surface on the true power of this system, send us comments below and we will do our best to supplement this guide with more tricks to teach your sipXecs PBX.