In early 2015, a project formerly known as sipXecs changed hands due to a dispute within development companies, SIPfoundry and partner eZuce. Now known as sipXcom, the FreeSWITCH-based PBX is moving forward with continued development.
The purpose of this guide conveys methods and best practices for installing and configuring SipXcom as a cloud based phone system. Essentially, this serves as a baseline for creating a unique hosted phone system. This example will walk through the installation and basic configuration in a VMware environment.

The SipXcom Communication System and Why it is Ideal for the Cloud
SipXcom is a PBX system using FreeSWITCH as the underlying platform for a communication solution. Already pre-installed with a vast number of applications, it allows one to design a very powerful and reliable VoIP system. One of the biggest advantages it holds over its main competitor, Asterisk, is the inherent ability to provide a high number of concurrent calls as well as multi-tenant functionality.
A proper installation in a cloud environment allows the system to securely provide phone service to a vast number of users. Several advanced networking options are included to assist in complex environments. The best part is that sipXcom is free (open-source) to use meaning no licensing is required to download or use the software.
You and the Cloud
Understandably, not everyone has access to VMware and the large suite of software furnished by the company. It requires a lot of training, certification procedures and money. However, many other systems on the market are quite similar in concept. If familiar with another system, most processes (at least for the initial configuration) should be very familiar.
Keep in mind, as every infrastructure has its subtle nuances, expect a good amount of troubleshooting and debugging. Typically, the most common problems experienced are the inability to register (i.e. connect your system to a SIP Trunk provider or any given phone to your system) and specific audio problems. We will do our best to cover common scenarios and explain settings as we go.
Prepping a Virtual Machine (VM)
The first step is to create a virtual canvas where the underlying CentOS operating system will install. The required version for this setup is CentOS 6.6 minimal to install the most current (and recommended) platform, sipXcom 14.10. Note: complete ISOs are available, however, every version attempted when producing the sipXecs article did not work though this should likely be resolved in the near future.
Creating a Blank Virtual Machine (VM)
If you are familiar with VMware, this process is likely second nature. The following steps will apply to creating a new Virtual Machine (VM) in vSphere. First, login via the web administration portal or use the vSphere client and find an appropriate place in your VM inventory to create the machine as implied in Figure 1. The base infrastructure should look as follows but feel free to make any adjustments.
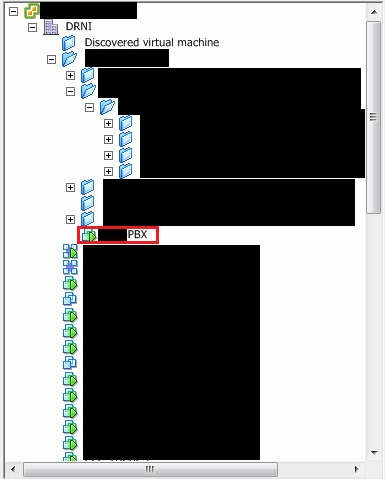
Figure 1: Create a Space for the sipXcom VM
Keep in mind, these systems can work together in clusters. So do not add an immense amount of power to any single sipXcom virtual machine. When creating a new machine, indicate it as a second, third, etc., system in the cluster. Feel free to add to baseline specs in the section below but do not go overboard.
- Configuration: Select the Custom option since this system requires certain parameters.
- Name and Location: Specify a name for the machine and modify the installation location, if necessary.
- Host / Cluster: Your unique setup will dictate your decision � I simply used a standalone host. This is probably the best solution as a faulty cluster is harder to troubleshoot than a single host.
- Resource Pool: Using a pool not too heavily burdened with resource consumption is your best bet.
- Storage: Pick a storage pool with adequate space. How you plan to scale the system in the future should dictate this decision and should further factor in maintenance policies for voicemail and call recording session retention.
- Virtual Machine Version: Choose the latest version (I used version 8 that caters to ESXi 5.5 or later.) If for some reason it is not compatible, you will know early in the Operating System (OS) install requiring you to restart the VM provisioning and select an older version.
- Guest Operating System: Pick Linux and either select the actual version from the dropdown menu (i.e. 5/6) or simply choose "Other Linux".
- CPUs: At least 2 cores necessary but 4 will be best as this is modifiable at a later time.
- Memory: For a moderately powerful system, select 4 GB. This easily enables 10 concurrent calls and multiple conference sessions.
- Network: Since the system can cater to multiple user groups, only one is necessary. Pick your best virtual network adapter � I chose VMXNET 3.
- SCSI Controller: Use an LSI Logic controller or something comparable. The closest choice to real hardware is the best so I used LSI Logic Parallel.
- Select a Disk: Make a new disk.
- Create a Disk: The system itself will need about 8 GB to be comfortable but add at least 40 GB to the virtual disk. To play it safe, assume each hour of recorded material (i.e. call recordings, voicemails and system prompts) will consume about 1GB. Also, use Thin Provisioning as this allows the system to fill the allocated space as it is consumed rather than blocking off an entire segment of storage for the amount provisioned.
- Advanced Options: This applies to advanced storage methods � do not mess with these settings unless you have a reason to do so.
Install CentOS
This is a straightforward process. I would recommend uploading the CentOS 6.6 minimal installation to a data store, just in case you need to restart. You can find a link to several repositories to download CentOS � choose the 64-bit link and pick any mirror you like. The OS install is covered in the sipXecs article where you can follow along from the "Installing CentOS 6.6 Minimal" through the "Preliminary sipXecs Configuration" headings. Note though that some items will need altered with respect to this guide.
One major change is necessary to install the system from the referenced article. The 5th item under the "Installing sipXecs" heading is different. Use this line of code instead (yes, the file is sipXecs, not sipXcom):
| wget http://download.sipxcom.org/pub/sipXecs/14.10/sipxecs-14.10.0-centos.repo |
A few other additional changes are necessary to enable accessibility. A FQDN (Fully Qualified Domain Name) should be used in place of a generic system name (see Figure 3 from the previously linked article) which you can acquire inexpensively from services like GoDaddy. The name server must be publicly resolvable by DNS. Also, consider applying a public IP address from your ISP to the system to aide in routing.


Configuring the sipXcom System
If on the same network, type in the IP address of the system into a web browser. If elsewhere, type in the FQDN of your machine. Typically, your browser will flag this as an unsafe connection so take the appropriate actions to access the page, despite the warnings.
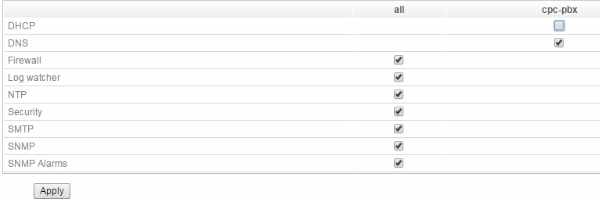
Figure 2: Server Core Services
The first order of business is to navigate to the Servers sub-item under the Systems tab. On the left-hand side of the page, you will see a link for Core Services � click this item and the next page should appear as seen in Figure 2. Ideally, activate all services with the exception of DHCP since it is best if the virtual router in a cloud environment controls IP assignment.

Figure 3: Telephony Services
A few options will appear with check marks when viewing this page for the first time. Make sure to replicate the setup in Figure 3 � some of these will not require configuration however, each is safe to activate even when not modifying values for each particular item. As we will cover voicemail later in this guide, it is especially important to ensure this item is checked.
These previous two steps are nearly identical to those from the sipXecs Freeswitch PBX article. The next several steps to complete are verbatim to the content found after Figure 6 through the first paragraph following Figure 9 and the paragraphs following Figure 11 through Figure 13. Make sure to apply settings like so, with one small alteration. The paragraph above Figure 13 of the referenced article shows the settings for the ITSP Account of the SIP Trunk gateway. Because Flowroute provides NAT traversal compensation, click the Show Advanced Settings and uncheck the box for Use public address for call setup.
Note: Each user requires a unique Voicemail PIN. Ensure each user has a unique value, as this will allow the person to listen to voicemails over the phone, without using the web console.
Another item necessary for a successful multi-tenant system is domain configuration. Navigate to the Domain item for the user and input the appropriate domain. This allows you to segregate users from different groups (or companies) in the same system.
Keep in mind, it is best to setup individual SIP accounts with your provider in most situations however, terms set with your provider will ultimately dictate how you setup your gateway. In the following sections, we will make some tweaks to accommodate for the typical nuances found in such a setup.
Firewall Configuration
In most cases, correct configuration of the firewall sitting above the sipXcom PBX system requires manipulation of the port policies for the VM. I use a Cisco ASA in my environment where the ADSM client is available to easily modify policies in said systems. However, it is quite likely your system is vastly different.
Regardless of your firewall system, make sure ports 5060, 5061, 5080 and 30000 to 31000 are open for both UDP and TCP � this is very important as certain Internet providers will block one or the other. Also, feel free to reference our SIP ALG guide for further reference as this technology typically hinders most VoIP transmissions.
Additional Network Configurations
In order for devices to register (such as IP Phones) with the PBX you are configuring as well as said system's ability to connect with a SIP provider additional configuration items are necessary. We will be using parts of the system's built-in Session Border Controller (SBC) for the process. However, most of the configuration items manipulated by this feature will be circumvented for appropriate usage.
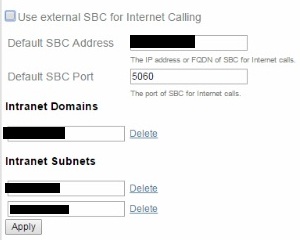
Figure 4: Internet Calling Setup
Under the System tab, find the Internet Calling item and click this link. Observe Figure 4 and input the following configuration items:
- Use External SBC � Disable this feature as additional configurations will be set in place to assist for the traversal of VoIP traffic
- Default SBC Port � Leave this as the standard SIP Port, 5060.
- Intranet Domains � Add the domains for the clientele you will serve. The example in Figure 4 only shows one blurred out domain � if adding additional clientele from other domains, click the Add Domain link to input another into the mix.
- Intranet Subnets � Devices on different subnets connecting to the system may be added here however, when using a FQDN, these are not critical in most cases.
Find the NAT Traversal link under the System tab. The only items that need changed are the Address Type and Specify Public IP field � make the necessary changes depicted in Figure 5. Ports specified for the system should be left as the generic values auto-populated during setup.
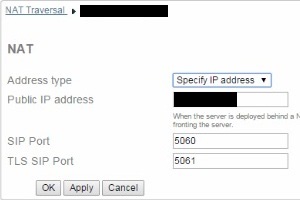
Figure 5: NAT Traversal Setup
Navigate to the DNS item under the System tab and add the information as seen in Figure 6. The first two blacked-out fields are our DNS servers - they are on a different subnet but the switch takes care of routing these VLANs without a hitch. Also, feel free to add Google�s DNS servers to any of the Additional External DNS server fields. In the bottom field under the Access Control Statement heading, these items should be left at default. If devices have a problem registering with an FQDN, add either add additional servers like Google�s or delete everything in the box.
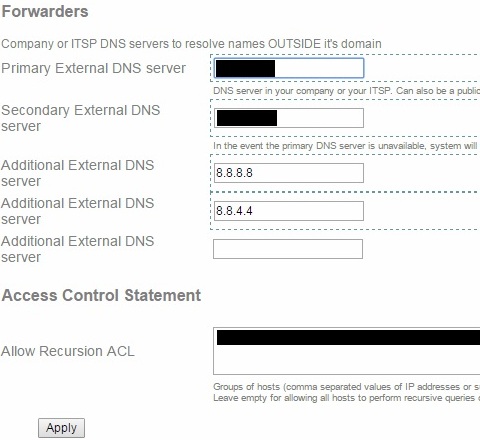
Figure 6: DNS Settings
Next, revisit the Gateway item under the Devices tab. Go to the Caller ID item from the menu on the left. Here, you should input the DID purchased from your choice provider and company name so when calling someone, they have the appropriate number and name appearing on their device. Figure 7 shows an example but the specifics have been blacked out.
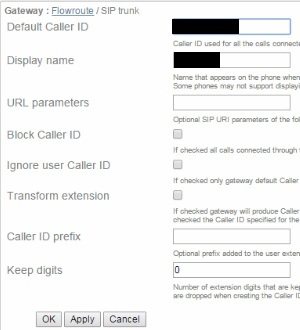
Figure 7: Dial Plan for the Gateway
We will map inbound calling to use the correct route from the providers system. Add the route to your IVR (or a choice extension) by following the formula shown in Figure 8 where the item following the �sip:' is the extension where the call should be routed � note that 100 is the default path for the IVR in sipXcom � and the blacked out area is the FQDN of our system.
Note: TCP is used for transport for a good reason. Many connections will block UDP SIP traffic whereas TCP is less regulated. This is very helpful (and necessary in some scenarios) when using a softphone over a mobile data connection such as Verizon that manipulates such traffic with SIP ALG.

Figure 8: Flowroute Inbound Route Configuration
Voicemail Usage
Assuming all the steps from this guide and the sipXecs reference guide were followed correctly, voicemail should be properly configured. A user can dial the voicemail extension (i.e. 101) from their phone or softphone and enter the PIN setup for their specific user � this is why it is essential to ensure a unique PIN is assigned to every user. Also, the user can login to the web console using their extension number as a username and password to manage voicemails from the web as seen in Figure 9.

Figure 9: Voicemail from the Web Console
Final Thoughts
Though many systems will function in a cloud setting, sipXcom is a good option for those looking to break into the hosted VoIP market or if simply catering to a large number of users. This guide should serve almost anyone with access to a cloud platform the ability to setup a functioning system.
Keep in mind, producing this system in such an environment inherently comes along with several pit falls. For the environment used in this guide, the system works. Different setups will require manipulation of different settings.