FusionPBX is a powerful open-source PBX platform that is scalable, adaptable and intuitive to use. It utilizes FreeSWITCH, as the underlying software that performs the routing functionality.
Open source software is wonderful, after all it is free and often supported by thousands of Engineers across the world. If there is one weakness, it tends to be on the support side and it is the goal of this FusionPBX guide to document the installation and configuration steps necessary to obtain a working system. I will also touch on some of the features available in this platform.

What is FusionPBX?
FusionPBX is an open source piece of software that is essentially a Graphical User Interface (GUI) for FreeSWITCH, using the GUI to create and edit XML files that are then used to control the switch software.
FreeSWITCH, for those that are unaware, is a telephony platform that can route and interconnect voice, video and text. The designers of FreeSWITCH were originally developers of that other popular open source platform known as Asterisk.
Both solutions provide excellent switching platforms, although many experts in the telephony world believe that FreeSWITCH is an improvement over Asterisk. Given the same hardware platform and operating system, FreeSWITCH can support a larger number of concurrent phone calls.
In addition to a rich and comprehensive feature set, the FusionPBX system also supports multi-tenancy. This is a very important point for VoIP service providers, as it enables them to segregate their customers into separate sub domains, thus ensuring that one customer cannot directly talk to another under the same installation. Most of the popular Asterisk based systems, such as FreePBX, do not support multi-tenants under one installation.
Installation
The FusionPBX install can be complicated mainly due to the lack of documentation that can be found on the Web. The official FusionPBX website can get you most of the way there with its online documentation but there tends to be areas that require you to roll your sleeves up. After reading this tutorial hopefully some of the pain of installation can be eliminated.
Pre-requisites
The official website gives no indication as to the hardware requirements for a computer running FusionPBX but from my own experience, unless you are just doing a basic test machine, I would go with at least a dual core CPU, at least 4GB of RAM and a minimum of 80GB of hard drive space.
After much trial and error, I opted for Ubuntu 12.04 LTS (64 bit server edition, Long Term Support). That is not to say you cannot use other operating systems, it's just I had the most success with this version and I like the fact that this is supported through April, 2017.
It is not in the scope of this tutorial to show you how to install the operating system, as there are plenty of good guides on this already on the Internet. You can download the Ubuntu 12.04 LTS Server Edition here and there are plenty of good guides on the Ubuntu website regarding installation.
Install FusionPBX
To install the software, first bring up a command shell in Ubuntu or log in remotely using a Secure SHell (SSH) with a tool such as PuTTy. If using PuTTy, type in the IP address of the Ubuntu machine into the Host Name (or IP address) field and click the Open button. The user name is "root" and the password will be the one created when you installed Ubuntu as root admin.
The following steps must then be performed at the command window in order to download and install FusionPBX (which performs the FreeSWITCH install).
UPDATE APRIL 2018: The FusionPBX is now very simple and removes all of the issues that could occur in the past. The latest version is now 4.4, which can be installed as follows:
| Download the install script. |
| wget -O - https://raw.githubusercontent.com/fusionpbx/fusionpbx-install.sh/master/debian/pre-install.sh | sh; |
| Run the installation script. |
| cd /usr/src/fusionpbx-install.sh/debian && ./install.sh |
This will upgrade Debian Jessie to the latest version, install the latest Freeswitch version (1.6.x), install PostgresQL, Fail2Ban, Nginx and of course FusionPBX (v4.4). It is now a very quick install, likely less than 10 minutes for most servers. At the end if will give instructions on next steps which is essentially just logging into FusionPBX using a web browser. It is that simple! Full instructions can be found on the official website download page.
Configuring FusionPBX
Now that we have the installation complete, it is time to look at the telephony side and configure the system to a working PBX. First of all I want to touch on multi-tenancy. This is useful if you need to keep customers or internal functions within an organization apart from each other. You can hopefully see why VoIP providers rely on multi-tenant systems, after all they do not want one customer inadvertently talking to a different customer by a simple extension call. Most of you reading this guide will likely have little interest in multi-tenancy and can skip the following section.
Note that the details given below along with the images relate to a slightly older version of FusionPBX but this should not cause issues for you.
Now would be a good time to login to your FusionPBX system, using the admin username and password from the installation.
Multi Tenant Setup (Optional)
This section is optional. Most people will disregard multi-tenancy and instead just use this PBX for a single tenant setup, in which case you can move to the following section.
In FusionPBX, multi-tenancy requires the use of sub-domains. Now would be a good time to go and setup a domain with a registrar and point the nameservers to the IP address of your Fusion installation. This exercise is left to the reader, but should not be a painful process and each registrar and Web hosting company has instructions on how to do this.
Navigate to Advanced and then on the left hand side select Domains. You will see one domain which will be the IP address of your computer. Edit this domain and change it to the domain you set up with your registrar. This is the master domain and I called this host.[domain].com and for the purpose of this example I set it up as host.myfusionpbxsystem.com as you can see in Figure 1 below.
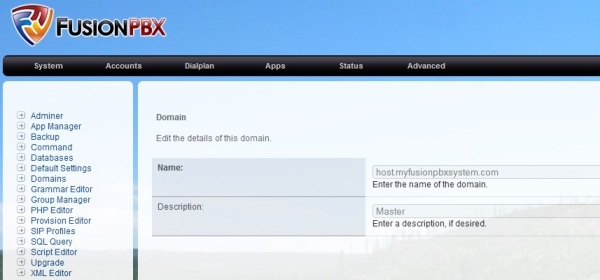
Figure 1: FusionPBX Domains
Now add new sub domains for each tenant. For example tenant100.myfusionpbxsystem.com etc. Each domain will be isolated from each other. We will now move into the configuration steps for the PBX below as though there was one tenant, since this is the most likely case for most readers. However, for those interested in multi-tenancy, I recommend setting up the gateways under the master account (i.e. host.myfusionpbxsystem.com ) simply because the gateway can be shared by ALL tenants. Therefore by using the master gateways in each tenant setup, it typically means there is less work to do later should a gateway change. In other words I can edit the gateway under the master domain and this will get picked up by all of the tenants. Other than that, the following sections apply to multi-tenancy too, simply place all of the dial plan information, extensions and users under a given tenant. You can select a tenant using the drop-down menu on the top right of the FusionPBX theme.


Gateways
The gateways are used to handle outgoing and incoming calls with respect to the PBX, for example calls to the PSTN, cellular networks and other VoIP providers. Internal extension calls are all handled by the Fusion PBX but whenever a call is made to the outside world it must be passed to the gateway. Similarly, incoming calls come through the gateway and are routed based on inbound dial plans.
For the purpose of this guide, I am using Flowroute as the trunking provider. Flowroute makes it easy for anyone to sign up for its service, whether a hobbyist or a business and also give you some free credits for calls, so it makes it easy to test out PBX systems. Navigate to Accounts and then Gateways in FusionPBX and click on the plus symbol to add a new gateway. Enter the details as viewed in Figure 5 below. Use the username and password details that you were given when you signed up with Flowroute (or the details of another provider if you went a different route).
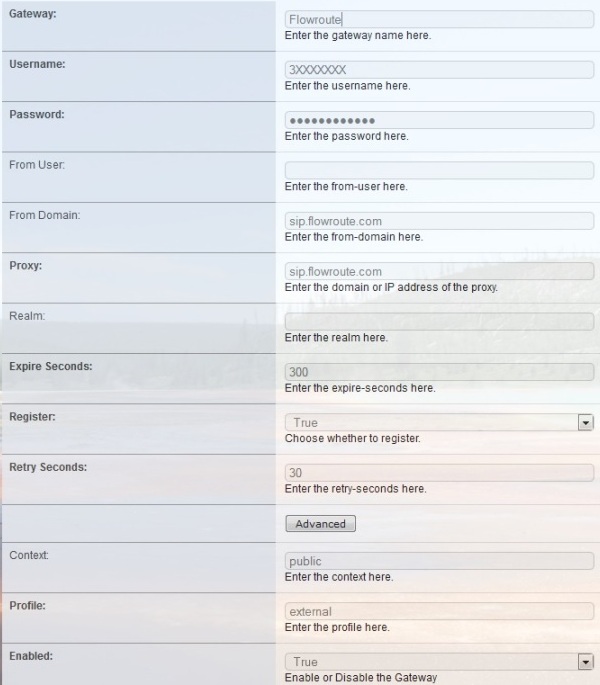
Figure 2: FusionPBX Gateway (Flowroute)
If this was successful, you should see registration with Flowroute. You can view this in two areas. First of all on the Flowroute Website portal (where you signed up for their service) under Interconnection it should indicate that there is a registration present with FreeSWITCH, as shown in Figure 3. Secondly, in FusionPBX under Status then SIP Status it should show the Flowroute gateway in the REGED state.
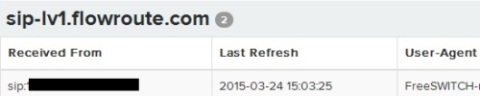
Figure 3: Flowroute Registration
Users and Extensions
Although it is not necessary to create user accounts, they can be useful as it enables users to log in to their own secure FusionPBX portal and perform basic tasks such as do not disturb, call forwarding, check voicemail and the likes. The level of functionality they see can also be altered. For example if you want to give them the ability to create ring groups you can add this to their permissions using the group manager feature. You can find this under Advanced and then Group Manager.
To create a user, simply go to Accounts and then User Manager and in there, click on the plus symbol to add a user. You can then fill in the user's details, as highlighted in Figure 7.
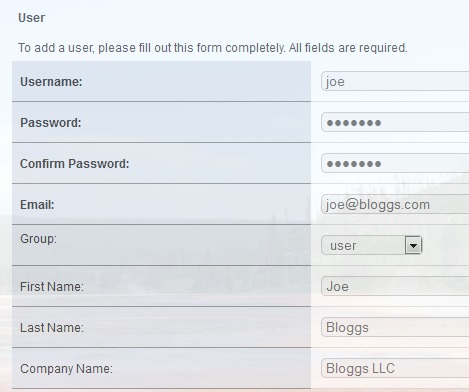
Figure 4: New User
Now we will add an extension and attach it to this user. Note that a user can have multiple extensions attached to them and they will be able to control all of them via their user portal. To add an extension go to Accounts and then Extensions and then click on the plus symbol to create a new extension. In Figures 5, 6 and 7 you will see the settings for extension 1000 that I created and attached to the user created in Figure 7. Don't forget to click on Save. A couple of notes when adding an extension. The extension number and password are used by your IP phone or soft-phone for authentication. I will be provisioning the phone manually so there is no need to enter the device provisioning details. For the context and account codes, this relates to the multi-tenant system I created. If you ignored this section, you will likely just have an IP address for these two fields.
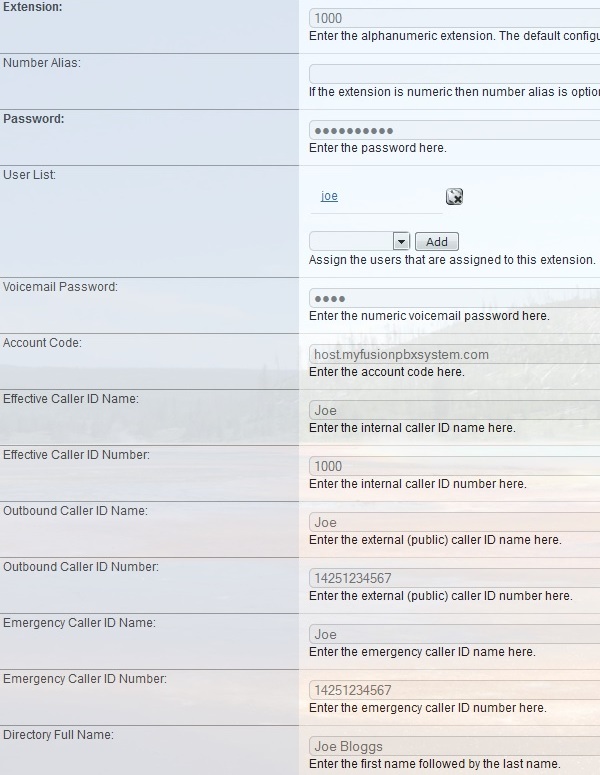
Figure 5: New Extension (Part 1)
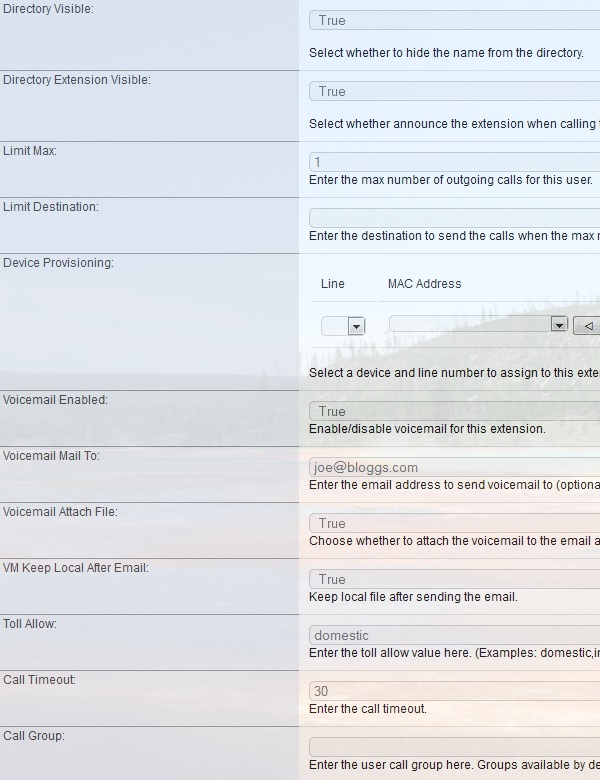
Figure 6: New Extension (Part 2)
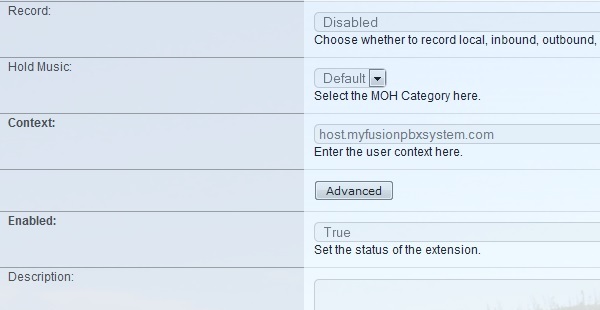
Figure 7: New Extension (Part 3)
Now we need to configure an IP phone for this extension. For the purpose of this test I am using a Grandstream DP715, which is a DECT (cordless) IP phone. Configuration is very simple for this device, and involves creating a profile and enabling the handset as shown in Figures 8 and 9 below. Note that the authentication matches the extension we created and the profile information is the domain for this tenant, for single tenant systems this could be just an IP address.
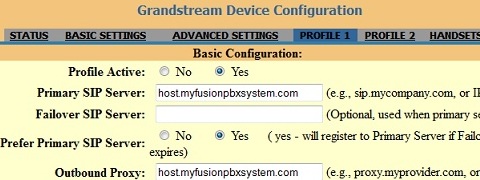
Figure 8: Grandstream Profile
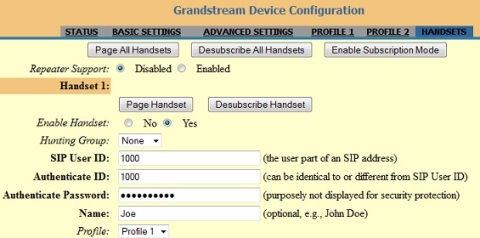
Figure 9: Grandstream Handset
If this has been successful you should see that the phone has registered with the FusionPBX system. You can check this on the status page for your phone and also in FusionPBX by going to the Status section and clicking on Registrations. You can see my registration in Figure 10. If you have multiple phones and you setup an extension for each one, you can now actually make calls between the extensions. However, no dial plans have been set up so you cannot call the outside world yet, we will do that next.

Figure 10: Grandstream Registered
Dial Plans
Dial plans are needed in order to send calls through your gateway in both the incoming and outgoing paths. FusionPBX makes this relatively straightforward to configure. First let's look at the outgoing side. To create an outbound route, navigate to Dialplan and then select Outbound Routes. Click on the plus symbol to add a new route and complete the details as shown in Figure 11, which sets up 10 digit dialing and prefixes with a "1" since Flowroute requires this for all domestic calls inside the United States. For the gateway I selected Flowroute from the drop-down, since we already configured this gateway inside FusionPBX. You should be able to make outbound calls now, give it a try.
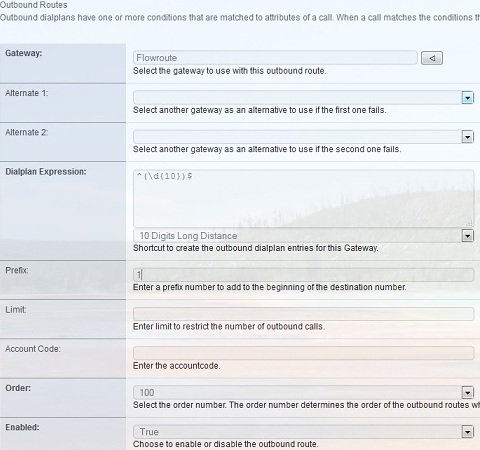
Figure 11: Outbound Configuration
For inbound routes you must have a Direct Inward Dial (DID) at Flowroute that can be routed into your PBX. You can purchase DIDs for a small fee in the Flowroute portal and make sure you set the route for this DID to SIP registration in your portal on the Flowroute website. To configure the inbound route in FusionPBX simply navigate to Dialplan and then select Destinations. Click on the plus symbol to create a new inbound destination and fill in the details as per Figure 12 below, but of course using your own DID that you purchased from Flowroute. FusionPBX simplified inbound routes by using the Destinations section. If you look inside the Inbound Routes area, you will see that the destination you created, was turned into an inbound route for you. This can be made more complex such as adding conditions and other actions but that is beyond the scope of this guide. Note that I am passing the call to extension 1000, in other words sending it to the extension we created earlier.
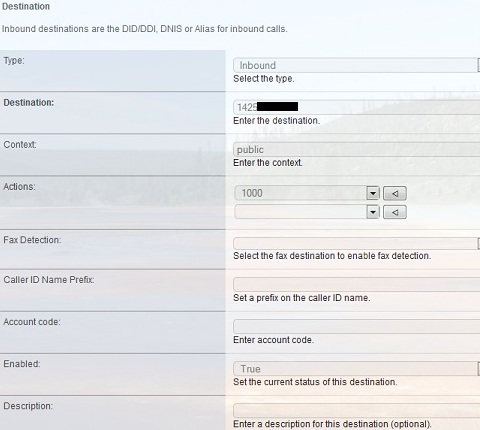
Figure 12: Inbound Configuration
Try calling your DID from another device, such as your cell phone. The call should come through to your IP phone, which in our case is the Grandstream DP715.
Other Features
Now that you have a working PBX, why not try playing with the other features inside FusionPBX (click on the App tab and you will see the features shown in Figure 13). There are many to choose from, for example a few simple ones to start with are as follows:
- Voicemail to Email - Inside Advanced then Default Settings edit the Email settings for your SMTP server and your voicemails can be sent as an attachment to the email address you configured under your extension.
- Conference Center - Create a conference extension number and setup the room with password protection.
- Follow Me - Configure Follow Me to send your calls to other numbers of your choosing.
- IVR (Interactive Voice Response) - Set up an IVR for your incoming calls, for example, press "1" for Sales, "2" for customer service etc. Use the Recordings feature to create your prompts.
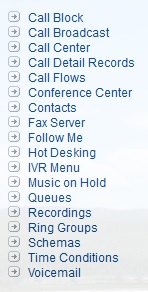
Figure 13: Other Features
Final Thoughts
FusionPBX is an impressive piece of software that takes advantage of the routing capabilities of FreeSWITCH and presents it all in an intuitive graphical interface. The installation used to be tricky but is now very straightforward and takes less than 10 minutes.
If you do come across some stumbling blocks, drop me a note using the comment form below and I will try to steer you in the right direction.
Finally, if an on-premise PBX sounds appealing for you or your business, check our our SIP trunking page for more information.